Призначення – Assignment
Reference – Довідка
- Panel – Панель
«Матеріал > Слоти Матеріалів» – menuselection:Material –> Material Slots
Матеріали – блоки даних, що можуть бути створені та потім призначені для одного або більше об’єктів. An object can also have multiple materials assigned in different material slots, which correspond to different parts of an object. If a smooth transition between materials is desired, then mixing shader nodes with a Mix shader is a better solution.
Слоти Матеріалів – Material Slots
Слоти матеріалів пов’язують матеріали з об’єктами та сітями. By default objects only have a single material slot, which assigns a material to the entire object. If different parts of the mesh need different materials, multiple material slots can be created.

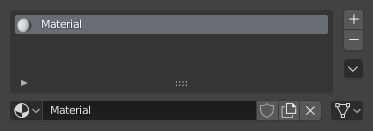
Панель слотів матеріалів.
Список Слотів – Slot List
Слоти матеріалів об’єкта та активний матеріал показуються в огляді списком – List View.
- Додати Слот Матеріалу – Add Material Slot
Додається новий слот матеріалу на об’єкт.
- Вилучити Слот Матеріалу – Remove Material Slot
Вилучається слот матеріалу з об’єкта.
- Copy Material – Копія Матеріалу
Копіюються вузли шейдерів та устави матеріалу у буфер обміну.
- Вставити Матеріал – Paste Material
Вставляються вузли шейдерів та устави матеріалу з буфера обміну.
- Копіювати Матеріал на Вибране – Copy Material to Selected
Копіюється таке ж призначення матеріалу з активного на інші вибрані об’єкти.
- Remove Unused Slots
Removes all material slots not assigned to the object.
Data-Block – Блок Даних
- Material – Матеріал
The Material Data-Block Menu for the selected material slot. Here new materials can be created, or existing materials can to the material slot.
- Link – Пов’язання
Specifies whether the material is to be linked to the object or to the object data.
The Link selector has two choices, Data and Object. These two menu choices determine whether the material is linked to the object or to the data (e.g. a mesh or curve). The Data menu item determines that this material will be linked to the mesh’s data-block which is linked to the object’s data-block. The Object menu item determines that the material will be linked to the object’s data-block directly.
This has consequences of course. For example, different objects may share the same mesh data-block. Since this data-block defines the shape of the object any change in Edit Mode will be reflected on all of those objects. Moreover, anything linked to that mesh data-block will be shared by every object that shares that mesh. So, if the material is linked to the mesh, every object will share it.
З іншого боку, якщо матеріал пов’язано безпосередньо до блоку даних об’єкта, то об’єкти можуть мати різні матеріали й все ще спільно використовувати одну і ту ж сіть.
Short explanation: If connected to the object, you can have several instances of the same Object Data using different materials. If linked to mesh data, you cannot. See Data System for more information.
Edit Mode – Режим Редагування
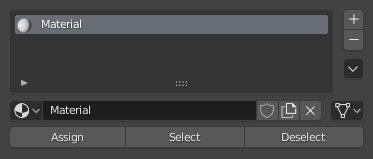
To assign materials to different parts of a mesh, enter Edit Mode on the mesh. Additional buttons will then appear in the material slots panel.

Панель слотів матеріалів у Edit Mode.
- Assign – Призначення
Призначається активні слот матеріалу та матеріал для вибраних граней у сіті, штрихах у нарисному олівці Grease Pencil та подібно для інших типів об’єктів.
- Select – Вибір
Вибираються грані, призначені для активного слота матеріалу.
- Deselect – Зневибір
Зневибираються грані, призначені для активного слота матеріалу.
Повторне Використання Наявних Матеріалів – Reusing Existing Materials
Blender is built to allow you to reuse anything, including material settings, between many objects. Instead of creating duplicate materials, you can simply reuse an existing material. There are several ways to do this using the Material’s data-block menu:
Single Object – With the object selected, click the sphere located to the left of the Material name. A pop-up appears showing all the materials available in the current blend-file. To use one, just click on it.
Порада
Пошук Матеріалів
The search field at the bottom of the material list allows you to search the names in the list. For example, by entering «wood» all existent materials are filtered so that only materials containing «wood» are displayed in the list.
Multiple Objects – In the 3D Viewport, with Ctrl-L you can quickly link all selected objects to the material (and other aspects) of the active object. Very useful if you need to set a large number of objects to the same material; just select all of them, then the object that has the desired material, and Ctrl-L links them to that «parent».
Видаляння Матеріалу – Deleting a Material
Для видалення матеріалу виберіть потрібний матеріал та клацніть на кнопці з «X» в його блоці даних.
Хоча, матеріал, начебто, зникає негайно, дія команди Delete може залежати від того, як матеріал використовується деінде.
Якщо матеріал, пов’язаний з цим об’єктом, також використовується іншими об’єктами, то цей матеріал буде вилучено з властивостей цього об’єкта (та залишиться у властивостях усіх інших пов’язаних з ним об’єктів).
Якщо увімкнена кнопка «Fake User» – «Псевдо Користувач» у блоці матеріалу, то такий матеріал буде залишено у blend-файлі, коли цей файл збережеться, навіть якщо матеріал не має жодного користувача для нього.
Only if it has 0 «real» users, and no «Fake» user, will the material be permanently deleted. Note that it will still remain in the Materials list until the blend-file is saved, but will have disappeared when the file is reloaded.
Кілька одночасно Матеріалів – Multiple Materials
Normally, different colors or patterns on an object are achieved by adding textures to your materials. However, in some applications you can obtain multiple colors on an object by assigning different materials to the individual faces of the object.
Для призначення різних матеріалів на різні грані одного і того ж об’єкта можна скористатися опціями слотів матеріалів Material Slots у заголовку панелі Materials.
Робпотік для призначення другого матеріалу на деякі грані одного і того ж об’єкту шляхом покриття базового матеріалу є наступним:
In Object Mode, create a base material.
Go into Edit Mode and Face Select (a new list will appear below the Active Material list with Assign, Select, Deselect buttons).
Select the faces to be colored with the second material.
In the Object Material Slots list, click the
+button to create a new slot or select an existing material.Click the Assign button, and the material will appear on the selected object faces.