Timeline – Часолінія
The Timeline editor, identified by a clock icon, is used for manipulating keyframes and scrubbing the Playhead.

Часолінія – Timeline.
The Timeline gives the user a broad overview of a scene’s animation, by showing the current frame, the keyframes of the active object, the start and end frames of your animation sequence, as well as markers set by the user.
The Timeline includes Transport Controls, to play, pause, and skip through an animation sequence.
It also includes tools for manipulating Keyframes, Keying Sets, and Markers.
Main View – Головний Огляд
The main Timeline region displays the animation frames over time.

Here you can see the Keyframes (diamond shapes), Playhead (blue handle), Scrollbar (along the bottom).
Наладжування цього Огляду – Adjusting the View
The Timeline can be panned by holding MMB, then dragging the area left or right.
You can zoom the Timeline by using Ctrl-MMB, the mouse Wheel, or pressing NumpadMinus and NumpadPlus.
You can also use the scrollbars, located at the bottom or the right of the editor, to pan and zoom the view.
Позиція грання – Playhead
The Playhead is the blue vertical line with the current frame number at the top.

Позиція грання – Playhead.
The Playhead can be set or moved to a new position by pressing or holding LMB in scrubbing area at the top of the timeline.
The Playhead can be moved in single-frame increments by pressing Left or Right, or you can jump to the beginning or end frame by pressing Shift-Left or Shift-Right.
Frame Range – Діапазон Кадрів
By default, the Frame Range is set to start at frame 1 and end at frame 250. You can change the frame range in the top right of the Timeline header, or in the Output Properties.
Keyframes – Ключкадри
For the active and selected objects, keyframes are displayed as diamond shapes.
You can click to select one at a time, or select several by holding Shift, or by dragging a box around the keyframes. You can then move single keys by dragging them, and you can move multiple keys by pressing G and scale them with S.
Only Selected Channels can be enabled. . For Armatures, this will display the object keyframes, and the keyframes for the active and selected pose bones.
Markers – Маркери
Дивіться детальніше тут – Markers.
Header – Заголовок
Випливні – Popovers
Випливне Програвання – Playback Popover

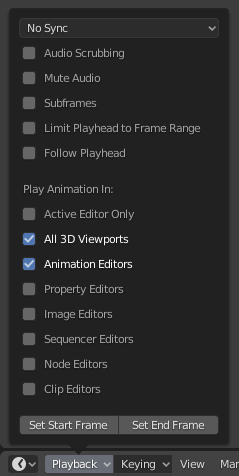
The Playback popover contains options controlling the animation playback.
- Sync

3D Viewport red FPS.
When you play an animation, the frame rate is displayed at the top left of the 3D Viewport. If the scene is detailed and playback is slower than the set Frame Rate, these options are used to synchronize the playback.
- Play Every Frame
Plays every frame even if playback is slow.
- Пропуск Кадрів – Frame Dropping
Drop frames if playback becomes slower than the scene’s frame rate.
- Sync to Audio
Drop frames if playback becomes too slow to remain synced with audio.
- Аудіо – Audio
- Scrubbing
If your animation has sound, this option plays bits of the sound wave while you move the Playhead with LMB or keyboard arrows.
- Mute – Приглушення
Mute the sound from any audio source.
- Playback – Програвання
- Limit Playback to Frame Range
Don’t allow selecting frames outside of the playback range using the mouse.
- Follow Current Frame
Animation editors can be setup to always follow the time indicator as animation is being played back. Following will be done when animating and changing frame: When the cursor reaches the end of the screen, the next range of frames of the same width will be displayed.
- Play In
- Active Editor
While playing, updates the Timeline, if Animation Editors and All 3D Viewports disabled.
- 3D Viewport – 3D Оглядвікно
While playing, updates the 3D Viewport and the Timeline.
- Animation Editors
While playing, updates the Timeline, Dope Sheet, Graph Editor, Video Sequencer.
- Image Editor – Редактор Зображень
The Image editor in Mask mode.
- Properties Editor
When the animation is playing, this will update the property values in the UI.
- Movie Clip Editor – Редактор Відеокліпів
While playing, updates the Movie Clip Editor.
- Node Editors
While playing, updates the Node properties for the node editors.
- Video Sequencer – Секвенсер Відео
While playing, updates the Video Sequencer.
- Show – Показ
- Підкадри – Subframes
Display and allow changing the current scene subframe.
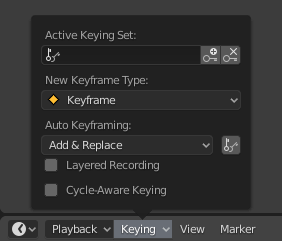
Випливне Ключування – Keying Popover

Випливне Ключування – Keying містить опції, що впливають на вставляння ключкадрів.
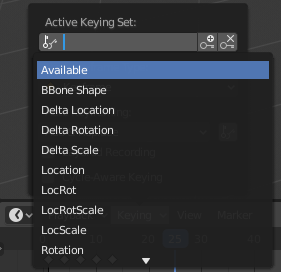
- Active Keying Set – Активний Набір Ключування

Набори Ключування на Часолінії.
Keying Sets are a set of keyframe channels in one. They are made so the user can record multiple properties at the same time. With a keying set selected, when you insert a keyframe, Blender will add keyframes for the properties in the active Keying Set. There are some built-in keying sets, LocRotScale, and also custom keying sets. Custom keying sets can be defined in the panels .
- Insert Keyframes (plus icon)
Insert keyframes on the current frame for the properties in the active Keying Set.
- Delete Keyframes (minus icon)
Delete keyframes on the current frame for the properties in the active Keying Set.
- Тип Нового Ключкадру – New Keyframe Type
Keyframe Types – Типи Ключкадрів on insertion.
- Ключування з Обізнаністю про Зацикленість – Cycle-Aware Keying
При вставлянні ключкадрів у тривіально циклічні криві – trivially cyclic curves спеціальне обробляння застосовується для бережіння цілісності циклу (більш корисно при підправленні установленого циклу):
Якщо вставляння ключа пробується поза головним діапазоном часу для циклу, то воно перерозкладається назад всередину цього діапазону.
When overwriting one of the end keys, the other one is updated accordingly.
In addition, when adding a new curve into an action with a Manual Frame Range and Cyclic Animation enabled, the curve is automatically made cyclic with the period matching the frame range. For convenience this check and conversion is also done before adding the second keyframe to such a curve.
Auto Keying Popover

Авто вставляння Ключкадрів на Часолінії.
The record button (⏺) enables Auto Keyframe: It will add and/or replace existing keyframes for the active object when you transform it in the 3D Viewport. For example, when enabled, first set the Playhead to the desired frame, then move an object in the 3D Viewport, or set a new value for a property in the UI.
When you set a new value for the properties, Blender will add keyframes on the current frame for the transform properties. Other use cases are Fly/Walk Navigation to record the walk/flight path and Lock Camera to View to record the navigation in camera view.
Примітка
Note that Auto Keyframe only works for transform properties (objects and bones), in the 3D Viewport (i.e. you can’t use it e.g. to animate the colors of a material in the Properties…).
- Add & Replace / Replace
This controls how the auto keyframe mode works. Only one mode can be used at a time.
- Додання і Заміна – Add & Replace
Add or replace existing keyframes.
- Replace – Заміна
Лише заміняє наявні ключкадри.
- Only Active Keying Set
When enabled, new keyframes for properties will be inserted into the active Keying Set.
- Нашаровуване Записування – Layered Recording
Adds a new NLA Track and strip for every loop/pass made over the animation to allow non-destructive tweaking.
Header Controls
The Timeline header controls.

Timeline header controls.
1. Popovers for Playback and Keying, 2. Transport Controls, 3. Frame Controls
Керувальники Транспортування – Transport Controls
These buttons are used to set, play, rewind, the Playhead.

Керувальники транспортування.
- Jump to Start (❙⏴) Shift-Left
This sets the cursor to the start of frame range.
- Jump to Previous Keyframe (◆⏴) Down
This sets the cursor to the previous keyframe.
- Rewind (◀) Shift-Ctrl-Spacebar
This plays the animation sequence in reverse. When playing the play buttons switch to a pause button.
- Play (▶) Spacebar
This plays the animation sequence. When playing the play buttons switch to a pause button.
- Jump to Next Keyframe (⏵◆) Up
This sets the cursor to the next keyframe.
- Jump to End (⏵❙) Shift-Right
This sets the cursor to the end of frame range.
- Pause (⏸) Spacebar
This stops the animation.
Керувальники Кадру – Frame Controls
- Поточний Кадр – Current Frame Alt-Wheel
The current frame of the animation/playback range. Also the position of the Playhead.
- Preview Range (clock icon)
This is a temporary frame range used for previewing a smaller part of the full range. The preview range only affects the viewport, not the rendered output. See Preview Range.
- Start Frame – Кадр Старту
The start frame of the animation/playback range.
- End Frame – Кадр Кінця
The end frame of the animation/playback range.

