Texture (Chất Liệu)
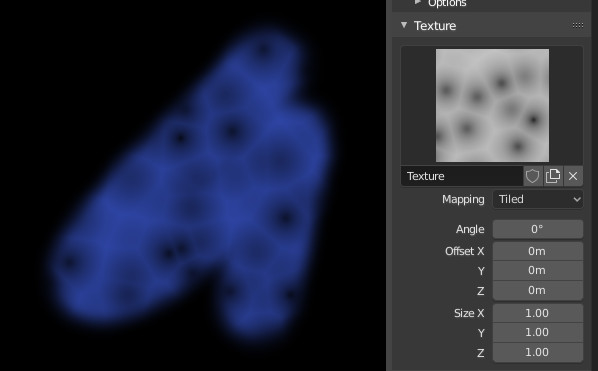
Texture options and example.
Use the texture data-block at the bottom of the paint panel to select a preloaded image or procedural texture to use as your brush pattern.
Note that in order to use it, you must have a placeholder material defined, and that particular texture defined using the Material and Texture buttons. It is not necessary to have that material or texture applied to any mesh anywhere; it must only be defined.
The example to the right shows the effects of painting with a Voronoi texture.
- Texture (Chất Liệu)
Trong các chế độ sơn, chất liệu được sử dụng làm nguồn màu sắc, trong khi đối với điêu khắc, nó được sử dụng để xác định độ mạnh, của đầu bút.
- Ánh Xạ (Mapping)
Sets the way the texture is applied to the brush stroke.
- Bình Diện của Góc Nhìn (View Plane)
If View Plane is enabled, the current view angle is used to project the brush texture onto the model. I.e. the texture follows the mouse, so it appears that the texture is being dragged across the model. In 2D painting, the texture moves with the brush.
- Bình Diện (Area Plane)
Projects the brush texture along the local surface normal, which keeps the texture from stretching when sculpting on a portion of the mesh that is at an extreme angle to the viewpoint.
- Xếp Ô Cờ (Tiled)
The Tile option tiles the texture across the screen, so moving the brush appears to move separately from the texture. The Tile option is most useful with tileable images, rather than procedural textures.
- 3D
Tùy chọn 3D cho phép đầu bút vẽ tận dụng tối đa chất liệu thủ tục. Chế độ này sử dụng các tọa độ điểm đỉnh, thay vì vị trí của đầu bút vẽ, để xác định vùng nào của chất liệu sẽ sử dụng.
- Ngẫu Nhiên (Random)
Picks a random texture coordinate to sample from for each dab.
- Khuôn In (Stencil)
Stencil mapping works by projecting the paint from the camera space on the mesh or canvas. Painting is applied only inside the boundaries of the stencil. The stencil is displayed as a screen space overlay on the viewport. To the transform the stencil texture and the stencil mask with additional Alt pressed:
Di chuyển NCP (RMB)
Đổi tỷ Lệ Shift-NCP (RMB)
Xoay Chiều Ctrl-NCP (RMB)
When using stencil scaling, X and Y are used to constrain the scaling to one axis. Pressing one of the buttons twice reverts to unconstrained scaling.
- Tỷ Lệ Tương Quan của Hình Ảnh (Image Aspect)
Khôi phục tỷ lệ khung hình của hình ảnh gốc để hoàn lại kích thước bị kéo dài bằng thao tác đổi tỷ lệ, (Duy chất liệu hình ảnh mà thôi.) Thao tác này có thể sử dụng các giá trị xếp ô cờ (nhắc lại) và tỷ lệ của chất liệu đầu bút vẽ nếu các tùy chọn liên quan được bật lên trong bảng điều khiển Điều Chỉnh Thao Tác Trước Đây (Adjust Last Operation).
- Hoàn Lại Biến Hóa (Reset Transform)
Khôi phục lại vị trí của khuôn in.
- Góc Độ (Angle) Ctrl-F
This is the rotation angle of the texture brush. It can be changed interactively via Ctrl-F in the 3D Viewport. While in the interactive rotation you can enter a value numerically as well.
- Rake R
Angle follows the direction of the brush stroke. Not available with 3D textures. (Shortcut sculpting only.)
- Random R
Angle is randomized per dab.
- Góc Ngẫu Nhiên (Random Angle)
Hạn chế độ lệch ngẫu nhiên trong một phạm vi.
- Dịch Chuyển X, Y, Z (Offset X, Y, Z)
Dịch chuyển vị trí ánh xạ chất liệu theo các trục X, Y và Z.
- Kích Thước X, Y, Z (Size X, Y, Z)
Set the scale of the texture in each axis. Not available for Drag sculpting textures.
- Mức Thiên Lệch của Mẫu Vật (Sample Bias) Chế Độ Điêu Khắc (Sculpt Mode)
Value added to texture samples.