Le modificateur Subdivision Surface
The Subdivision Surface modifier (often shorten to « Subdiv ») is used to split the faces of a mesh into smaller faces, giving it a smooth appearance. It enables you to create complex smooth surfaces while modeling simple, low-vertex meshes. It avoids the need to save and maintain huge amounts of data, and gives a smooth « organic » look to the object.
As with any modifier, order of execution (position in the modifier stack) has an important bearing on the results.
Gardez à l’esprit que ceci est une opération différente de sa compagne, Smooth Shading. vous pouvez voir la différence entre les deux dans l’image de grille ci-dessous.
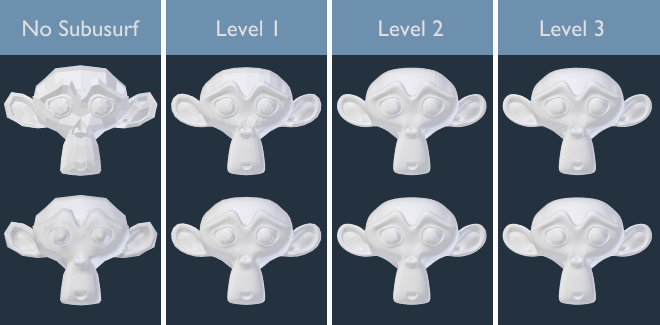
Niveaux de subdivision 0 à 3, avec et sans Smooth Shading.
Astuce
Le modificateur Subdivision Surface ne vous permet d’éditer la nouvelle géométrie subdivisée sans l’appliquer, mais le modificateur Multiresolution le fait (en Mode Sculpture).
Note
This modifier now uses the OpenSubdiv library as a backend.
Options
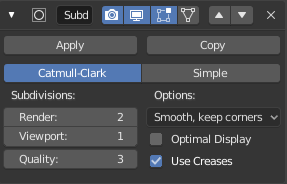
Le modificateur Subdivision Surface.
- Type
Ce bouton interrupteur vous permet de choisir l’algorithme de subdivision.
- Catmull-Clark
L’option par défaut, subdivise et lisse les surfaces. Selon sa page Wikipedia (en), la « formule d’aspect arbitraire a été choisie par Catmull et Clark en fonction de l’aspect esthétique des surfaces résultantes plutôt que d’une dérivation mathématique. »
- Simple
Subdivise uniquement les surfaces, sans aucun lissage (le même que l’opérateur Subdivide, en Mode Edition). Par exemple, pour augmenter la résolution de base du maillage lors de l’utilisation de displacement maps.
- Subdivisions
Ajoute récursivement plus de géométrie. Pour les détails sur les nombres de polygones, voir la section `Performance Considerations`_ .Ajoute récursivement plus de géométrie. Pour les détails sur les nombres de polygones, voir la section `Performance Considerations`_ .
The right combination of these settings will allow you to keep a fast and lightweight approximation of your model when interacting with it in the 3D Viewport, but use a higher quality version when rendering.
Avertissement
Higher levels of subdivisions results in more vertices, which means more memory will be occupied (both system RAM, and video memory for display). Blender could potentially crash or hang if you do not have enough available memory.
- Render
Le nombre de niveaux de subdivisions affiché dans les rendus.
- Viewport
Le nombre de niveaux de subdivisions affiché dans la Vue 3D.
- Quality
How precisely the vertices are positioned (relatively to their theoretical position of an infinitely subdivided mesh), can be lowered to get a better performance.
Using higher values does not necessarily mean real improvement in quality, ideal results might be reached well before the maximum Quality value.
Astuce
Soyez attentif de ne pas fixer le nombre de subdivisions de Viewport à une valeur supérieure à celui des subdivisions de Render, ceci pourrait signifier que la qualité de la Vue 3D sera supérieure à celle du rendu.
- Options
- UV Smooth
How to handle UVs during subdivision.
- Smooth, keep corners
UV islands are smoothed, but their boundary remain sharp.
- Sharp
UV remain unchanged.
- Optimal Display
When rendering the wireframe of this object, the wires of the new subdivided edges will be skipped (only displays the edges of the original geometry).
- Use Creases
Use the Weighted Edge Creases values stored in edges to control how smooth they are made.
Raccourcis clavier
To quickly add a Subdivision Surface modifier to one or more objects, select the object(s) and press Ctrl-1. That will add a Subdivision Surface modifier with Viewport subdivisions set to 1. You can use other numbers too, such as Ctrl-2, Ctrl-3, etc, to add a modifier with that number of subdivisions. Adding a Subdivision Surface modifier in this fashion will not modify the Render subdivisions.
If an object already has a Subdivision Surface modifier, doing this will simply change its subdivision level instead of adding another modifier.
Control
Catmull-Clark subdivision arrondit les arêtes, et souvent ceci n’est pas que vous souhaitez. Il y a plusieurs solutions qui vous permettent de contrôler la subdivision.
Weighted Edge Creases
Weighted edge creases for subdivision surfaces allows you to change the way the Subdivision Surface modifier subdivides the geometry to give the edges a smooth or sharp appearance.
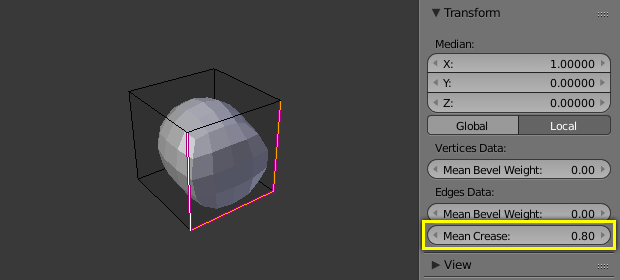
A subdivided cube with creased edges.
The crease weight of selected edges can be changed in the Transform panel, Sidebar of the 3D View. The scale-like dedicated tool Shift-E can also be used to adjust the crease weight. A higher value makes the edge « stronger » and more resistant to the smoothing effect of subdivision surfaces.
Edge Loops
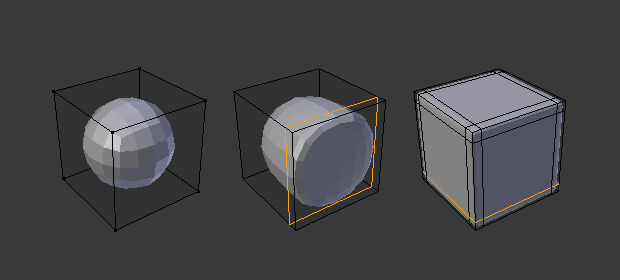
Subdivision Level 2 cube, the same with an extra Edge Loop, and the same with six extra Edge Loops.
The Subdivision Surface modifier demonstrates why good, clean topology is so important. As you can see in the figure, the it has a drastic effect on a default cube. Until you add in additional loops (with e.g. Loop Cut and Slide), the shape is almost unrecognizable as a cube.
A mesh with deliberate topology has good placement of edge loops, which allow the placement of more loops (or their removal) to control the sharpness/smoothness of the resultant mesh.
Limitations connues
Normales non contiguës
Le système de subdivision de Blender produit des maillages subdivisés joliment lisses, mais n’importe quelle surface subdivisée (à savoir, n’importe quelle petite face créée par l’algorithme à partir d’une simple face du maillage d’origine), partage l’orientation de la normale globale de cette face d’origine.
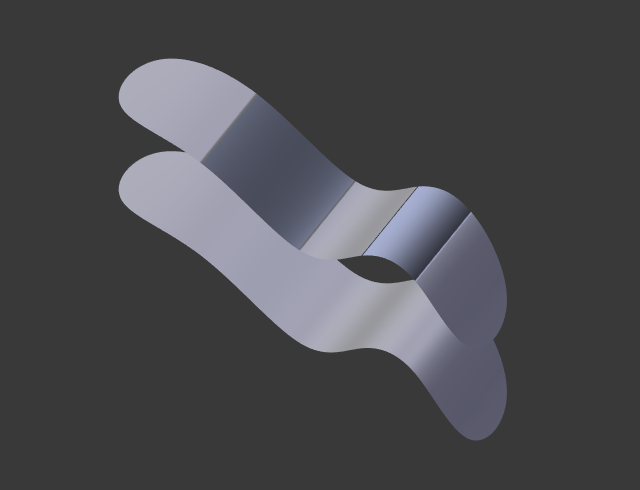
Comparaison des normales et des normales.¶ |
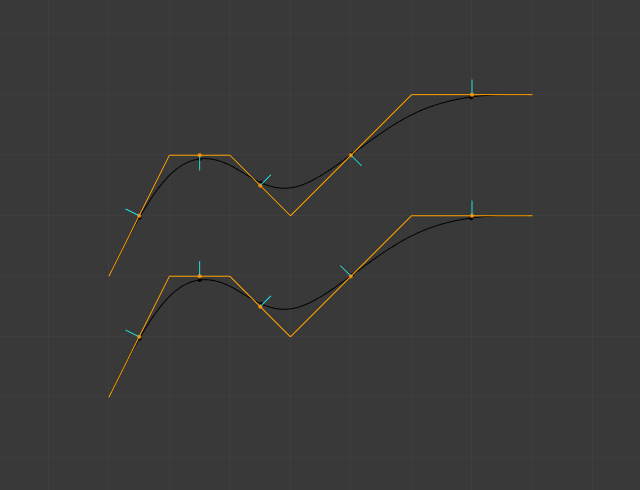
Side view of image on the left.¶ |
Abrupt normal changes can produce ugly black gouges even though these flipped normals are not an issue for the shape itself.
A quick way to fix this is to use Blender’s Recalculate Normals operation in Edit Mode.
If you still have some ugly black gouges you will have to manually flip the normals.