Editing(編集)
Transform(トランスフォーム)
参照
- Mode(モード)
Edit Mode(編集モード)
- Menu(メニュー)
An F-curve can be edited by transforming the locations of the keyframes.
- Move(移動)、Rotate(回転)、Scale(スケール)
Blenderの他の要素と同様に、キーフレームは、 基本的なトランスフォーム変換 で説明されているように、移動、回転、スケールできます。
- Extend(拡張)
Moves keyframes relative to the Playhead. If the mouse is to the left of the Playhead, this operator only affects the selected keyframes that are to the left of the Playhead. On the contrary, if the mouse is to the right of the Playhead, this operator only affects the selected keyframes that are to the right of the Playhead.
ちなみに
キーフレームの位置と値を正確にコントロールするために、サイドバー領域の Active Keyframe(アクティブキーフレーム) に値を設定できます。
Snap(スナップ)
参照
- Menu(メニュー)
- ショートカットキー
Shift-S
キーフレームは、 Snap Keys(キーをスナップ) ツールを使用してさまざまなプロパティにスナップできます。
- Selection to Current Frame(選択物 → 現在のフレーム)
Snap the selected keyframes to the Playhead.
- Selection to Cursor Value(選択物 → カーソル値)
選択したキーフレームを 2Dカーソル にスナップします。
- Selection to Nearest Frame(選択物 → 最近フレーム)
選択したキーフレームを個別に最も近いフレームにスナップします。
- Selection to Nearest Second(選択物 → 最近秒数)
シーンの FPS に基づいて、選択したキーフレームを個別に最も近い秒にスナップします。
- Selection to Nearest Marker(選択物 → 最近マーカー)
選択したキーフレームを個別に最も近いマーカーにスナップします。
- Flatten Handles(水平のハンドル)
選択したキーフレームの ベジェ ハンドルをフラットにします。
Flatten Handles(水平のハンドル) のスナップの例。¶ 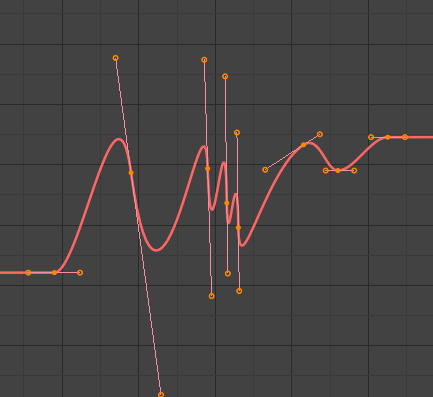
Flatten Handles(水平のハンドル) の実施前。
Flatten Handles(水平のハンドル) の実施後。
- Cursor to Selected(カーソル → 選択物) Ctrl-G
選択したキーフレームの中間点にカーソルを置きます。
- Cursor Value to Selection(カーソル値 → 選択物)
選択したキーフレームの平均値にカーソル値を置きます。
Mirror(ミラー)
参照
- Menu(メニュー)
- ショートカットキー
Ctrl-M
選択したキーフレームは、 Mirror Keys(キーをミラー) ツールを使用してさまざまなプロパティをミラーできます。
- By Times over Current Frame(現在のフレームを中心に時間を反転)
Mirror horizontally over the playhead.
- By Values over Cursor Value(カーソルの値を中心に値を反転)
2Dカーソルで垂直にミラーします。
- By Times over Time 0(時間0を中心に時間を反転)
フレーム 0で水平にミラーします。
- By Values over Value 0(0 を中心に値を反転)
値 0で垂直にミラーします。
- By Times over First Selected Marker(最初の選択中のマーカーを中心に時間を反転)
最初に選択したマーカーで水平にミラーします。
Insert Keyframes
参照
- Menu(メニュー)
- ショートカットキー
Ctrl-RMB, Shift-Ctrl-RMB
Inserts a keyframe to the active F-curve at the mouse position. The newly added keyframes will be selected, making it easier to quickly tweak the newly added keyframes. All previously selected keyframes are kept selected by using Shift-Ctrl-RMB.
Add F-Curve Modifier(Fカーブモディファイアーを追加)
参照
- Menu(メニュー)
- ショートカットキー
Shift-Ctrl-M
Opens a pop-up allowing you to add modifiers to the active F-curve. Settings for the modifier can be found in the tab.
Bake Sound to F-Curves(音声をFカーブにベイク)
参照
- Menu(メニュー)
Bake Sound to F-Curves(音声をFカーブにベイク) 操作は、サウンドファイルを取得し、その波形を使用してアニメーションデータを作成します。
- Lowest Frequency(最低周波数)
音声データに適用されるハイパスフィルターのカットオフ周波数。
- Highest Frequency(最高周波数)
音声データに適用されるローパスフィルターのカットオフ周波数。
- Attack Time(アタック時間)
ハルカーブが上昇する早さを示す値です。小さな値で早く上昇します。
- Release Time(リリース時間)
ハルカーブが下降する早さを示す値です。小さな値で早く下降します。
- Threshold(しきい値)
ハルカーブに影響を与えるのに必要な最小振幅値です。
- Accumulate(蓄積)
出力を生成するのに、ハルカーブ振幅の正の差異のみが集約されます。
- Additive(付加)
ハルカーブ振幅が集約されます。 Accumulate(蓄積) がONの時、正と負の差異の両方が蓄積されます。
- Square(正方形)
出力が矩形カーブになります。負の値が常に-1に、正の値が1になります。
- Square Threshold(矩形のしきい値)
このしきい値より低い値はすべて0になります。
Copy(コピー)/Paste(貼り付け)
参照
- Menu(メニュー)
、
- ショートカットキー
Ctrl-C 、 Ctrl-V
Ctrl-C を使用して選択したキーフレームをコピーし、 Ctrl-V で以前にコピーしたキーフレームを貼り付けます。貼り付けアクション中に、 Adjust Last Operation(最後の操作を調整) パネルに、貼り付けの適用方法に関するいくつかのオプションが表示されます。
- Offset(オフセット)
- No Offset(オフセットなし)
キーフレームをコピー元の場所に貼り付けます。
- Frame Relative(フレームの相対)
Pastes the keyframe relative to the Playhead position based on the locations of the keyframes relative to the Playhead when they were copied.
- Frame Start(開始フレーム)
Pastes the keyframes with the first keyframe of the copied set placed at the Playhead.
- Frame End(フレームの終わり)
Pastes the keyframes with the last keyframe of the copied set placed at the Playhead.
- Type(タイプ)
- Mix(ミックス)
貼り付けたキーフレームを既存のキーフレームと統合し、フレームを共有するキーフレームのみを上書きします。
- Overwrite All(全てを上書き)
以前のすべてのキーフレームを削除し、貼り付けたキーフレームに置き換えます。
- Overwrite Range(範囲を上書き)
貼り付け範囲のキーを上書きします。
- Overwrite Entire Range(範囲全体を上書きします)
コピーするキーの全範囲で、貼り付け範囲のキーを上書きします。
- Flipped(反転)
あれば対称のボーンのキーフレームを貼り付けます。
Delete Keyframes(キーフレームを削除)
参照
- Menu(メニュー)
- ショートカットキー
X 、 Delete
X か Delete を押すことで、選択したキーフレームを削除できるポップアップメニューを開きます。
Decimate(減量)
参照
- Menu(メニュー)
- Menu(メニュー)
The Decimate tool simplifies an F-curve by removing keyframes that influence the curve shape the least.
- Mode(モード)
使用するキーフレームの数を選択して、使用する方法を制御します。
- Ratio(比率)
定義された割合のキーフレームを削除します。削除するキーフレームの量は、Remove(削除) プロパティによって定義されます。
- Error Margin(エラーマージン)
Deletes keyframes which only allowing the F-curve to change by a defined amount. The amount of change is controlled by the Max Error Margin which controls how much the new decimated curve is allowed to deviate from the original.
Clean Keyframes(キーフレームを掃除)
参照
- Menu(メニュー)
- ショートカットキー
X
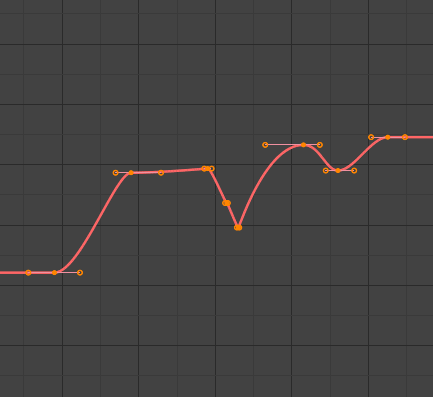
Clean Keyframes(キーフレームを掃除) は、選択されたキーフレームの接線が変更されている場合、自動固定された形状にリセットされます。

掃除前のFカーブ。¶ |
掃除後のFカーブ。¶ |
Clean Channels
参照
- Menu(メニュー)
- ショートカットキー
X
Acts like the Clean Keyframes tool but will also delete the channel itself if it is only left with a single keyframe containing the default property value and it's not being used by any generative F-curve modifiers or drivers.
注釈
The modified curve left after the Clean tool is run is not the same as the original, so this tool is better used before doing custom editing of F-curves and after initial keyframe insertion, to get rid of any unwanted keyframes inserted while doing mass keyframe insertion (by selecting all bones and pressing I for instance).
Smooth Keys
参照
- Menu(メニュー)
- ショートカットキー
Alt-O
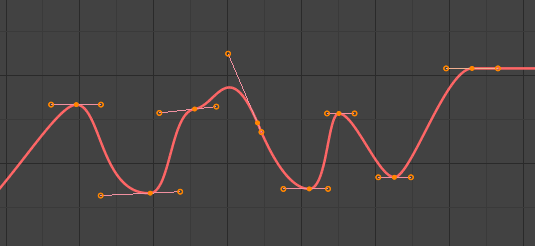
選択したカーブをスムーズにするオプションもありますが、注意してください。そのアルゴリズムは、設定なしで、各キーフレーム間の距離とカーブの平均線形値を2で割ることであるように見えます。これにより、非常に強力なスムーズが得られます。最初と最後のキーは、このツールでは変更されないように見えることに注意してください。
|
スムーズ前のFカーブ。¶ |
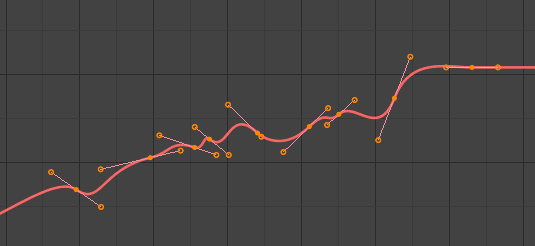
スムーズ後のFカーブ。¶ |
Sample Keyframes(キーフレームを抽出)
参照
- Menu(メニュー)
- ショートカットキー
Shift-Alt-O
キーフレームのセットを抽出すると、補間された値がフレームごとに新しいキーフレームに置き換えられます。
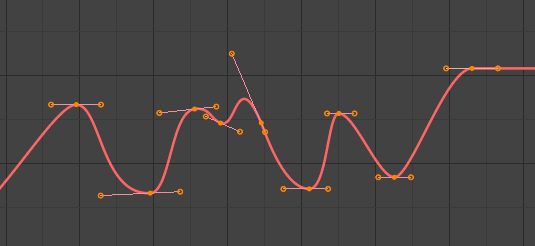
抽出前のFカーブ。¶ |
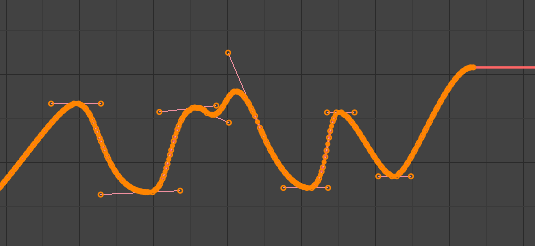
抽出後のFカーブ。¶ |
Bake Curve(カーブをベイク)
参照
- Menu(メニュー)
- ショートカットキー
Alt-C
カーブをベイク処理すると、抽出したポイントのセットに置き換えられ、カーブを編集する機能が削除されます。
Discontinuity (Euler) Filter(不連続(オイラー)フィルター)
(未稿)。