Uzol Zmiešať
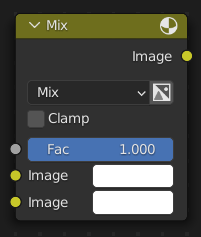
The Mix Node mixes images by working on the individual and corresponding pixels of the two input images. Called „Mix Color“ in the shader, geometry, and texture context.
Dôležité
As of Blender 3.4 this node has been updated in Shader and Geometry node editors. Files saved with the new node are not forward compatible.
Vstupy
- Faktor
Ovláda mieru vplyvu, ktorý vykonáva uzol na výstupný obrázok.
- Obrázok
The background image. The image size and resolution sets the dimensions of the output image.
- Obrázok
Obrázok v popredí.
Vlastnosti
- Zmiešať
Režimy prelínania je možné zvoliť v ponuke výberu. Pozrite si Režimy prelínania farieb pre podrobnosti o jednotlivých režimoch prelínania.
Add, Subtract, Multiply, Screen, Divide, Difference, Exclusion, Darken, Lighten, Overlay, Color Dodge, Color Burn, Hue, Saturation, Value, Color, Soft Light, Linear Light
- Použiť alfa
If activated, by clicking on the Color and Alpha icon, the Alpha channel of the second image is used for mixing. When deactivated, the default, the icon background is a light gray. The alpha channel of the base image is always used.
- Zarážka
Limit the output value between 0.0 and 1.0.
Výstupy
- Obrázok
Štandardný farebný výstup.
Príklady
Below are samples of common mix modes and uses, mixing a color or checker with a mask.
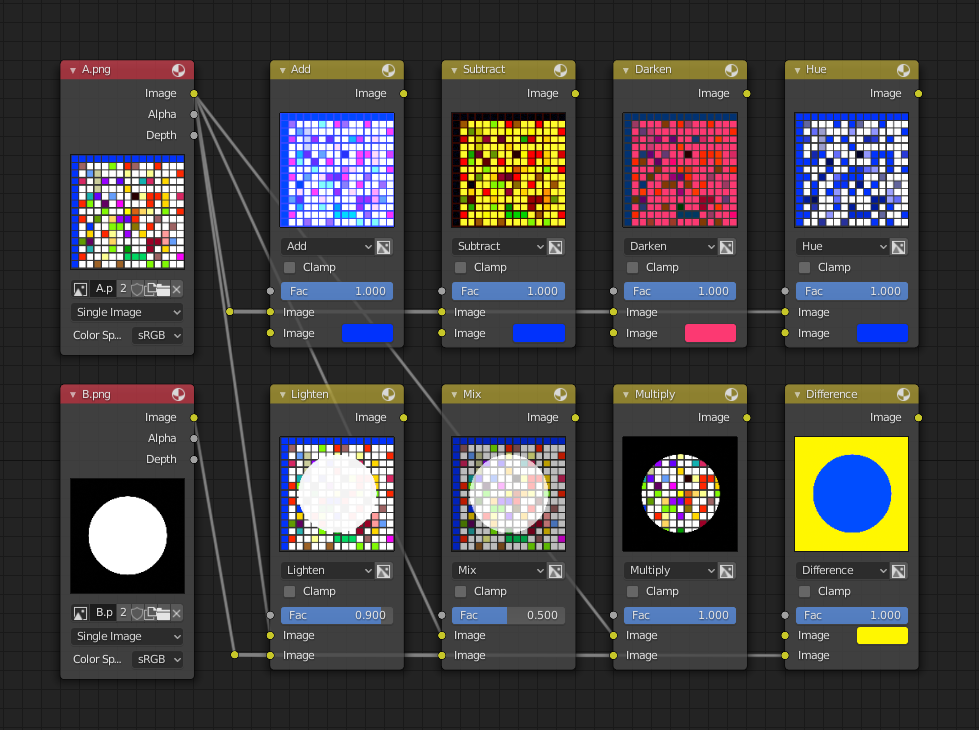
Some explanation of the mixing methods above might help you use the Mix node effectively:
- Pridať (pripočítať)
Adding blue to blue keeps it blue, but adding blue to red makes purple. White already has a full amount of blue, so it stays white. Use this to shift a color of an image. Adding a blue tinge makes the image feel colder.
- Odpočítať
Taking Blue away from white leaves Red and Green, which combined make Yellow. Taking Blue away from Purple leaves Red. Use this to desaturate an image. Taking away yellow makes an image bluer and more depressing.
- Vynásobiť
Black (0.0) times anything leaves black. Anything times White (1.0) is itself. Use this to mask out garbage, or to colorize a black-and-white image.
- Odtieň
Shows you how much of a color is in an image, ignoring all colors except what is selected: makes a monochrome picture (style ‚Black & Hue‘).
- Zmiešať
Combines the two images, averaging the two.
- Zosvetliť
Like bleach makes your whites whiter. Used with a mask to lighten up a little.
- Rozdiel
It takes out a color. The color needed to turn Yellow into White is Blue. Use this to compare two very similar images to see what had been done to one to make it the other; sort of like a change log for images. You can use this to see a watermark (see Watermark images) you have placed in an image for theft detection.
- Stmaviť
With the colors set here, it’s like looking at the world through rose-colored glasses.
Poznámka
Only add, subtract, multiply and divide are suitable for Scene Referenced images.
Contrast Enhancement
Here is a small node tree showing the effects of two other common uses for the RGB Curve: Darken and Contrast Enhancement. You can see the effect each curve has independently, and the combined effect when they are mixed equally.
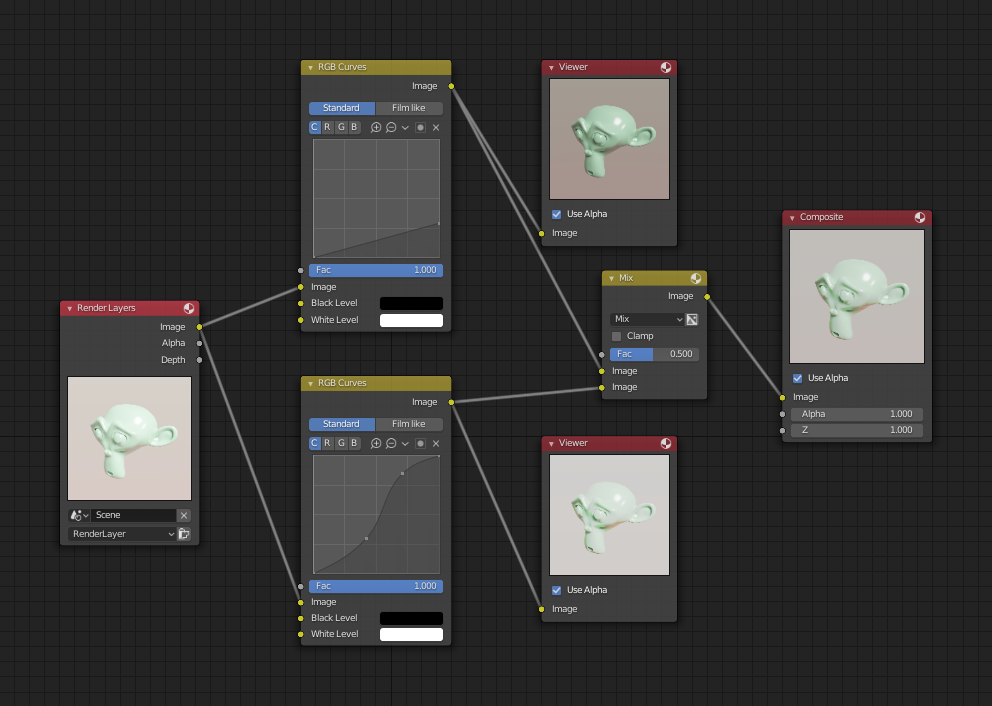
Example node setup showing „Darken“, „Enhance Contrast“ and „Mix“ nodes for composition.
As you can hopefully see, our original magic monkey was overexposed by too much light. To cure an overexposure, you must both darken the image and enhance the contrast.
In the top RGB curve, Darken, only the right side of the curve was lowered; thus, any X input along the bottom results in a geometrically less Y output. The Enhance Contrast RGB (S-shaped) curve scales the output such that middle values of X change dramatically; namely, the middle brightness scale is expanded, and thus, whiter whites and blacker blacks are output. To make this curve, simply click on the curve and a new control point is added. Drag the point around to bend the curve as you wish. The Mix node combines these two effects equally, and Suzanne feels much better.
Obrázky vodoznaku
In the old days, a pattern was pressed into the paper mush as it dried, creating a mark that identified who made the paper and where it came from. The mark was barely perceptible except in just the right light. Probably the first form of subliminal advertising. Nowadays, people watermark their images to identify them as personal intellectual property, for subliminal advertising of the author or hosting service, or simply to track their image’s proliferation throughout the web. Blender provides a complete set of tools for you to both encode your watermark and to tell if an image has your watermark.
Kódovanie vodoznaku do obrázka
First, construct your own personal watermark. You can use your name, a word, or a shape or image not easily replicated. While neutral gray works best using the encoding method suggested, you are free to use other colors or patterns. It can be a single pixel or a whole gradient; it is up to you. In the example below, we are encoding the watermark in a specific location in the image using the Translate node; this helps later because we only have to look at a specific location for the mark. We then use the RGB to BW node to convert the image to numbers that the Map Value node can use to make the image subliminal. In this case, it reduces the mark to one-tenth of its original intensity. The Add node adds the corresponding pixels, making the ones containing the mark ever-so-slightly brighter.
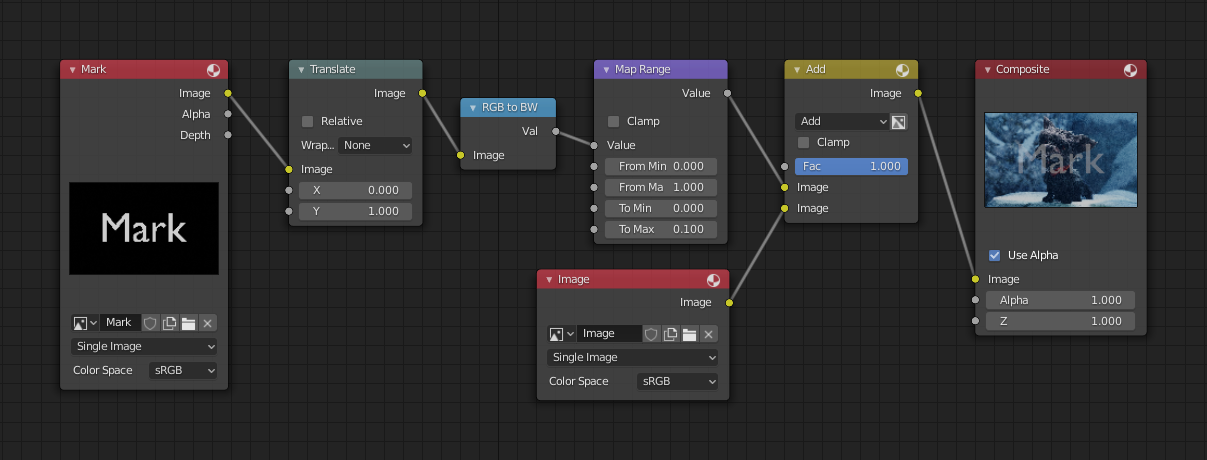
Embedding your mark in an image using a mark and specific position.
Samozrejme, ak chcete, aby si ľudia všimli vašu značku, neznižujte ju tak výrazne alebo ju upravte do kontrastnej farby. Existuje aj mnoho ďalších spôsobov, ktoré využívajú iné nastavenia zmiešania a lepšie triky. Nebojte sa experimentovať!
Rada
Additional uses
You can also use this technique, using settings that result in visible effects, in title sequences to make the words appear to be cast on the water’s surface, or as a special effect to make words appear on the possessed girl’s forearm.
Dekódovanie obrázka vášho vodoznaku
When you see an image that you think might be yours, use the node tree below to compare it to your stock image (pre-watermarked original). In this tree, the Mix node is set to Difference, and the Map Value node amplifies any difference. The result is routed to a viewer, and you can see how the original mark clearly stands out.
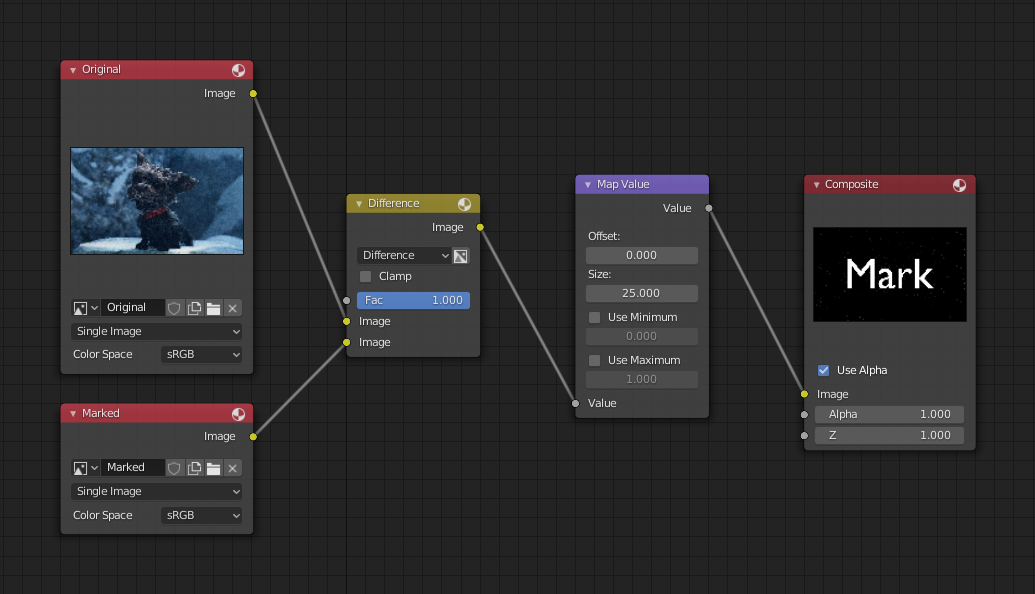
Kontrola obrázku vodoznaku.
Various image compression algorithms lose some of the original; the difference shows as noise.
Experiment with different compression settings and marks to see which works best for you by
having the encoding node group in one scene, and the decoding group in another.
Use them while changing Blender’s image format settings,
reloading the watermarked image after saving, to get an acceptable result.
In the example above, the mark was clearly visible all the way up to JPEG compression of 50%.