Časová os
The Timeline editor, identified by a clock icon, is used for manipulating keyframes and scrubbing the Playhead.

Časová os.
The Timeline gives the user a broad overview of a scene’s animation, by showing the current frame, the keyframes of the active object, the start and end frames of your animation sequence, as well as markers set by the user.
The Timeline includes Transport Controls, to play, pause, and skip through an animation sequence.
It also includes tools for manipulating Keyframes, Keying Sets, and Markers.
Hlavné zobrazenie
The main Timeline region displays the animation frames over time.

Here you can see the Keyframes (diamond shapes), Playhead (blue handle), Scrollbar (along the bottom).
Úprava zobrazenia
The Timeline can be panned by holding MMB, then dragging the area left or right.
You can zoom the Timeline by using Ctrl-MMB, the mouse Wheel, or pressing NumpadMinus and NumpadPlus.
You can also use the scrollbars, located at the bottom or the right of the editor, to pan and zoom the view.
Prehrávacia hlava
The Playhead is the blue vertical line with the current frame number at the top.
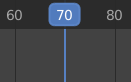
Prehrávacia hlava.
The Playhead can be set or moved to a new position by pressing or holding LMB in scrubbing area at the top of the timeline.
The Playhead can be moved in single-frame increments by pressing Left or Right, or you can jump to the beginning or end frame by pressing Shift-Left or Shift-Right.
Rozsah snímok
By default, the Frame Range is set to start at frame 1 and end at frame 250. You can change the frame range in the top right of the Timeline header, or in the Output Properties.
Kľúčové snímky
For the active and selected objects, keyframes are displayed as diamond shapes.
You can click to select one at a time, or select several by holding Shift, or by dragging a box around the keyframes. You can then move single keys by dragging them, and you can move multiple keys by pressing G and scale them with S.
Only Selected Channels can be enabled. . For Armatures, this will display the object keyframes, and the keyframes for the active and selected pose bones.
Značky
Pre ďalšie informácie si pozrite na stránke Značky.
Záhlavie
Vyskakovacie okná
Vyskakovacie okno Prehrávanie
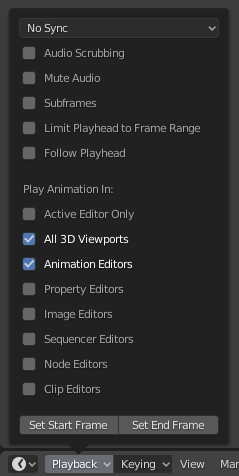
The Playback popover contains options controlling the animation playback.
- Synchronizácia
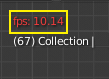
3D záber červený počet snímok za sekundu (FPS).
When you play an animation, the frame rate is displayed at the top left of the 3D Viewport. If the scene is detailed and playback is slower than the set Frame Rate, these options are used to synchronize the playback.
- Prehrať každú snímku
Plays every frame even if playback is slow.
- Vypúšťanie snímok
Ak je prehrávanie pomalšie ako obnovovacia frekvencia scény, vypúšťajú sa snímky.
- Synchronizovať so zvukom
Ak je prehrávanie príliš pomalé na to, aby zostalo synchronizované so zvukom, vypúšťajú sa snímky.
- Audio
- Snímanie
If your animation has sound, this option plays bits of the sound wave while you move the Playhead with LMB or keyboard arrows.
- Stlmiť
Mute the sound from any audio source.
- Prehrávanie
- Limit Playback to Frame Range
Don’t allow selecting frames outside of the playback range using the mouse.
- Nasledovať aktuálnu snímku
Animation editors can be setup to always follow the time indicator as animation is being played back. Following will be done when animating and changing frame: When the cursor reaches the end of the screen, the next range of frames of the same width will be displayed.
- Prehrať v
- Active Editor
While playing, updates the Timeline, if Animation Editors and All 3D Viewports disabled.
- 3D záber
While playing, updates the 3D Viewport and the Timeline.
- Animation Editors
While playing, updates the Timeline, Dope Sheet, Graph Editor, Video Sequencer.
- Editor obrázkov
The Image editor in Mask mode.
- Properties Editor
When the animation is playing, this will update the property values in the UI.
- Editor filmových klipov
While playing, updates the Movie Clip Editor.
- Node Editors
While playing, updates the Node properties for the node editors.
- Radič videosekvencií
While playing, updates the Video Sequencer.
- Zobraziť
- Medzisnímky
Zobrazí a povolí zmenu aktuálnej pomocnej snímky scény.
Vyskakovacie okno Kľúčovanie
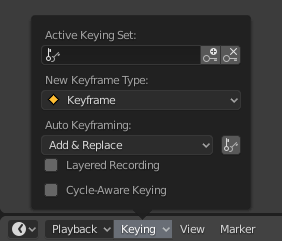
Vyskakovacie okno Kľúčovania obsahuje možnosti, ktoré ovplyvňujú vkladanie kľúčových snímok.
- Aktívna sústava kľúčovania
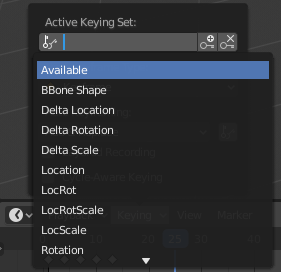
Sústavy kľúčovania na časovej osi.
Keying Sets are a set of keyframe channels in one. They are made so the user can record multiple properties at the same time. With a keying set selected, when you insert a keyframe, Blender will add keyframes for the properties in the active Keying Set. There are some built-in keying sets, LocRotScale, and also custom keying sets. Custom keying sets can be defined in the panels .
- Insert Keyframes (plus icon)
Insert keyframes on the current frame for the properties in the active Keying Set.
- Delete Keyframes (minus icon)
Delete keyframes on the current frame for the properties in the active Keying Set.
- Typ novej kľúčovej snímky
Typy kľúčových snímok on insertion.
- Vedome cyklovať kľúčovanie
Pri vkladaní kľúčových snímok do triviálnych cyklických kriviek sa používa špeciálna manipulácia, aby sa zachovala integrita cyklu (najužitočnejšie pri dolaďovaní zavedeného cyklu):
Ak sa o vloženie kľúča pokúsite mimo rozsah hlavného časového cyklu, premapuje sa späť do tohto rozsahu.
Pri prepise jedného z koncových kľúčov sa druhý zodpovedajúcim spôsobom aktualizuje.
In addition, when adding a new curve into an action with a Manual Frame Range and Cyclic Animation enabled, the curve is automatically made cyclic with the period matching the frame range. For convenience this check and conversion is also done before adding the second keyframe to such a curve.
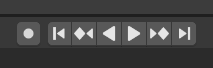
Auto Keying Popover
Automatická kľúčová snímka časovej osi.
The record button (⏺) enables Auto Keyframe: It will add and/or replace existing keyframes for the active object when you transform it in the 3D Viewport. For example, when enabled, first set the Playhead to the desired frame, then move an object in the 3D Viewport, or set a new value for a property in the UI.
When you set a new value for the properties, Blender will add keyframes on the current frame for the transform properties. Other use cases are Fly/Walk Navigation to record the walk/flight path and Lock Camera to View to record the navigation in camera view.
Poznámka
Note that Auto Keyframe only works for transform properties (objects and bones), in the 3D Viewport (i.e. you can’t use it e.g. to animate the colors of a material in the Properties…).
- Add & Replace / Replace
This controls how the auto keyframe mode works. Only one mode can be used at a time.
- Pridať a nahradiť
Add or replace existing keyframes.
- Nahradiť
Nahradí iba existujúce kľúčové snímky.
- Len aktívna sústava kľúčovania
When enabled, new keyframes for properties will be inserted into the active Keying Set.
- Vrstvové záznam
Adds a new NLA Track and strip for every loop/pass made over the animation to allow non-destructive tweaking.
Ponuky
Ponuka Zobraziť
The View Menu controls what you see, and what it looks like.
- Upraviť poslednú operáciu
Zobrazí vyskakovací panel na zmenu vlastností poslednej dokončenej operácie. Pozrite si časť Upraviť poslednú operáciu.
- Zobraziť sekundy Ctrl+T
Whether to show the time in the X axis and the Playhead as frames (based on the FPS) or as seconds.
- Synchronizovať viditeľný rozsah
It synchronizes the horizontal panning and scale of the current editor with the other editors (Graph, Dope Sheet, NLA and Sequencer) when this option is set. That way you always have these editors showing the same section of frames.
- Zobraziť značky
Shows the markers region. When disabled, the Markers Menu is also hidden and markers operators are not available in this editor.
- Only Keyframes from Selected Channels
For Armatures, this will display the object keyframes, and the keyframes for the active and selected pose bones.
- Zásobník
- Zobraziť zásobník
Show all enabled types.
Soft Body, Particles, Cloth, Simulation Nodes, Smoke, Dynamic Paint, Rigid Body.
Zásobník časovej osi.
- Všetky snímky Home
Maximize the area based on the Animation Range.
- Prejsť na aktuálnu snímku Num0
Vycentruje časovú os na prehrávacej hlave.
Markers Menu
Značky sa používajú na označenie snímok s kľúčovými bodmi alebo významnými udalosťami v rámci animácie. Rovnako ako u väčšiny editorov animácií sú značky zobrazené v dolnej časti editora.

Značky v editore animácií.
For descriptions of the different marker tools see Editing Markers.
Header Controls
The Timeline header controls.

Timeline header controls.
1. Popovers for Playback and Keying, 2. Transport Controls, 3. Frame Controls
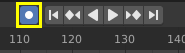
Ovládače transportu
These buttons are used to set, play, rewind, the Playhead.
Ovládače transportu.
- Skočiť na počiatočnú (❙⏴) Shift+←
This sets the cursor to the start of frame range.
- Skočiť na predošlú kľúčový snímku (◆⏴) ↓
This sets the cursor to the previous keyframe.
- Previnúť späť (◀) Shift+Ctrl+medzerník
This plays the animation sequence in reverse. When playing the play buttons switch to a pause button.
- Prehrať (▶) medzerník
This plays the animation sequence. When playing the play buttons switch to a pause button.
- Skočiť na ďalšiu kľúčovú snímku (⏵◆) ↑
This sets the cursor to the next keyframe.
- Skočiť na koniec (⏵❙) Shift+→
This sets the cursor to the end of frame range.
- Pauza (⏸) medzerník
This stops the animation.
Ovládače snímky
- Aktuálna snímky Alt+koliesko
The current frame of the animation/playback range. Also the position of the Playhead.
- Preview Range (clock icon)
This is a temporary frame range used for previewing a smaller part of the full range. The preview range only affects the viewport, not the rendered output. See Preview Range.
- Počiatočná snímka
The start frame of the animation/playback range.
- Koncová snímka
The end frame of the animation/playback range.