Atração para elementos
Reference
- Mode
Object, Edit, and Pose Mode
- Header
- Atalho
Atalho: Shift-Tab
A capacidade de capturar (snap) objetos e elementos de malha (mesh) para vários tipos de elementos de cena durante uma transformação está disponível através da troca do ícone do ímã nos botões de cabeçalho do Viewport 3D.
Ícone magnético no cabeçalho do 3D Viewport (azul quando ativado).
Snap menu.
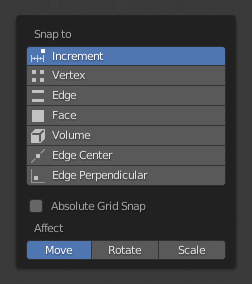
Snap To
Reference
- Mode
Object, Edit, and Pose Mode
- Header
- Atalho
Shift-Ctrl-Tab
- Incremental
Snap to grid points. When in Orthographic view, the snapping increment changes depending on zoom level.
Nota
In this context the grid does not mean the visual grid cue displayed. Snapping will use the resolution of the displayed grid, but all transformations are relative to the initial position (before the snap operation).
- Vertex
Atrair para os vértices do objeto de malha.
- Edge
Atrair para as arestas dos objetos de malha.
- Face
Snaps to the surfaces of faces in mesh objects; This is useful for retopologizing.
- Volume
Snaps to regions within the volume of the first object found below the mouse cursor. Unlike the other options, this one controls the depth (i.e. Z coordinates in current view space) of the transformed element. By toggling the button that appears to the right of the snap target menu (see below), target objects will be considered as a whole when determining the volume center.
- Edge Center
Snaps to the middle of an edge. This snap element only pertains to mesh objects.
- Edge Perpendicular
Snaps to the nearest vertex in an edge that makes a perpendicular angle. This snap element only pertains to mesh objects.
Dica
Multiple snapping modes can be enabled at once by Shift-LMB the different snapping elements.
Snap With
Reference
- Mode
Object, Edit, and Pose Mode
- Header
- Atalho
Shift-Ctrl-Tab
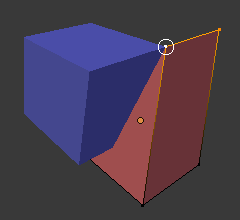
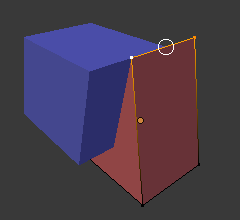
As opções de snap ficam ativas quando Vertex, Edge, Face, ou Volume é selecionado como o elemento snap. Estes determinam que parte da seleção se encaixa (snaps) nos objetos alvo.
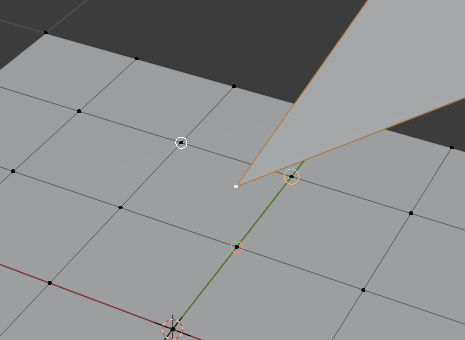
- Ativo(a)
Move o elemento ativo (vértice no Edit Mode, objeto no Object Mode) para o alvo.
- Mediano
Moves the median of the selection to the target.
- Center
Moves the current transformation center to the target. Can be used with 3D cursor to snap with an offset.
- Mais próximo
Moves the closest point of the selection to the target.
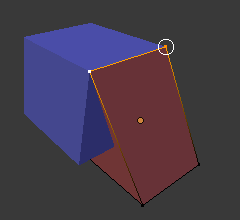
Mais próximo. |
Ativo(a). |
Mediano. |
Additional Options
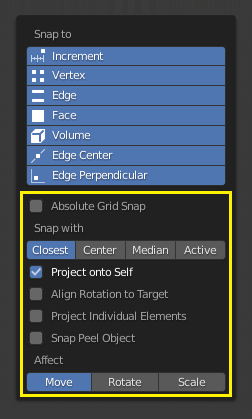
As seen by the yellow highlighted areas in the image above, besides the snap target, additional controls are available to alter snap behavior. These options vary between mode (Object and Edit) as well as Snap Element. The four options available are:
- Absolute Grid Snap
Disponível apenas para a opção de aumento. Snap to grid, em vez de snap in incrementos em relação à localização atual.
- Backface Culling
Exclude back facing geometry from snapping.
- Project Onto Self
Snaps elements to its own mesh. Available only in editing mode for Vertices, Edges, Faces and Volume. Not available when Proportional Editing is enabled.
- Alinha a rotação com o alvo de atração
Available for Vertices, Edges, Faces and Volume. When the Snap Affects Rotation, this align rotation with the snapping target.
- Project Individual Elements
Disponível para snap to Faces. Projeta elementos individuais na superfície de outros objetos.
- Snap Peel Object
Disponível para snap to Volume. Considera os objetos como um todo durante a localização do centro do volume.
- Deslocamento
Limits the effect of the snap to the transformation type.
Múltiplos alvos de atração
Once transforming a selection with Snapping on (not just when holding Ctrl), you can press A to mark the current snapping point, then proceed to mark as many other snapping points as you wish and the selection will be snapped to the average location of all the marked points.
Marking a point more than once will give it more weight in the averaged location.
Uso de múltiplos alvos de atração.