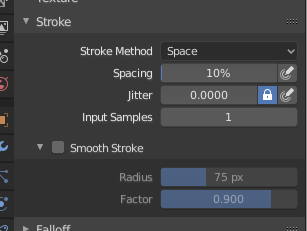
Nét Vẽ (Stroke)

Kiểu Nắp Đầu Nét Vẽ.
- Phương Pháp Tạo Nét Vẽ E (Stroke Method E)
Defines the way brush strokes are applied to the canvas.
- Dots
Tô sơn trên mỗi bước di chuyển của chuột.
- Kéo Dấu Chấm (Drag Dot)
Leaves only one dab on the canvas which can be placed by dragging.
- Khoảng Cách/Trống/Không Gian (Space)
Creates brush stroke as a series of dots, whose distance (spacing) is determined by the Spacing setting.
- Phân Khoảng (Spacing)
Represents the percentage of the brush radius.
Limits brush application to the distance specified by spacing.
- Đầu Phun Sơn (Airbrush)
Flow of the brush continues as long as the mouse click is held (spray), determined by the Rate setting. With other methods the brush only modifies the color when the brush changes its location. This option is not available for the Grab sculpting brush.
- Tốc Độ (Rate)
Khoảng thời gian giữa các vết sơn của Bút Phun Sơn.
- Neo Chốt (Anchored)
Creates a single dab at the brush location. Clicking and dragging will resize the dab diameter.
- Cạnh Nọ đến Cạnh Kia (Edge to Edge)
The brush location and orientation are determined by a two point circle, where the first click is one point, and dragging places the second point, opposite from the first.
- Đường Thẳng/Dòng (Line)
Clicking and dragging lets you define a line in screen space. The line dabs are separated by Spacing, similar to space strokes. With Alt the line stroke is constrained to 45 degree increments.
- Curve (Đường Cong)
Defines the stroke curve with a Bézier curve (dabs are separated according to Spacing). Use Ctrl-RMB to create the initial control point of the curve.
- Đồ Thị Nét Sơn (Paint Curves)
Stroke Curves are reusable and can be stored and selected by using the Trình Đơn khối dữ liệu (Data-Block Menu) menu.
- Thêm các Điểm (Add Points)
You can define additional curve control points by using Ctrl-RMB. The handles can be defined by dragging the mouse. The stroke flows in the direction of the first control point to the second control point. If another control point is added after the second control point, instead of extending it from the first control point in a different direction, it will become the initial control point, and thus the stroke still flows in the direction of the first to the second.
- Các Điểm Biến Hóa (Transforming Points)
The control points and handles can be dragged with LMB. To make sure that the handles of a control point are symmetrical, drag them using Shift-RMB. A few transform operators are supported such as moving, scaling and rotating.
- Lựa Chọn (Selection)
The handles can be selected individually by using RMB, extend the selection by Shift-RMB and deselect/select all by using A.
- Xóa các Điểm X (Delete Points X)
To delete a curve point, use X.
- Vẽ Đường Cong Return (Draw Curve Return)
To confirm and execute the curved stroke, press Return or use the Draw Curve button.
- Kích Thước Phân Khoảng Duy Chế Độ Điêu Khắc (Sculpt Mode Only)
Method used to calculate the distance to generate a new brush step.
- Góc Nhìn (View)
Calculates the brush spacing relative to the view.
- Cảnh (Scene)
Calculates the brush spacing relative to the scene using the stroke location. This avoids artifacts when sculpting across curved surfaces.
- Điều Chỉnh Cường Độ để Phân Khoảng (Adjust Strength for Spacing)
Attenuate the brush strength according to spacing. Available for the Space, Line, and Curve stroke methods.
- Tỷ Số Đường Gạch Ngang (Dash Ratio)
Ratio of samples in a cycle that the brush is enabled. This is useful to create dashed lines in texture paint or stitches in Sculpt Mode. Available for the Space, Line, and Curve stroke methods.
- Chiều Dài Đường Gạch Ngang (Dash Length)
Length of a dash cycle measured in stroke samples. This is useful to create dashed lines in texture paint or stitches in Sculpt Mode. Available for the Space, Line, and Curve stroke methods.
- Biến Động (Jitter)
Biến động vị trí của đầu bút trong khi sơn.
- Áp Lực Biến Động (Jitter Pressure)
Brush Jitter can be affected by enabling the pressure sensitivity icon, if you are using a Graphics Tablet.
- Đơn Vị Biến Động (Jitter Unit)
Controls how the brush Jitter is measured.
- Góc Nhìn (View)
The Jitter is measured based on how the cursor appears on the monitor i.e. "screen space".
- Cảnh (Scene)
The Jitter is measured based on real world units. The unit type and scaling can be configured in the Scene Units.
- Mẫu Vật Cung Cấp (Input Samples)
Recent mouse locations (input samples) are averaged together to smooth brush strokes.
Ổn Định Hóa Nét Vẽ (Stabilize Stroke)
Stabilize Stroke makes the stroke lag behind the cursor and applies a smoothed curve to the path of the cursor. This can be enabled temporary by holding Shift while painting or permanently by clicking the checkbox found in the header.
- Bán Kính (Radius)
Sets the minimum distance from the last point before stroke continues.
- Hệ Số (Factor)
Sets the amount of smoothing.