混合节点

将两幅图像混合在一起,类似于图像编辑程序混合两个图层。
输入
- 系数
前景图像的不透明度。
- 图像
背景图像,决定了输出尺寸。
- 图像
前景图像。
需注意,与图像编辑程序将前景图层置于顶部的做法不同,Blender 中的前景槽位于底部。
属性
- 混合模式
要使用的混合模式。
- 混合
常规 alpha 混合。在图像编辑程序中一般被称作 正常。
- 变暗
对于每个颜色成分,取两个混合值中最小的一个。
- 正片叠底(相乘)
将颜色相乘。与白色像素(值为 1.0)混合不会产生任何效果,而与黑色像素(值为 0.0)混合则会产生黑色效果。
- 颜色加深
反转背景色,再除以前景色,然后反转结果。
- 变亮
对于每个颜色成分,取两个混合值中最大的一个。
- 滤色
反转两种颜色,再相乘,然后反转相乘后的结果。
- 颜色减淡
用背景色除以反转的前景色。
- 相加
将两种颜色相加。
- 叠加
如果前景色亮度低于 0.5,执行正片叠底混合,否则执行滤色混合。
- 柔光
类似于叠加,但较为不明显。
- 线性光
如果前景色的明度低于 0.5,则应用线性加深(背景 + 前景 - 1);如果高于 0.5,则应用线性减淡(背景 + 前景)。
- 差值
对每个成分,用较大的值减去较小的值。
- 排除
两种颜色相加,然后减去其乘积两次。
- 相减
从背景色中减去前景色。
- 相除
将背景色除以前景色。
- 色相
将背景色的饱和度和明度与前景色的色相组合。
- 饱和度
将背景色的色相和明度与前景色的饱和度相组合。
- 颜色
将背景色的明度与前景色的色相和饱和度相组合。
- 明度
将背景色的色相和饱和度与前景色的明度相组合。
- 使用 Alpha
混合时是否使用前景图像的 alpha 通道。背景图像的 alpha 通道始终会被使用。
- 钳制
将输出值限制在 0.0 到 1.0 之间。
输出
- 图像
混合操作的结果。
示例
以下是混合模式的示例以及一些实际使用案例。
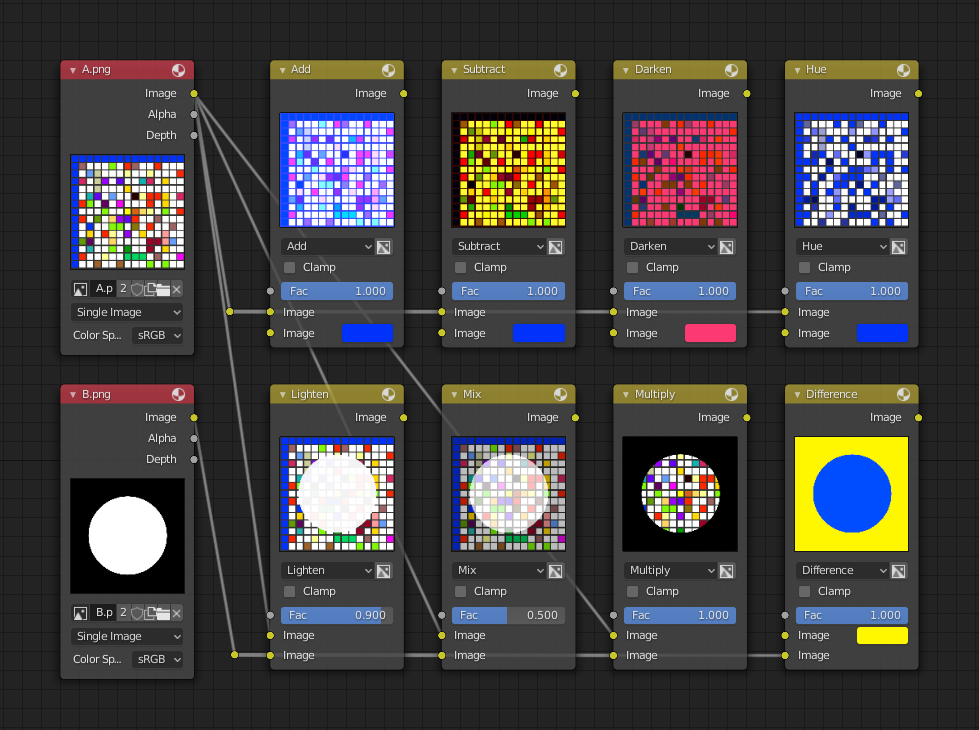
用平面色彩(上排)和圆形遮罩(下排)混合彩色图案。
修正过曝
如下所示的合成配置展示了如何通过压暗和增强对比度来修复一个过曝的渲染。
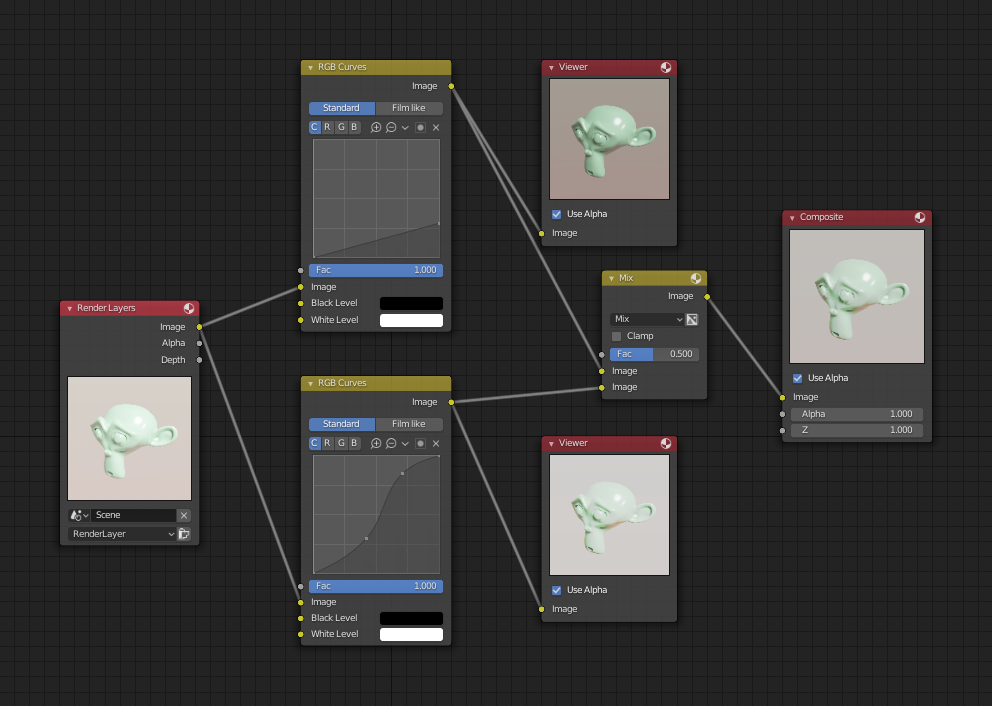
节点设置示例,显示两个 RGB 曲线节点和一个混合节点,用于合成。
The top RGB曲线节点 darkens the image by linearly scaling each color value to a smaller one.
The bottom curve node increases constract by making small values smaller and large values larger.
最后,由混合节点来混合两者。
水印图像
In the old days, a pattern was pressed into the paper mush as it dried, creating a mark that identified who made the paper and where it came from. The mark was barely perceptible except in just the right light. Probably the first form of subliminal advertising.
Nowadays, people watermark their images to identify them as personal intellectual property, for subliminal advertising of the author or hosting service, or simply to track their image's proliferation throughout the web.
Blender provides a complete set of tools for you to both encode your watermark and to tell if an image has your watermark.
在图像中设置水印
First, construct your own personal watermark. You can use your name, a word, or a shape or image not easily replicated. While neutral gray works best using the encoding method suggested, you are free to use other colors or patterns. It can be a single pixel or a whole gradient; it is up to you.
In the example below, we are encoding the watermark in a specific location in the image using the Translate node; this helps later because we only have to look at a specific location for the mark. We then use the RGB to BW node to convert the color image to grayscale numbers, which we then feed into the Map Range node to reduce the mark to one-tenth of its original intensity.
The Add node (Mix node with blending mode Add) adds the corresponding pixels, making the ones containing the mark ever-so-slightly brighter.
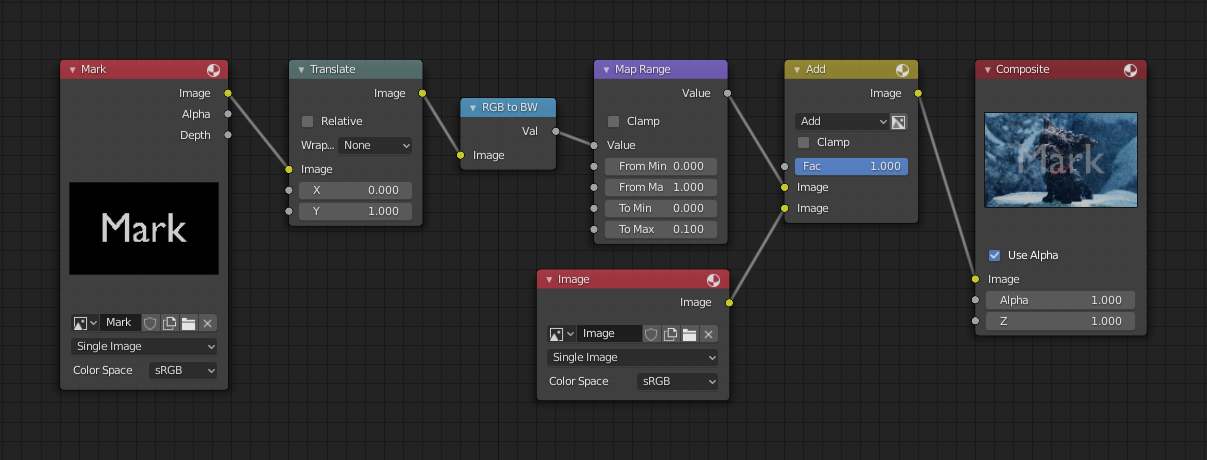
在图像中嵌入水印。
当然,如果想让人们注意到你的水印标记,请不要把它缩的太小,或者你可以把它变成对比色。当然也有许多其他的方法,比如使用其他混合设置和更高级的功能,你可以随意尝试!
为你的水印解码图像
When you see an image that you think might be yours, use the node tree below to compare it to your stock image (pre-watermarked original). In this tree, the Mix node is set to Difference, and the Map Value node amplifies any difference. You can see how the original mark clearly stands out.
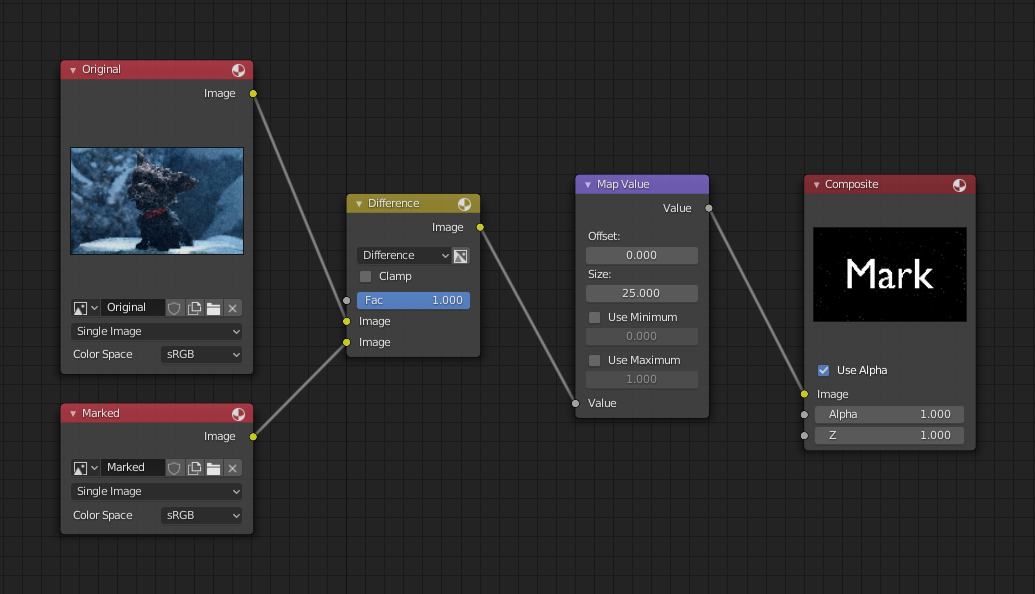
检查图像的水印。