Introduction
Channels Region

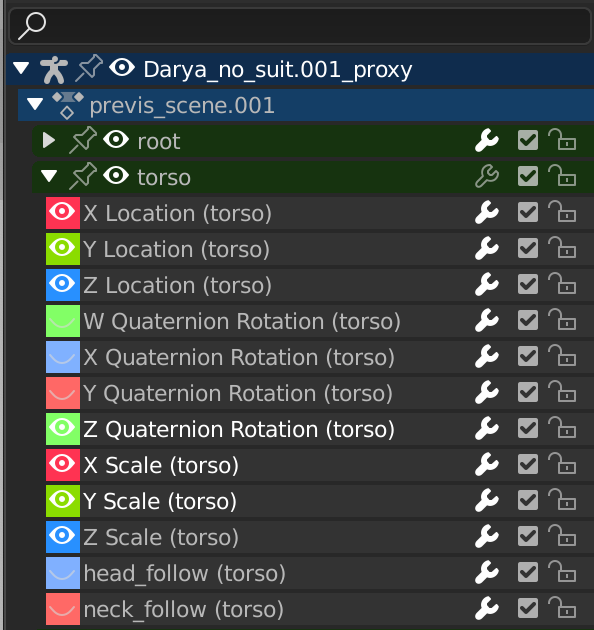
The Channels region.
This region is found on the left side of time-based editors like the Timeline, the Dope Sheet Editor, and the Graph Editor. It shows a tree of items (objects, bones...) and their animated properties, with the latter also being called "channels." Each channel has an associated F-curve describing how its value changes over time.
The rows are color-coded as follows:
Dark blue: scenes, objects
Light blue: actions, shape keys etc.
Green: channel groups
Gray: channels
- Search Ctrl-F
Lets you filter the channels by typing a part of their name. Click the Invert button to instead show channels that don't include the search text.
Controls
The headers contain the following toggle buttons:
- Pin (pin icon)
Keep the row and its children visible even when selecting a different object.
- Hide (eye icon)
Hides the keyframes and curve associated with the channel.
- Modifiers (wrench icon)
Deactivates the modifiers of the curve.
- Mute (checkbox)
Deactivates the curve, making the animation behave as though it doesn't exist.
- Lock Tab (padlock icon)
Prevent the curve from being edited.
ملاحظة
This also works in the Nonlinear Animation Editor, but note that it only locks the strips there, not the underlying F-curves.
Selection
Select single header: click LMB
Add/Remove single header to/from selection: click Ctrl-LMB
Select range: click Shift-LMB
Select All: A
Deselect All: press Alt-A or double-tap A
Box Select: drag LMB
Box Add: drag Shift-LMB
Box Remove: drag Ctrl-LMB
Select all keyframes in the channel: double-click LMB on its header.
Editing
Rename (anything but a channel): double-click LMB
Delete selected: X or Delete
Lock selected: Tab
Sliders

The Action editor showing sliders.
If you enable , the region will show a value slider next to each channel. Changing such a slider will change the value of the curve at the current frame, creating a keyframe if one doesn't already exist.