Vùng Thanh Bên
Cảnh Quay
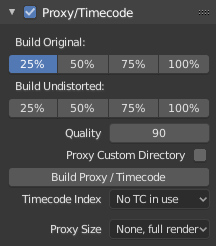
Đại Diện/Mã Thời Gian
A proxy is a smaller image (faster to load) that stands in for the main image. When you rebuild proxies Blender computes small images (like thumbnails) for the big images and may take some time. After computing them, though, editing functions like scrubbing and scrolling is much faster but gives a low-res result. Make sure to disable proxies before final rendering.
Once you have chosen the Proxy/Timecode options, you need to use to generate the proxy clip and it will be available after Blender makes it.
- Xây Dựng Nguyên Bản
Used to define which resolutions of proxy images should be built.
- Xây Dựng từ Bản Chưa Bị Biến Dạng
Builds images from undistorted original images for the sizes set above. This helps provide faster playback of undistorted footage.
- Chất Lượng
Xác định chất lượng hình ảnh JPEG trong các bản đại diện.
- Thư Mục Đại Diện Tùy Chọn
Theo mặc định, Toàn bộ các hình ảnh đại diện do máy Sinh Tạo ra được lưu trữ tại thư mục '<path of original footage>/BL_proxy/<clip name>', song mình có thể tự đặt vị trí này một cách thủ công dùng tùy chọn này.
- Tái Dựng Bản Đại Diện
Regenerates proxy images for all sizes set above and regenerate all timecodes which can be used later.
- Mã Thời Gian
When you are working with footage directly copied from a camera without pre-processing it, there might be bunch of artifacts, mostly due to seeking a given frame in sequence. This happens because such footage usually does not have correct frame rate values in their headers. This issue can still arise when the source clip has the same frame rate as the scene settings. In order for Blender to correctly calculate frames and frame rate there are two possible solutions:
Tiền Xử Lý phim video của bạn với MEncoder, chẳng hạn, để sửa chữa phần đầu đề của tập tin và ghi số khung khóa đúng đắn vào.
Sử dụng Đại Diện/Mã Thời Gian tùy chọn vào Blender.
- Không
Do not use any timecode.
- Quá Trình Thu
Sử dụng hình ảnh theo thứ tự đã được thu.
- Vận Hành Tự Do
Dùng mã thời gian toàn cầu được ghi bởi thiết bị thu.
- Vận Hành Tự Do (ngày tháng thu)
Nội suy một mã thời gian toàn cầu dùng ngày tháng thu và thời gian được ghi lại bởi thiết bị thu.
- Quá Trình Thu Không Cách Trống
Record run, but ignore timecode, changes in frame rate or dropouts.
Ghi chú
Record Run is the timecode which usually is best to use, but if the source file is totally damaged, Record Run No Gaps will be the only chance of getting acceptable result.
- Kích Thước Kết Xuất của bản Đại Diện
Defines which proxy image resolution is used for display. If Render Undistorted is set, then images created from undistorted frames are used. If there are no generated proxies, render size is set to "No proxy, full render", and if render undistorted is enabled, undistortion will happen automatically on frame refresh.
Sắp Đặt của Cảnh Quay
See Sắp đặt về hình ảnh.
Góc Nhìn
Con Trỏ 2D
The 2D cursor is the dashed gray cross-hair that is shown in the main region. It can be used by setting the pivot point to 2D Cursor to transform all points in relation to the location of the 2D cursor.
- Vị Trí X, Y
The location of the 2D cursor is relative to the bottom left of the main region. The edge of the image will be 0.5 away, so (0.5, 0.5) will be the top right corner.
The 2D cursor's location can also be set with Shift-RMB.