Sidebar#
Edited Action#
Reference
- Panel:
Sidebar ‣ Edited Action

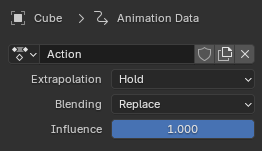
Edited Action panel.#
Contains settings for the object’s active action. Only visible if the Action Track is selected.
- Action
A data-block menu where you can see, change, and clear the object’s active action. See also the Action Editor’s Action.
- Extrapolation
Determines whether the action will influence the frames before/after its boundaries once it has been pushed down into a strip. (As long as it’s still the active action, Hold is used regardless of the choice.)
- Hold
The property values at the action’s first keyframe also apply to the earlier frames (if the strip is the first in the track). The values at its last keyframe also apply to the later frames (up to the next strip).
- Hold Forward
The property values at the action’s last keyframe also apply to the later frames (up to the next strip).
- Nothing
The animated properties return to their default values outside of the strip boundaries.
- Blending
How to combine the action’s property values with those of the tracks below.
- Replace
Overwrites the values produced by the lower tracks. If Influence is less than 1, a linear interpolation between the previous and new values is used instead.
- Multiply, Subtract, Add
Blends the action’s values with those of the lower tracks using a simple calculation. If Influence is less than 1, a linear interpolation between the previous values and these calculated values is used.
- Combine
Depending on the type of each property, one of the following methods is automatically chosen:
- Axis/Angle Rotation
This results in averaging the axis and adding the amount of rotation.
- Quaternion Rotation
Quaternion math is applied to all four channels of the property at once:
- Proportional (Scale)
- Others
Note
Since this blending mode uses quaternion multiplication to calculate the Quaternion Rotation properties, it always drives all four channels during playback, and Insert Single Keyframe is forced to insert all four keys. Other types of channels can still be keyed individually.
- Influence
How much the action contributes to the result of the NLA stack.
Strip#
- Name
Name of the strip.
- Mute (checkbox)
When unchecked, the strip will no longer contribute to the animation. It’s shown with a dotted outline to indicate this.
Active Strip#
Reference
- Panel:
Sidebar ‣ Strip ‣ Active Strip

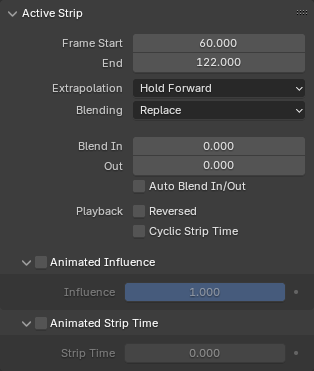
Active Strip panel.#
Contains common strip properties.
- Frame Start
The frame where the strip begins. Changing this will move the strip while keeping its duration constant.
- Frame End
The frame where the strip ends. Changing this will also change the Action Clip Frame End, thereby cropping or extending the action. If you instead want to speed it up or slow it down, scale it by using Strip ‣ Transform ‣ Scale or adjusting the Playback Scale setting.
- Extrapolation
See Extrapolation.
- Blending
See Blending.
- Blend In, Out
How many frames it takes for the strip’s influence to ramp up at the start and wind down at the end.

Two strips with Auto Blend enabled.#
- Auto Blend In/Out
Calculates Blend In/Out automatically by looking at the strips in the track above or below that overlap the current strip in time.
- Playback
- Reversed
Makes the strip play backwards.
- Cyclic Strip Time
Whether to wrap the Animated Strip Time back to the start if it exceeds the Action Clip Frame End.
Animated Influence#
Lets you manually specify, and animate, how strongly the strip affects the animation. This is an alternative to using the (Auto) Blend In/Out settings above.
To create an influence keyframe, first type a value, then either click Insert Keyframe in its context menu or press I while hovering over it. You can see the keyframes in e.g. the Graph Editor.
Animated Strip Time#
Lets you manually specify, and animate, the frame at which the underlying action is sampled.
Note
Although the setting is called Strip Time, its value is a frame number inside the action, not inside the strip. If you have an action going from frame 1 to frame 50 that’s referenced by a strip going from frame 101 to 150, you’d set the Strip Time to 1 to see the first keyframe, not 101.
In combination with Cyclic Strip Time, this lets you play the action’s keyframes multiple times in a single strip. As an example, say that the action’s keyframes are between frames 1 and 50. If you animate the strip time to instead go from 1 to 100, the keyframes will play twice (at twice the speed).
In practice, however, it’s easier to use the Repeat setting described below.
Action Clip#
Reference
- Panel:
Sidebar region ‣ Strip ‣ Action Clip

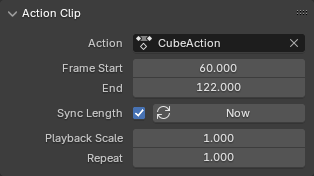
Action Clip panel.#
Contains properties specific to Action strips.
- Action
The action referenced by the strip.
- Frame Start, End
How much of the action to use. By adjusting these, you can crop or extend the action (and the strip, as its Frame End will change accordingly). If you extend the action, F-Curve Extrapolation will kick in.
One case where these settings can be useful is in cyclic animation where the first and last keyframes of the action have the same value (meaning this value applies for two frames when the animation restarts). By reducing the Frame End, you can exclude the last keyframe and have the value apply for only one frame instead.
- Sync Length
Automatically sets Frame Start/End to the action’s first/last keyframe when exiting Tweak Mode.
- Now
Sets Frame Start/End to the action’s first/last keyframe.
- Playback Scale
Makes the animation play more quickly (scale < 1) or slowly (scale > 1) than the original action.
- Repeat
Makes the action play multiple times.
Action#
Reference
- Panel:
Sidebar region ‣ Strip ‣ Action
See Action Properties.
Modifiers#
Reference
- Panel:
Sidebar region ‣ Modifiers
Strip modifiers let you make non-destructive changes to all the curves inside the strip’s action.
See F-Curve Modifiers.