Installation on Windows
Ta vodič se osredotoča na naslednje teme:
Nameščanje Pythona (ki bo „pretvoril“ izvorne datoteke v HTML)
Nameščanje Pythona
Download the Python installation package for Windows. In this guide version 3.9.x is used.
S pomočjo čarovnika za namestitev namestite Pythona. Prosimo, prepričajte se, da med namestitvijo odkljukate možnost „Add Python to PATH“:
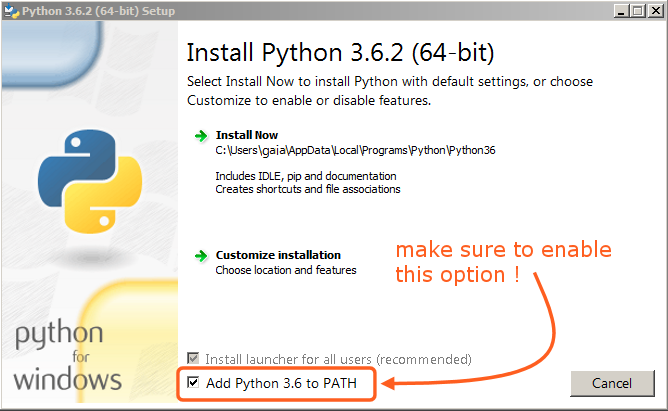
Ta možnost mora biti omogočena, da boste lahko priročnik zgradili s skripto make.
Vse ostale nastavitve lahko pustite take, kot so.
Installing Git and Downloading the Repository
In this guide, we will use the official Git client, though any Git client will do.
Download and install Git for Windows.
Preprosto odjavite (ang. check out) repozitorij z ukazom:
cd ~
git lfs install
git clone https://projects.blender.org/blender/blender-manual.git
Repozitorij se bo začel prenašati, kar utegne trajati nekaj minut, odvisno od vaše internetne povezave.
Opomba
This process can be completed using a graphical Git client, in that case you will just use the repository address in the URL field provided by your client:
https://projects.blender.org/blender/blender-manual.git
Nastavljanje okolja za gradnjo priročnika
Nasvet
It is recommended to setup and activate a virtual Python environment where dependencies will be installed:
python3 -m venv .venv
.venv/Scripts/activate
Repeat the .venv/Scripts/activate command to re-activate the virtual environment,
whenever you open a new terminal to build the documentation.
Open a Command Prompt. (Run as Administrator)
Enter the
blender-manualfolder which was just added bygit clone:cd C:\blender-manual
V tej mapi je datoteka, imenovana
requirements.txt, ki vsebuje seznam vseh odvisnih paketov, ki jih potrebujete. Namestite jih z ukazompip:pip install -r requirements.txt
Če bo šlo vse po sreči, boste ob koncu nameščanja videli sporočilo:
Successfully installed Jinja2 MarkupSafe Pygments Sphinx docutils sphinx-rtd-theme Cleaning up...
Med nameščanjem utegnete dobiti nekaj opozoril, vendar se zanje ne menite. Dosti bolj kočljivo je, če vam konzola javi napako.
Opomba
Od časa do časa se prepričajte, da imate najnovejše odvisne pakete:
pip install -r requirements.txt --upgrade