Proxy
As projects involve increasingly high-resolution footage, the performance of the video preview can decrease drastically. To combat this, Blender can generate proxies – copies of the original footage stored at a lower quality and/or resolution – to maintain a smooth editing experience without compromising visual fidelity in the end result.
The quickest way to set up proxies for videos is to simply select a Proxy Render Size in the View tab (visible when the editor is in Preview or Sequencer & Preview mode). This will automatically enable the selected proxy resolution in all the strips and start generating the downscaled video files.
You can use the Proxy tab if you want to configure proxies in more detail (or create proxies for image sequences).
Proxy Settings
Sklic
- Podokno:
Contains scene-wide proxy settings.
- Storage
How proxies are stored for the project.
- Per Strip:
Each strip can specify where to store its proxies (see below).
- Project:
All proxies are stored in one directory.
- Proxy Directory
The location to store the proxies for the project.
- Set Selected Strip Proxies
Shows a pop-over that lets you choose the resolution(s) to generate and whether to overwrite existing proxy files. Once you confirm with the Set button, your choices are applied to the selected strips. You can view and tweak the settings for individual strips in the Strip Proxy & Timecode panel (see below).
In the Preview mode, where the Proxy tab is not available, this is instead done through the menu .
- Rebuild Proxy and Timecode Indices
Generates proxies and time indices for the selected strips.
In the Preview mode, where the Proxy tab is not available, this is instead done through the menu .
Strip Proxy & Timecode
Sklic
- Podokno:

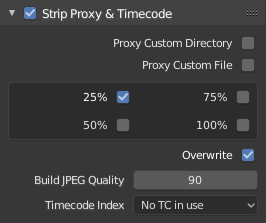
Contains strip-specific proxy settings. The checkbox in the header can be used to enable/disable proxy generation.
- Custom Proxy
- Directory
By default, all generated proxy videos are stored to the folder
<path of original footage>/BL_proxy/<clip name>, but this can be changed to a custom directory using this option.- File
Allows you to use preexisting proxies.
- Resolutions
The resolution(s) of the proxy videos to generate; multiple sizes can be selected.
- Overwrite
Whether to overwrite existing proxy files or keep them.
- Quality
The video/image quality for proxies.
- Timecode Index
When you are working with footage directly copied from a camera without preprocessing it, there might be numerous artifacts, mostly due to seeking to a given frame in the sequence. This happens because such footage usually does not have correct frame rate values in the file header. This issue can still arise when the source clip has the same frame rate as the scene settings. In order for Blender to correctly calculate the frames and frame rate there are two possible solutions:
Preprocess your video with e.g. MEncoder to repair the file header and insert the correct keyframes.
Use the Timecode Index option in Blender.
- None:
Ignore generated timecodes, seek in movie stream based on calculated timestamp.
- Record Run:
Seek based on timestamps read from movie stream, giving the best match between scene and movie times.
- Record Run No Gaps:
Effectively convert movie to an image sequence, ignoring incomplete or dropped frames, and changes in frame rate.
Opomba
Record Run is the Timecode Index which usually is best to use, but if the source file is totally damaged, Record Run No Gaps will be the only chance of getting an acceptable result.