Анотації#
The annotation tool is available in multiple editors. It can be used to add notes to e.g. 3D objects or node setups. The arrow in the screenshot below is an annotation.
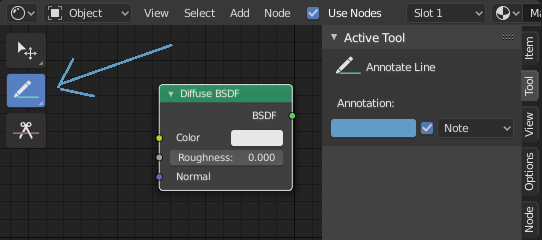
Засіб анотацій у редакторі вузлів.#
Annotation Tools#
The annotation tool can be activated in the Toolbar and has the following sub-tools:
- Annotate – Анотування
Draw free-hand strokes in the main area.
- Annotate Line – Лінія Анотування
Клацніть і тягніть для створення лінії. Optionally, you can select the arrow style for the start and end of the line.
- Annotate Polygon – Полігон Анотування
Click multiple times to create multiple connected lines, then press Return or Esc to confirm.
- Annotate Eraser – Стирач Анотування
Click and drag to remove lines. The eraser has a Radius setting found in .
Tools Settings – Устави Засобів#
Загальне#
- Колір
Adjust the color of existing and new strokes.
- Annotation Layer
A pop-over menu, showing the name of the current layer, to access the Annotation Layers.
- Placement – Розміщення
Determines where the annotations are drawn.
- 3D Cursor – 3D Курсор:
Only available in the 3D Viewport. The new annotations become part of the 3D scene; they’re drawn on an imaginary plane that goes through the 3D Cursor – 3D Курсор and is aligned to your view.
- Surface – Поверхня:
Only available in the 3D Viewport. The new annotations become part of the 3D scene; they’re drawn onto the surface of the object under the mouse. If there is no surface, you get the same behavior as 3D Cursor.
- Image – Зображення:
Only available in 2D editors such as the Image Editor. The annotations become part of the 2D space, meaning their position and size change as you pan and zoom in the editor.
- Огляд:
The new annotations are 2D and get stuck to the screen. They keep the same position, rotation and size no matter how you pan, orbit or zoom in the editor.
- Only End Points Surface Placement
Only use the first and last parts of the stroke for snapping.
- Project Onto Selected Surface Placement
Only project the strokes onto selected objects.
- Стабілізувати Штрих – Stabilize Stroke
Helps to reduce jitter of the strokes while drawing by delaying and correcting the location of points.
- Radius – Радіус
Мінімальна відстань від останньої точки перед тим, як штрих продовжується.
- Factor – Фактор
Фактор згладження, де вищі значення дають згладженіші штрихи, але рисування відчувається, ніби ви витягуєте штрих.
Annotate Line – Лінія Анотування#
- Style Start, End
The decoration to use at the beginning or end of the line segment. This can be used for example to create arrows to point out specific details in a scene.
Annotation Layers#
When the annotation tool is enabled, the settings for managing multiple layers can be found in the panel.
- Opacity – Безпрозорість
Adjusts the opacity of existing and new strokes.
- Thickness – Товщина
Наладнує товщину наявних та нових штрихів.
Onion Skin – Покрив Калькою#
Shows a ghosted image of strokes made in frames before and after the current frame. Onion skinning only works in the 3D Viewport and Sequencer. See the Grease Pencil documentation for an explanation of Onion Skinning.
- Перед/Після – Before/After
Колір для використання перед та після поточного кадру на кадрах привидів. The number defines how many frames to show before and after the current frame.