Biên Soạn
These preferences control how several tools will interact with your input.

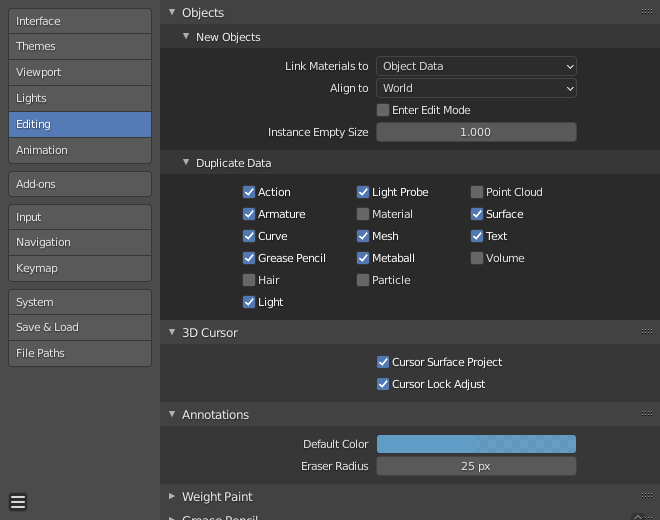
Vật Thể
Vật Thể Mới
- Kết Nối Nguyên Vật Liệu với
To understand this option properly, you need to understand how Blender works with Objects. Almost everything in Blender is organized in a hierarchy of data-blocks. A data-block can be thought of as containers for certain pieces of information. For example, the Object data-block contains information about the Object's location while the Object Data "ObData" data-block contains information about the mesh.

Example for a mesh.
A material may be linked in two different ways:
- Dữ liệu vật thể
Any created material will be created as part of the Object Data data-block.
- Vật Thể
Any created material will be created as part of the Object data-block.

A material linked to Object Data (left) and Object (right).
Xem thêm
- Canh hàng với
- Thế Giới
New objects align with world coordinates.
- Góc Nhìn
New object align with view coordinates.
- Con Trỏ 3D
New objects align to the 3D cursor's orientation.
- Chuyển Sang Chế Độ Biên Soạn
If selected, Edit Mode is automatically activated when you create a new object.
- Kích thước của Thực Thể Trống Rỗng
The display size for empties when a new collection instance is created.
Sao Chép Dữ Liệu
The Duplicate Data checkboxes define what data is copied with a duplicated object and what data remains linked. Any boxes that are checked will have their data copied along with the duplication of the object. Any boxes that are not checked will instead have their data linked from the source object that was duplicated.
For example, if you have Mesh checked, then a full copy of the mesh data is created with the new object, and each mesh will behave independently of the duplicate. If you leave the mesh box unchecked then when you change the mesh of one object, the change will be mirrored in the duplicate object.
The same rules apply to each of the checkboxes in the Duplicate Data list.
Con Trỏ 3D
- Con Trỏ dùng sự Phóng Chiếu Bề Mặt
When placing the cursor by clicking, the cursor is projected onto the surface under the cursor.
- Điều Chỉnh sự Khóa Con Trỏ
When the viewport is locked to the cursor, moving the cursor avoids the view jumping based on the new offset.
Chú Thích
- Màu Mặc Định
The default color for new Annotate layers.
- Bán Kính của Đầu Tẩy
The size of the eraser used with the Annotate Tool.
Xem thêm
Phạm vi Sơn trọng lượng tùy chỉnh
Mesh skin weighting is used to control how much a bone deforms the mesh of a character. To visualize and paint these weights, Blender uses a color ramp (from blue to green, and from yellow to red). Enabling the checkbox will enable an alternate map using a ramp starting with an empty range. Now you can create your custom map using the common color ramp options. For detailed information see the Color ramps page.
Bút Chì Dầu
- Khoảng Cách
- Manhattan
The minimum number of pixels the mouse should have moved either horizontally or vertically before the movement is recorded. Decreasing this should work better for curvy lines.
- Euclid
The minimum distance that mouse has to travel before movement is recorded.
Xem thêm
Linh Tinh/Những cái Khác
- Màu Vẽ Lồng trong Điêu Khắc
This color button allows the user to define a color to be used in the inner part of the brushes circle when in sculpt mode, and it is placed as an overlay to the brush, representing the focal point of the brush influence. The overlay color is visible only when the overlay visibility is selected (clicking at the eye to set its visibility), and the transparency of the overlay is controlled by the alpha slider located at the in the Tool Shelf.
- Lề Dịch Chuyển Nút Tự Động
Margin to use for offsetting nodes.