Bộ Điều Chỉnh Đối Xứng
The Mirror modifier mirrors a mesh along its local X, Y and/or Z axes, across the Object Origin. It can also use another object as the mirror center, then use that object's local axes instead of its own.
Tùy Chọn

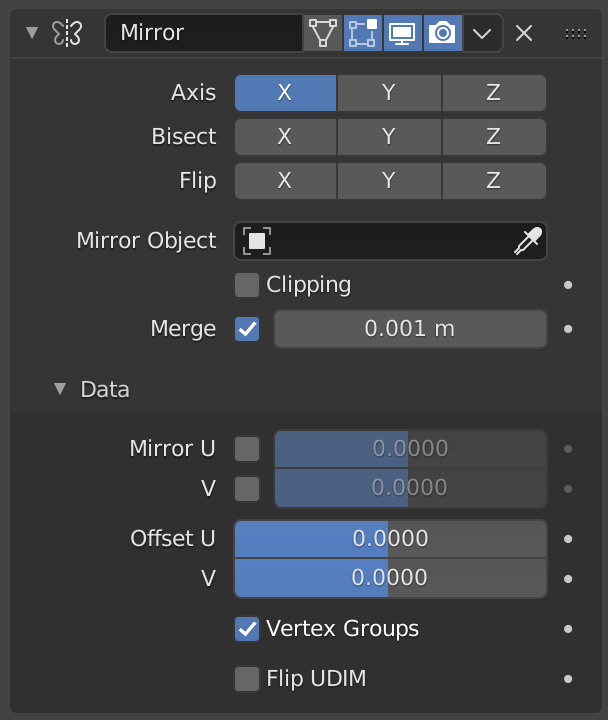
Bộ điều chỉnh Đối Xứng.
- Trục
The X, Y, Z axis along which to mirror, i.e. the axis perpendicular to the mirror plane of symmetry.
To understand how the axis applies to the mirror direction, if you were to mirror on the X axis, the positive X values of the original mesh would become the negative X values on the mirrored side.
Bạn có thể chọn vài trục này cùng một lúc, và do đó có thể tạo được nhiều bản sao Đối Xứng hơn. Với một trục thì bạn chỉ đạt được một bản sao Đối Xứng ngược chiều, với hai trục thì bạn đạt được bốn bản sao Đối Xứng, và với tất cả ba trục cùng đã được lựa chọn thì bạn có thể có được tám bản sao Đối Xứng.
- Chia Đôi
If the mesh is already on both sides of the mirror plane, it is cut by that plane, and only one side (the "negative" one by default) is kept to perform the mirror process.
- Đảo Lật
When Bisect is enabled on an axis, you can use this setting to switch the side kept and mirrored (i.e. when it is enabled, the "positive" side will be kept, instead of the "negative" one).
- Vật Thể Đối Xứng
An Object Selector to select an object (usually an empty), which position and rotation will be used to define mirror planes (instead of using the ones from the modified object).
You can animate it to move the mirror axis.
- Cắt Xén
Prevents vertices from moving through the mirror plane(s) when you transform them in Edit Mode.
If it is enabled but vertices are beyond the mirror plane and outside of the Merge Distance, the vertices will not be merged. But as soon as the vertices are within Merge Distance they are snapped together and cannot be moved beyond the mirror plane.
Ghi chú
Vertices on the mirror plane will be unable to move away from the mirror plane as long as Clipping is enabled. You must disable it to be able to move the vertices along the mirror axis again.
- Hội Nhập
Where a vertex is in the same place (within the Merge Distance) as its mirror it will be merged with the mirrored vertex.
- Khoảng Cách Hội Nhập
The maximum distance between a vertex and its mirror copy at which they are merged together (being snapped on the mirror plane). Needs Merge to be enabled.
- Khoảng Cách Phân Đôi
Những điểm đỉnh nào nằm trong khoảng cách giữa hai bề diện tách phân này sẽ bị xóa đi.
Dữ Liệu
- Đảo Lật UV
With this option you can mirror the UV texture coordinates across the middle of the image.
E.g. if you have a vertex with UV coordinates of (0.3, 0.9), its mirror copy will have UV coordinates of (0.7, 0.1).
- Lượng Dịch Chuyển UV
Amount to shift mirrored UVs on the U/V axes.
It's useful for baking (as overlapping UVs can cause artifacts to appear in the baked map), so the UVs can be moved outside the image and not used for baking, but still be used for display.
- Nhóm Điểm Đỉnh
Try to mirror existing vertex groups, with the following specific prerequisites:
The vertex groups you want to mirror must be named following the usual left/right pattern (i.e. with suffixes like ".R", ".right", ".L", etc.).
The mirror side vertex group must already exist (it will not be created automatically). It must also be completely empty (no vertices assigned to it).
- Đảo Chiều UDIM
Mirror the texture coordinates around each tile center.
Gợi ý
Many modeling tasks involve creating objects that are symmetrical. This modifier offers a simple and efficient way to do this, with real-time update of the mirror as you edit it. Once your modeling is completed you can either click Apply to make a real version of your mesh, or leave it as-is for future editing.
Định Vị Bề Diện phản chiếu đối xứng Chính Xác
To apply a Mirror modifier, it is common to have to move the object's origin onto the edge or face that is to be the axis for mirroring. This can be tricky when attempted visually.
A good technique to achieve an exact position is to select the edge, then snap Cursor to Selection. This will position the 3D Cursor in the center of the edge. Finally, use the Set Origin menu, and select Origin to 3D Cursor. This will move the object's origin (and thus, the mirror plane) to where the 3D cursor is located, and the mirroring will be exact.
An alternative is to use an empty as a Mirror Object that you move to the correct position.