Toolbar
- Tweak W
Lets you select images by clicking, and move them by dragging. Press W to cycle between this tool and Select Box.
- Select Box
Lets you select one image by clicking, or multiple images by dragging a rectangle.
- Cursor
Lets you move the 2D Cursor by clicking or dragging with LMB.
While dragging, you can press X or Y to constrain movement to an axis.
If you need extra precision, you can hold Shift to move the cursor more slowly than the mouse, or type a number to move it by an exact amount.
The header shows how far the cursor has traveled, including the distance along each axis.
Instead of this tool, you can also drag the mouse while holding Shift-RMB (works with all tools) or adjust the 2D Cursor Location in .
Note
By default, the 2D Cursor is only shown while dragging it. To make it permanently visible, enable the 2D Cursor overlay.
- Move G
Lets you move the selected images by dragging with LMB. Alternatively, you can press G, move the mouse, and finally click LMB to confirm (or RMB to cancel).
If the Active Tools gizmo is enabled, you can drag one of the colored arrows to only move along that one axis. You can also press X or Y while moving: press once to constrain to the corresponding global axis, a second time to constrain to the local axis, and a third time to remove the constraint again. Yet another way is to hold MMB and move the mouse horizontally or vertically.
If you need more precision, you can do one of the following while moving:
Hold Shift to move more slowly.
Type a number to move by an exact amount.
Use the arrow keys.
The header shows how far the image has moved, including the offset along each axis.
Instead of using this tool, you can also adjust the Position in the Sidebar’s Strip tab (only available in the Sequencer and Sequencer & Preview modes).
- Rotate R
Lets you rotate the selected images by holding LMB and moving the mouse in a circle. Alternatively, you can press R, move the mouse, and finally click LMB to confirm (or RMB to cancel).
Images are rotated around the Pivot Point, so if it’s off-center, the images will not just rotate but also move around it.
If you need more precision, you can do one of the following while rotating:
Hold Shift to rotate more slowly.
Hold Ctrl to rotate in increments of 5 degrees.
Type a number to rotate by an exact amount.
Use the arrow keys.
The header shows how much the image has rotated.
Instead of using this tool, you can also adjust the Rotation in the Sidebar’s Strip tab (only available in the Sequencer and Sequencer & Preview modes).
- Scale S
Lets you resize the selected images by dragging with LMB. Alternatively, you can press S, move the mouse, and finally click LMB to confirm (or RMB to cancel).
If the Active Tools gizmo is enabled, you can drag one of the colored lines to only scale along that one axis. You can also press X or Y while scaling: press once to constrain to the corresponding global axis, a second time to constrain to the local axis, and a third time to remove the constraint again. Yet another way is to hold MMB and move the mouse horizontally or vertically.
Images are scaled around the Pivot Point, so if it’s off-center and you scale down, the images will not just become smaller but also move towards it.
If you need more precision, you can do one of the following while scaling:
Hold Shift to scale more slowly.
Hold Ctrl to scale in increments of 10%.
Type a number to scale by an exact factor (e.g.
.5to make it half the size).Use the arrow keys.
The header shows the current scale factor.
Instead of using this tool, you can also adjust the Scale in the Sidebar’s Strip tab (only available in the Sequencer and Sequencer & Preview modes).
- Transform
Lets you move, rotate, and scale images all using one tool.
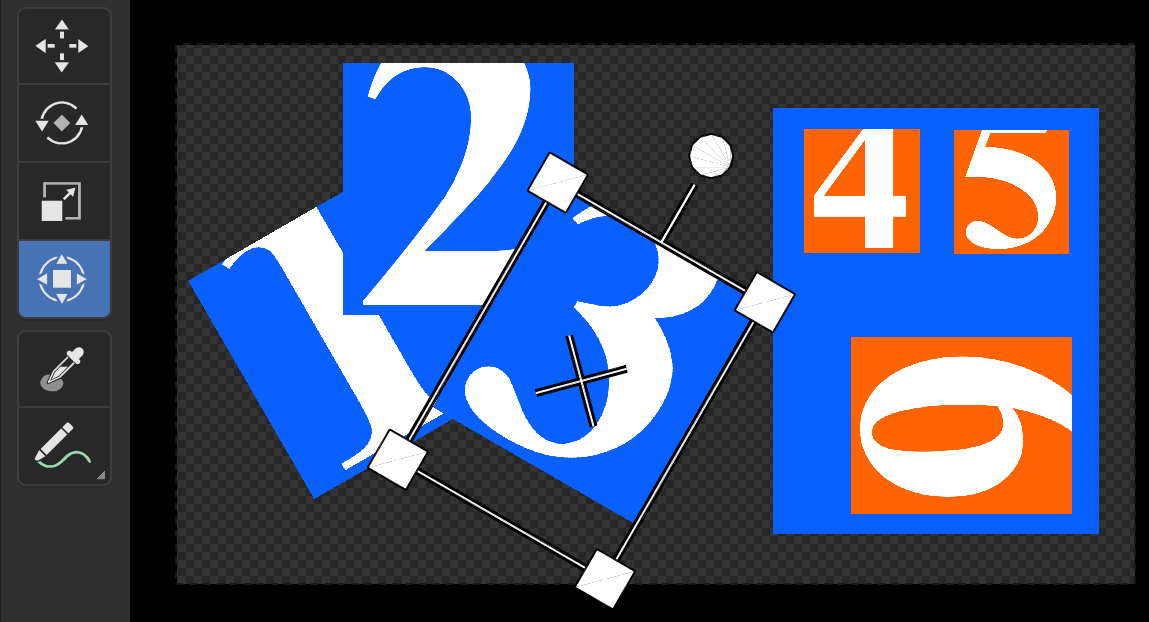
The Transform tool
It works as follows:
Drag the cross in the center to move the image.
Drag the dot on the protruding line to rotate.
Drag one of the corners to scale equally along both axes.
Drag one of the sides to scale along just one axis.
- Sample
Lets you sample a pixel’s color by holding LMB. The editor will show the following information about it on the bottom:
The X and Y coordinates, in pixels relative to the top left corner.
The red, green, blue, and alpha components of the pixel, as decimal values between 0 and 1.
The red, green, and blue components of the pixel with Color Management applied.
The hue, saturation, value, and luminance components of the pixel with Color Management applied.
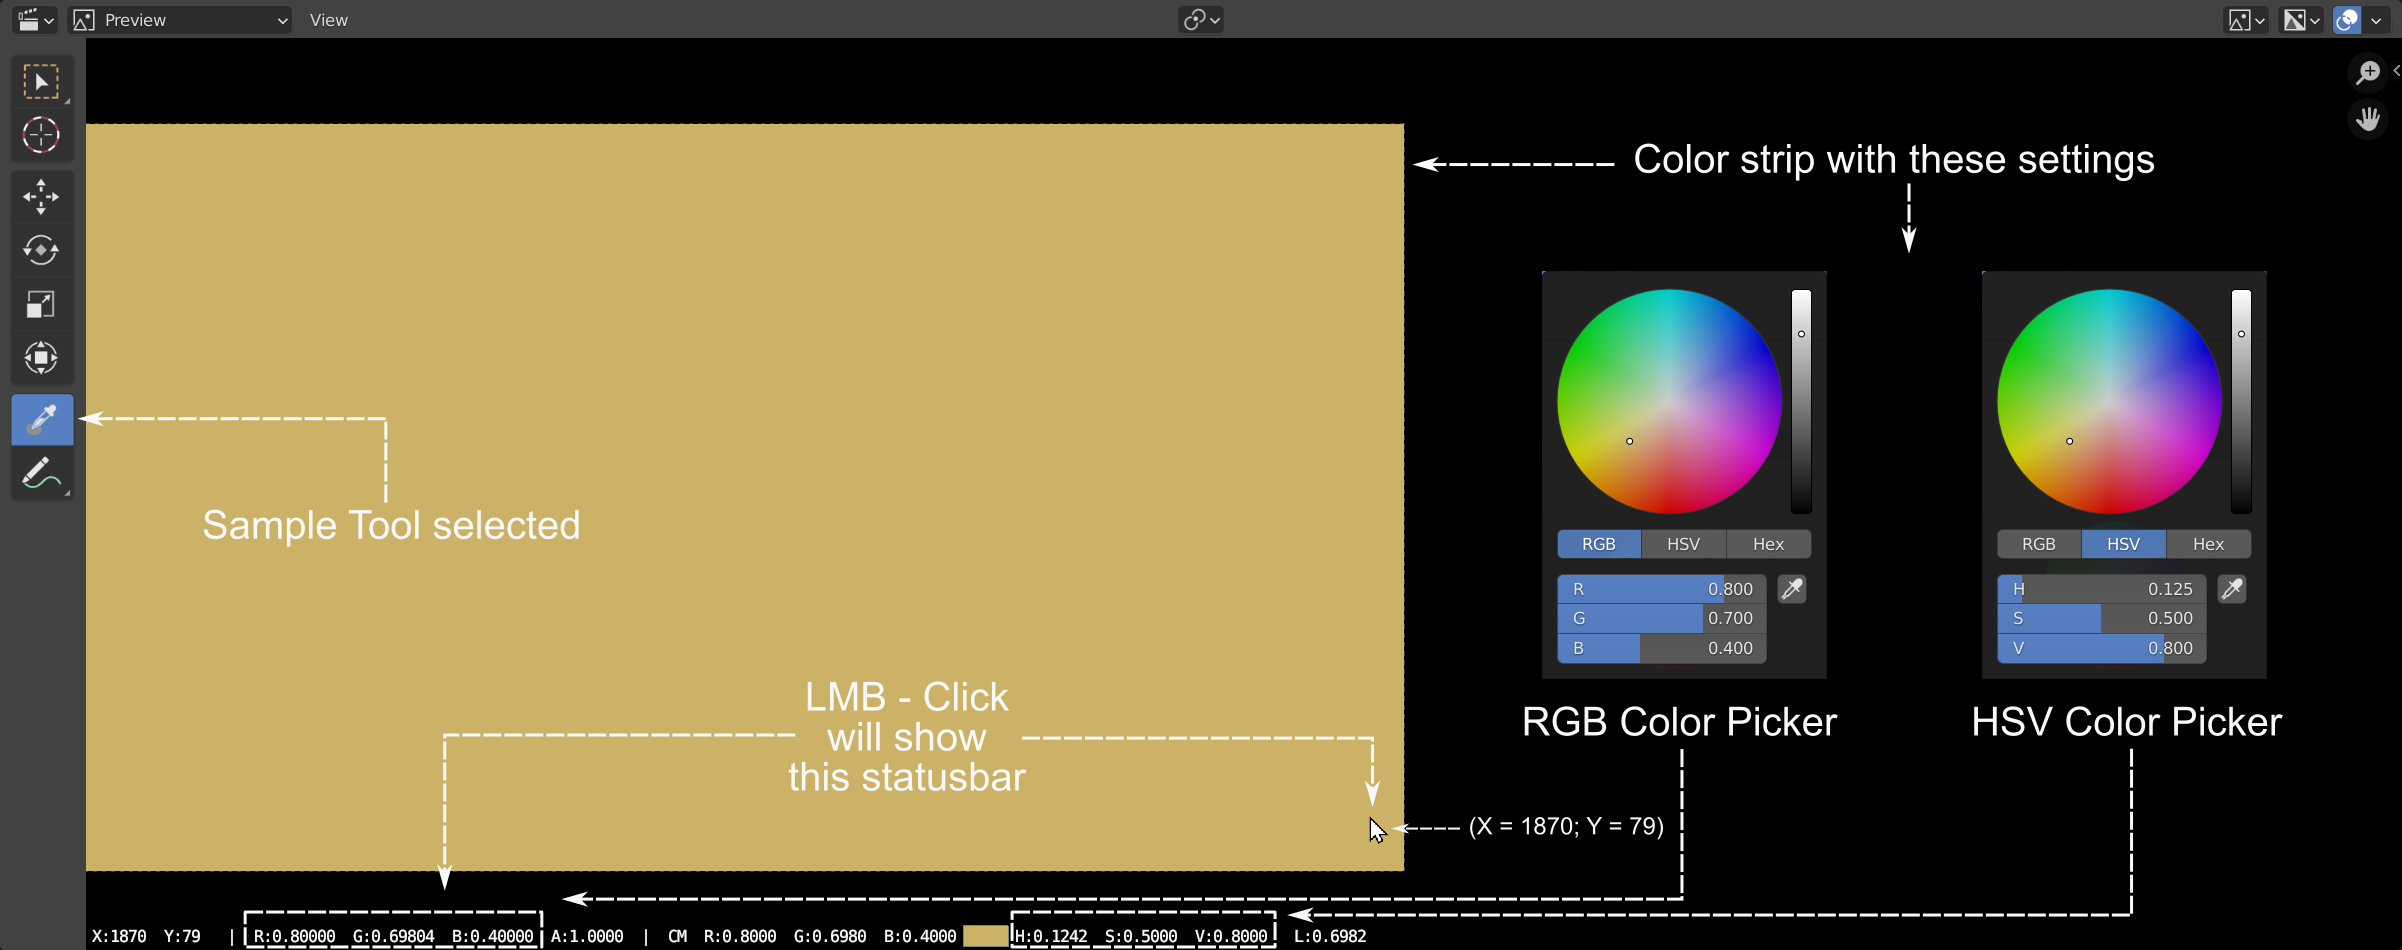
Sample tool example.
- Annotate
Draw free-hand annotations.
- Annotate Line
Draw a straight line annotation.
- Annotate Polygon
Draw a polygon annotation.
- Annotate Eraser
Erase previously drawn annotations.