Object
Visibility
Reference
- Panel:
See also
There are several other general visibility properties.
- Mask – Shadow Catcher
Enables the object to only receive shadow rays. It is to be noted that, shadow catcher objects will interact with other CG objects via indirect light interaction. This simplifies compositing CGI elements into real-world footage.
Note
The Shadow Catcher outputs different results depending on if the Shadow Catcher pass is enabled in Render Layer settings. With the Shadow Catcher pass enabled, all indirect light interactions are captured. With it disabled, a simple approximation is used instead. The simple approximation is used in viewport rendering.
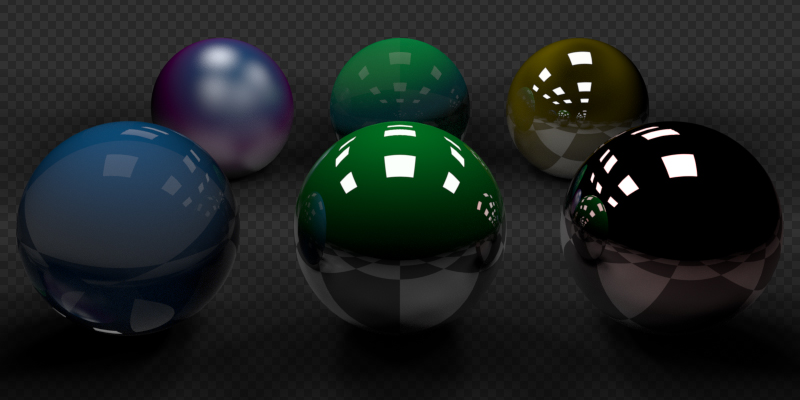
Example of the shadow catcher. Note how the material of the plane can still be viewed in the spheres.
Ray Visibility
Objects can be set to be invisible to particular ray types. This can be used, for example, to make an emitting mesh invisible to camera rays. For instanced objects, visibility is inherited; if the parent object is hidden for some ray types, the children will be hidden for these too.
In terms of performance, using these options is more efficient that using a shader node setup that achieves the same effect. Objects invisible to a certain ray will be skipped in ray traversal already, leading to fewer ray casts and shader executions.
- Camera
Makes the object visible to the Camera; this includes the viewport’s perspective in viewport rendering.
- Diffuse
Makes the object visible in diffuse rays.
- Glossy
Makes the object visible in glossy rays.
- Transmission
Makes the object visible in transmission rays.
- Volume Scatter
Makes the object visible in volumetric scatter rays.
- Shadow
Enables the object to cast shadows.
Culling
In order to activate these options the respectively camera cull options have to be enabled in the scene simplify panel.
- Use Camera Cull
Ignore and this way make objects invisible to rays outside of the camera frustum.
- Use Distance Cull
Will cull any objects further from the camera than a given distance. When used in combination with camera frustum culling, this can be used to avoid culling nearby objects that are outside the camera frustum, but still visible in reflections. It is also useful to cull small objects far from the camera.
Motion Blur
Reference
- Panel:
Each object has its own motion blur settings along with the Scene Level Motion Blur. These settings can be found in the Object Properties tab of the Properties.
Note
This option only applies to the motion of the object itself. Disabling it does not affect motion blur from other sources, such as camera motion or animated focal length.
- Steps
Controls accuracy of deformation motion blur, more steps uses more memory. The actual number of time steps is \(2^{steps -1}\).
- Deformation
Enables motion blur for deformed meshes such as animated characters, including hair.
Warning
An object modifier setup that changes mesh topology over time can not render deformation motion blur correctly. Deformation blur should be disabled for such objects. Common examples of this are animated Booleans, Deformation before Edge Split, Remesh, Skin or Decimate modifiers.
Shading
Reference
- Panel:
Shadow Terminator
- Geometry Offset
Offset rays from the surface to reduce shadow terminator artifacts on low-poly geometry. Higher values affect more triangles, a value of one affecting all triangles and zero having no effect. The default value only affects triangles at grazing angles to light and should eliminate most artifacts.
Unlike the Shading Offset, this option has little affect on the lighting making it the preferable method to handle shadow terminator artifacts.
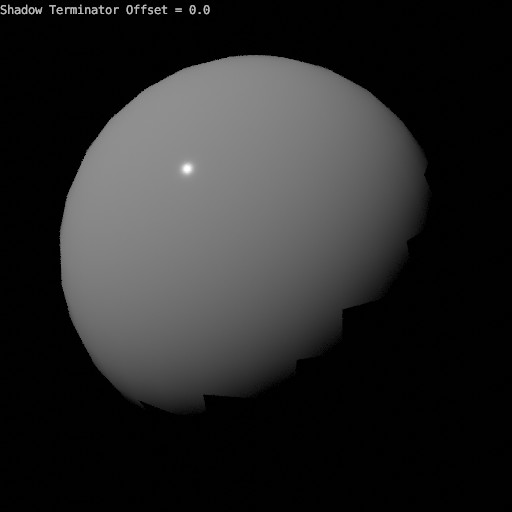
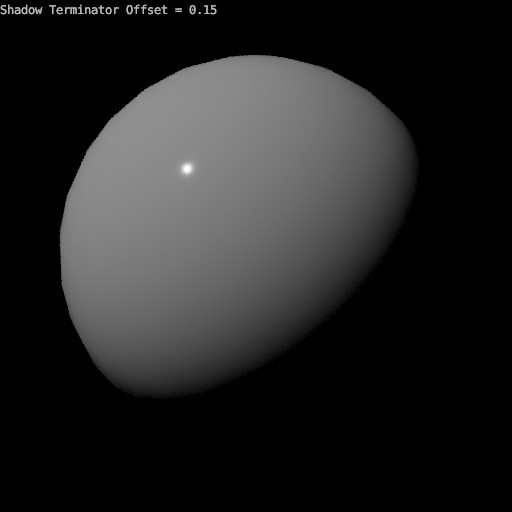
- Shading Offset
Pushes the shadow terminator (the line that divides the light and dark) towards the light to hide artifacts on low-poly geometry such as the ones below:
Note
This property artificially alters the scene’s lighting and is not energy conserving and consequently not physically accurate (see Geometry Offset instead).
Fast GI Approximation
- AO Distance
Override for the world’s AO Distance, if the value is zero the world’s distance is used.
Caustics
Mark objects as caustic casters or receivers. This is used in conjunction with a Light or World Shader with Shadow Caustics enabled to selectively speed up caustic rendering of objects in your scene.
Note
The rendering technique used to speed up the rendering of caustics is based on MNEE. There are a number of limitations with this technique and its implementation in Cycles:
Only refractive caustics in the shadows of objects work. Caustics from reflections or caustics that fall outside shadows are not rendered with this technique.
MNEE Caustics are an approximation of caustics and will produce physically inaccurate results in many situations. Examples include incorrect brightnesses and the incorrect representation of caustics caused by rough or curved surfaces.
In complex materials with multiple refractive BSDFs, MNEE will only generate caustics for one of the BSDFs.
Filter Glossy settings are ignored when using MNEE for refractive caustics.
MNEE Caustic rays can pass through up to 6 Caustic Caster surfaces between a Caustic Receiver and a Shadow Caustic light before the ray is terminated and caustics are ignored.
The Ambient Occlusion and Bevel nodes will not produce a valid result on objects that are a Caustic caster or Caustic receiver while the scene contains a active Caustic caster, Caustic receiver, and Shadow Caustic Light.
MNEE Caustics only work if the caustic caster has smooth normals.
Volumetric materials are not considered when calculating MNEE caustics.
Bump and normal maps are ignored when calculating caustics.
GPU rendering using Radeon RX 6000 series HIP devices on Windows is not supported.
- Cast Shadow Caustics
Mark an object as a caustic caster.
- Receive Shadow Caustics
Mark an object as a caustic receiver.

Light Group
- Light Group
Select the Light Group to add the current Object or Light too.
- Add Light Group
If the name input into the Light Group field does not align with an existing Light Group, then pressing this button will create a Light Group with that name and assign the selected Object or Light to it.
Light Linking
Limit light influence to specified objects, with Light Linking.
- Receiver Collection
Collection of objects that will receive light emitted from the object.
Shadow Linking
Limit shadows to specified objects, with Light Linking.
- Shadow Blocker Collection
Collection of objects that will act as shadow blockers for light emitted from the object.