Collada (Legacy)
중요
COLLADA I/O support is now considered as a legacy feature in Blender, and will be removed in a future release. Please see the official announcement for more insight on this topic.
The COLLADA™ module has been implemented as a flexible tool for exporting and importing .dae files.
A design goal is to provide a set of parameters which should make it possible
to export/import Collada files from/to a variety of tools.
But please be aware that the Collada module is still a work in progress.
So it may be possible that your particular usage scenario is not yet supported.
Collada Exporter
Reference
- Menu:

Operator Presets
There are two operator presets (see top of the Sidebar) for Second Life (SL) users:
Second Life Static – is good for exporting static meshes.
Second Life Rigged – is good for exporting the SL default character.
참고
Special Notes for Second Life users:
Please use the Operator presets. All other export settings will not work for Second Life.
The character orientation needs to be such that the character looks towards positive X.
Scale and Rotation must be applied before the export!
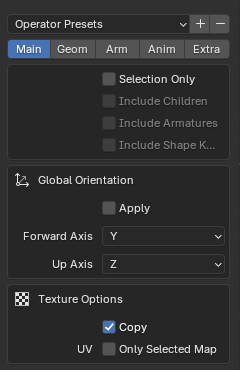
Main
- Selection Only
When Selection Only is enabled, then only the selected objects will be exported. Otherwise the entire scene is exported with all visible and all invisible objects.
- Include Children
When this option is enabled then all children of the selected objects will also be exported regardless of their selection state.
힌트
You can select only an armature, then using this option, all rigged meshes attached to the armature will also be exported.
- Include Armatures
When this option is enabled, then all armatures related to the selected objects will also be exported regardless of their selection state.
힌트
You can select only the objects, then in the exporter enable this option to export the armature data also.
- Include Shape Keys
Includes the application of shape keys by exporting meshes with the current shape key configuration baked in.
Global Orientation
- Apply
Rotate all root objects to match the global orientation settings otherwise set the global orientation per Collada asset.
- Forward / Up Axis
Since many applications use a different axis for pointing upwards, these are axis conversion for these settings, Forward and up axes – By mapping these to different axes you can convert rotations between applications default up and forward axes.
Blender uses Y forward, Z up (since the front view looks along the +Y direction). For example, it is common for applications to use Y as the up axis, in that case -Z forward, Y up is needed.
Texture Options
- Copy
When you export images either material based image textures, then the exporter creates absolute file references in the export file.
But if the Copy option is enabled, the exporter will create copies of the images instead and place the copies besides the export file. In that case the file references are made relative.
- Only Selected UV Map
When your mesh contains multiple UV layers, then Blender exports all layers by default. This option allows you to only export the active (selected) UV layer.
Geometry
Export Data Options
- Triangulate
The mesh can be triangulated on-the-fly. The triangulation is based on the same function which is used in the Triangulate Faces tool for triangulating the current selection of faces. For full control over the triangulation you can do this manually before exporting. However, this option allows to apply the triangulation only on the exported data; the mesh itself is not affected.
- Apply Modifiers
Export objects using the evaluated mesh, meaning the resulting mesh after all Modifiers have been calculated.
- Resolution
Controls whether to apply the 3D Viewport resolution or the render resolution for modifiers that provide a preview mode and a render mode.
- 변형
Collada supports two types of transformation matrix specifications. Either as
<Matrix>or as a set of transformation decompositions (for move, rotate and scale). Note that the exporter will not strictly follow this option setting, but will rather take it as a hint to use the option if ever possible. This is so because some of the exported data types have specific rules about how the transformation matrix has to be exported. This is ongoing development and a less ambiguous method may be provided in the future.
Armature
Armature Options
- Deform Bones Only
When this option is enabled, then the exporter strips all non-deforming bones from the exported armatures. This option is useful when your armatures contain control bones which are not actually part of the character skeleton. For example you can export the Avastar rig with this option enabled. The resulting exported rig is compatible with Second Life. But please note the restrictions further below.
- Export to SL/OpenSim
When this option is enabled, some issues with bone orientation are calculated differently and is designed to be used to export to Second Life or OpenSim.
This is only relevant for rigged meshes, for static meshes it just does nothing at all.
애니메이션
Extra
Collada Options
- Use Object Instances
In Blender you can reuse the same mesh for multiple objects. This is named “object instantiation”. When you enable this option, then Blender will propagate object instantiation to the Collada file.
- Use Blender Profile
Collada can be extended with tool specific data (profiles). Blender has its own (unofficial) profile that allows to export rig information into the Collada file. Later It can be used to reconstruct the rig when it should ever be necessary to import a dae file back into Blender.
- Sort by Object Name
The export order of data is bound to internal object order and it can not be influenced in a reliable way. This option ensures that the Geometry nodes and the Object nodes are both exported in alphabetical order.
- Keep Bind Info
When a rig is imported to Blender, the rig’s bind pose will be used as Blender’s rest pose. So all Matrix information of the original rest pose is lost. But in some cases you may want to preserve the original rig information. This option checks each bone for having two arrays:
rest_mat– an array of 16 floats which represent the bone’s original rest-pose matrix.bind_mat– an array of 16 floats which represent the bone’s original bind-pose matrix.
If the arrays are present, then those arrays will be used instead of the current rest pose/bind pose. Those two arrays are either created by a previous Collada import (see Collada Importer below), or they can be created manually, or by an add-on (script based).
Collada Importer
Reference
- Menu:

The Collada importer is mostly driven by the imported data. There is one option for controlling the import units:
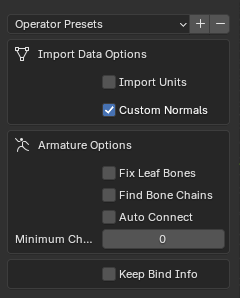
Import Data Options
- Custom Normals
Use the mesh normals defined in the collada file, if they are defined, otherwise Blender will recompute them during the import process.
- Import Units
If not enabled the imported data will be rescaled according to the currently used unit system. If this option is enabled, then Blender will adjust itself to the unit system as provided by the Collada file.
Armature Options
- Fix Leaf Bones
Collada only records “joints” which is mostly similar to Blender’s bone heads. But when you import a Collada file then the bone head/tail are not defined. This does not matter for connected bones where the bone parent only has one child. In that case the parent bone’s end location is adjusted to the child’s joint position. But especially for unconnected bones and for bones with more than one child a problem arises.
When the Fix Leaf Bones option is enabled then Blender tries to guess where the bone head/tail of unconnected bones would best be placed. If the option is disabled, then the bone head/tail are placed at an offset along the Y axis. That is why bones often point towards the Y axis.
- Find Bone Chains
When a bone has multiple children, then it is not defined which (if any) of the children should be connected to the bone. When the Find Bone Chains option is enabled, then Blender determines the longest bone chain (of children) for each bone. All bones along this chain will then be auto connected.
If the option is disabled, then children will only be connected to parents, if the parent has only one child. But see the Auto Connect option below.
- Auto Connect
When this option is enabled, then children will automatically be connected to their parents, if the parent has only one child.
- Keep Bind Info
When this option is enabled, then the importer creates two custom properties for each bone:
rest_mat– an array of 16 floats which represent the bone’s original rest-pose matrix.bind_mat– an array of 16 floats which represent the bone’s original bind-pose matrix.
Those two arrays can later be used when you want to export the rig again and be sure the original rest pose/bind pose combination must be used.
Technical Details
Mesh
Import
Supported geometry types are:
Tris (not tested)
Polylist
Polygons
N-gons
Tri-fans (not tested)
Lines
Export
Mesh data is exported as <polylist>, <lines> and <vertices>.
가볍게(Light)
Import
Blender does a best effort on importing lights from a dae-file.
If a Blender profile is detected for lights, all values from these will be used instead.
This ensures full re-import from a Blender exported dae-file. <extra> support has been added in Blender 2.57.
Export
A Blender profile for lights has been added through the <extra> tag.
The entire Light struct from Blender will be exported through this profile,
with the exception of light curve falloff.
애니메이션
Export & Import
Support for object (mesh, camera, light) transform animations. Only Euler rotations, which is the default option for Objects, can be exported. For armature bone animations, Euler and quaternion rotation types are supported.
Import and export of animations for the following parameters are supported:
가볍게(Light)
카메라
Material effects
Non-skin controlling armature bone animation.
Animations of armatures with skin deforming bones.
Animations of armatures in Object Mode.
Fully rigified armature animations (referring to the Rigify add-on). For export of rigified armature animations:
Run the Bake Action operator.
If you have only the deform bones selected check Only Selected. This will give smaller dae. Otherwise uncheck Only Selected.
Check Clear Constraints.
Bake Action.
Select the mesh and the deform bones. Then export to Collada while checking only selected option. (Selecting only the Mesh and bones is not strictly necessary. Selecting and export only selected will give smaller dae.)
For bone nodes which are leaf nodes in the armature tree,
or if a bone has more than one child, a Blender profile for tip with an <extra> tag,
is added for those joint nodes. To correctly derive the bone-to-tail location on re-import.
참고
Important Things to Remember
Object and data-block names are constrained to 21 characters (bytes).
UV layer names are constrained to 32 characters (bytes).
Only armature animation on mesh, single skin controller.
No support for modifiers yet.
When importing a dae-file that has <instance_node> on exporting
this information is essentially lost and these nodes will be <node>s.