Shrinkwrap Constraint
The Shrinkwrap constraint is the “object counterpart” of the Shrinkwrap Modifier. It moves the owner origin and therefore the owner object’s location to the surface of its target. This implies that the target must have a surface; thus, you can only use meshes as targets.
Options

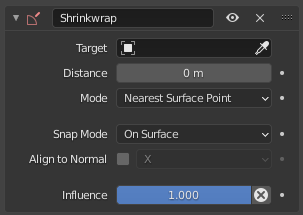
Shrinkwrap panel.
- Target
Data ID used to select the constraint’s target, which must be a mesh object, and is not functional (red state) when it has none. See common constraint properties for more information.
- Distance
This number field controls the offset of the owner from the shrunk computed position on the target’s surface.
- 영향
Constraint가 오브젝트에 미치는 영향의 백분율을 제어합니다. 자세한 내용은 공통 common constraint properties 을 참조합니다.
Mode
This selector allows you to select which method to use to compute the point on the target’s surface to which to move the owner’s origin. You have these options:
Nearest Surface Point
The chosen target’s surface’s point will be the nearest one to the original owner’s location. This is the default and most commonly useful option.
Projection
The target’s surface point is determined by projecting the owner’s origin along a given axis.
- Project Axis
This axis is controlled by the radio buttons that show up when you select this type. This mean the projection axis can only be aligned with one of the three axes, or their opposites. When the projection of the owner’s origin along the selected direction does not hit the target’s surface, the owner’s location is left unchanged.
+X, +Y, +Z, -X, -Y, -Z
- Space
Coordinate space in which the axis direction is specified.
- Distance
Distance cutoff after which projection is assumed to have failed, leaving the location unchanged.
- Project Opposite
In addition to the selected projection axis, project in the opposite direction and choose the closest hit.
- Face Cull
This radio button allows you to prevent any projection over the “front side” (respectively the “back side”) of the target’s faces. The “side” of a face is determined by its normal (front being the side “from where” the normal “originates”).
Off, Front, Back
- Invert Cull
When used with Project Opposite and Face Culling, it inverts the Front or Back cull choice for the opposite direction.
Nearest Vertex
This method is very similar to the Nearest Surface Point one, except that the owner’s possible shrink locations are limited to the target’s vertices.
This method doesn’t support the Snap Mode setting described below.
Target Normal Projection
This method is similar to Nearest Surface Point, but produces a much smoother projection in return for being significantly slower.
Instead of finding the closest point, it searches for the nearest point that has its interpolated smooth normal pointing towards or away from the original owner position. Non-manifold boundary edges are specially handled as infinitely thin cylinders that emit normals in all perpendicular directions; ignores flat shading.
Snap Mode
Most Shrinkwrap types support an additional setting to control how the owner is moved to the target point selected by the methods described above. Some of the choices only differ if Distance is not zero.
- On Surface
The owner location is always changed. The offset is applied along the projection line connecting the original owner location and selected target point towards the original position.
- Outside Surface
Like On Surface, but the offset is always applied towards the outside of the target.
- Above Surface
Like On Surface, but the offset is applied along the smooth normal of the target.
- Inside
The owner is not moved if it is already inside the target. Offset shrinks the allowed volume towards the inside along the projection line.
- 외부
The owner is not moved if it is already outside the target. Offset expands the exclusion volume towards the outside along the projection line.
The Inside and Outside options can be used for very crude collision detection. The inside vs outside determination is done based on the target normal and is not always stable near 90 degree and sharper angles in the target mesh.
Align To Normal
Whenever Snap Mode is available, it is also possible to align the specified local axis of the object to the smooth normal of the target at the selected point. The axis is selected via radio buttons.
The alignment is performed via smallest rotation, like in Damped Track constraint.