Image Texture Node
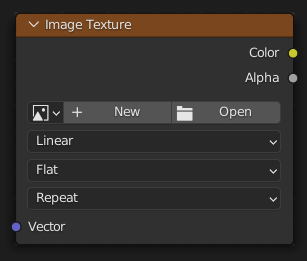
Used for applying an image as a texture.
Inputs
- Vector
3D coordinate that’s projected onto the 2D image using the selected Projection method. The node then outputs the color and alpha at this projected point.
This slot is usually connected to an output of the Texture Coordinate Node. If left unconnected, the coordinate is taken from the object’s active UV map (with Z = 0).
Properties
- Image
Image data-block to use.
- Interpolation
Method to scale images up or down for rendering.
- Linear:
Regular quality interpolation.
- Cubic:
Smoother, better quality interpolation. Bump maps should use this for best results.
- Closest:
No interpolation (nearest neighbor). Useful for rendering pixel art.
- Smart:
Cycles Only Only for Open Shading Language. Use cubic interpolation when scaling up and linear when scaling down, for better performance and sharpness.
- Projection
How to project Vector onto the image for arriving at a color.
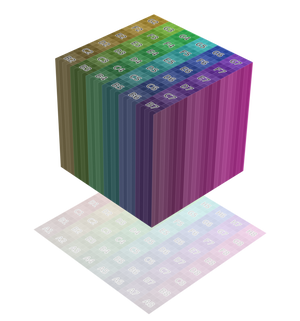
- Flat:
Place the image in a unit square (stretching from (0, 0, 0) to (1, 1, 0)) and project the Vector vertically onto it. This projection is typically used in combination with UV maps.
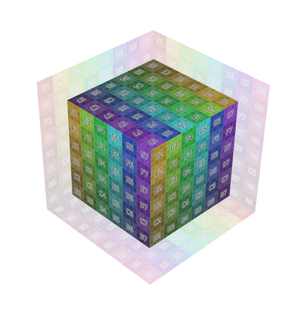
- Box:
Place the image on each side of a unit cube (stretching from (0, 0, 0) to (1, 1, 1)) and project the Vector onto this cube, along the axis that’s closest to the mesh normal. This projection is commonly used in architectural models considering these have lots of box-shaped objects.
- Blend
Rather than projecting onto just one side (which creates sharp transitions), project onto multiple sides and blend the results together. The higher the value, the more blending and the smoother the result.
- Sphere:
Wrap the image around a sphere with origin (0.5, 0.5, 0.5), and project the Vector from this origin onto this sphere. This projection is, of course, perfect for spherical objects such as planets, and is also useful for organic objects.
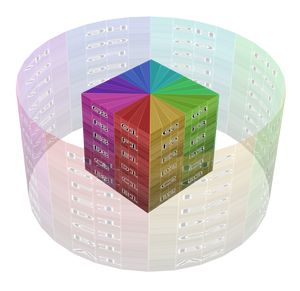
- Tube:
Wrap the image around a cylinder with base (0.5, 0.5, 0) and height 1, and project the Vector horizontally from the central axis onto this cylinder. This projection is useful for a label on a bottle, for example. However, it’s not suited for the top or bottom side of objects.
- Extension
How the image is extrapolated if Vector lies outside the regular (0, 0, 0) to (1, 1, 1) bounds:
- Repeat:
Repeat the image horizontally and vertically (tiling).
- Extend:
Extend the image by repeating the pixels on its edges.
- Clip:
Clip to the original image size and set all the exterior pixels values to transparent black.
- Mirror:
Repeatedly flip the image horizontally and vertically.
- Source
Type of image (Single Image, Movie…). See Image Settings.
- Frames
How many frames of the Movie-type image (video) to play. Past this point, the video will be paused (unless Cyclic is enabled).
If you want to play the whole video, you can click Match Movie Length in the Image Editor’s Sidebar, then copy the Frames from there to the node.
- Start Frame
Scene frame at which the video should start playing.
- Offset
Number of frames to offset the video to an earlier point in time. (Put differently: how many frames at the start of the video to skip.)
Hint
Blender plays video textures at the scene frame rate, not their original frame rate, meaning they’ll be faster or slower than intended if these frame rates don’t match up. You can put a Driver on the Offset to work around this. Simply type the following into the field, replacing StartFrame, VideoFrameRate and SceneFrameRate by their respective numbers:
#(frame - StartFrame) * (VideoFrameRate - SceneFrameRate) / SceneFrameRate
- Cyclic
Start over after the last frame to create a continuous loop.
- Auto Refresh
Update the video texture in the 3D Viewport when moving through the timeline.
- Color Space
The Color Space the image file was saved in. See Image Settings for details.
- Alpha
How the image uses its Alpha Channel. See Image Settings for details.

Outputs
- Color
RGB color from image. If the image has transparency, the color is premultiplied if the Alpha output is used, and non-premultiplied (straight) otherwise.
- Alpha
Alpha channel from image.
Examples
Image texture from GoodTextures.com.