Stroke
The stroke settings define the behavior of the sculpted/painted stroke. Any other brush behavior and effect is applied on top of the stroke.
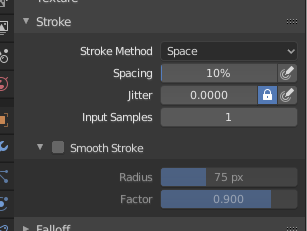
Stroke panel.
- Stroke Method Alt-E
Defines the way brush strokes are applied to the canvas.
- Dots:
Apply paint on each mouse move step. This is regardless of their distance to each other, and instead depends on the stroke speed. This means that a slower stroke will have more accumulative strength applied.
- Drag Dot:
Leaves only one dab on the canvas which can be placed by dragging.
- Space:
Creates brush stroke as a series of dots, whose distance (spacing) is determined by the Spacing setting.
- Spacing
Limits brush application to the distance specified by the percentage of the brush radius.
- (Spacing Pressure)
Brush Spacing can be affected by enabling the pressure sensitivity icon, if you are using a Graphics Tablet.
- Airbrush:
Flow of the brush continues as long as the mouse click is held (spray), determined by the Rate setting.
- Rate
Interval for how frequent the brush is applied during the stroke.
- Anchored:
Creates a single dab at the brush location. Clicking and dragging will resize the dab diameter.
- Edge to Edge
The brush location and orientation are determined by a two point circle, where the first click is one point, and dragging places the second point, opposite from the first.
- Line:
Clicking and dragging lets you define a line in screen space. The line dabs are separated by Spacing, similar to space strokes. With Alt the line stroke is constrained to 45 degree increments.
- Curve:
Defines the stroke curve with a Bézier curve (dabs are separated according to Spacing). This Bézier curve is stored in Blender as a «Paint Curve» data-block.
Use Ctrl-RMB to create the initial control point of the curve.
- Paint Curves
Paint Curves are reusable and can be stored and selected by using the Data-Block Menu menu.
- Add Points
You can define additional curve control points by using Ctrl-RMB. The handles can be defined by dragging the mouse. The stroke flows in the direction of the first control point to the second control point, and so on.
- Transforming Points
The control points and handles can be dragged with RMB (In right click select with LMB). To make sure that the handles of a control point are symmetrical, drag them using Shift-RMB. A few transform operators are supported such as moving (G), rotating (R) and scaling (S).
- Selection
The handles can be selected individually by using LMB (In right click select with RMB), extend the selection by Shift-LMB and deselect/select all by using A.
- Delete Points X
To delete a curve point, use X.
- Draw Curve Return
To confirm and execute the curved stroke, press Return or use the Draw Curve button. Alternatively, Ctrl-LMB can be used to execute the stroke (In right click select with LMB).
- Spacing Distance Sculpt Mode Only
Method used to calculate the distance to generate a new brush step.
- View:
Calculates the brush spacing relative to the view.
- Scene:
Calculates the brush spacing relative to all three dimensions of the scene using the stroke location. This avoids artifacts when sculpting across curved surfaces and keeps the spacing much more consistent.
- Adjust Strength for Spacing
Keep the brush strength consistent, even if the spacing changes. Available for the Space, Line, and Curve stroke methods.
- Dash Ratio
Ratio of samples in a cycle that the brush is enabled. This is useful to create dashed lines in texture paint or stitches in Sculpt Mode. Available for the Space, Line, and Curve stroke methods.
- Dash Length
Length of a dash cycle measured in stroke samples. This is useful to create dashed lines in texture paint or stitches in Sculpt Mode. Available for the Space, Line, and Curve stroke methods.
- Jitter
Jitter the position of each step in the brush stroke.
- (Jitter Pressure)
Brush Jitter can be affected by enabling the pressure sensitivity icon, if you are using a Graphics Tablet.
- / (Expand/Collapse)
Show or hide the customizable pressure curve.
- Custom Curve
By default this is a straight line with positive slope such that increased pressure results in more jitter of the brush positions.
For the curve controls see: Curve widget.
- Jitter Unit
Controls how the brush Jitter is measured.
- View:
The Jitter is relative to the view direction i.e. «screen space».
- Scene:
The Jitter is measured relative to all three dimensions of the scene. The unit type and scaling can be configured in the Scene Units.
- Input Samples
Recent mouse locations (input samples) are averaged together to smooth brush strokes.
- Use Unified Input Samples
Use the same brush Input Samples across all brushes.
Stabilize Stroke
Stabilize Stroke makes the stroke lag behind the cursor and creates a smoothed curve to the path of the cursor. This can be enabled pressing Shift S or by clicking the checkbox found in the header.
- Radius
Minimum distance from the last point before the stroke continues.
- Factor
A smooth factor, where higher values result in smoother strokes but the drawing sensation feels like as if you were pulling the stroke.