Animaatio
The Animation section lets you manage settings related to Animation. This includes how editors look and also some different tools properties.
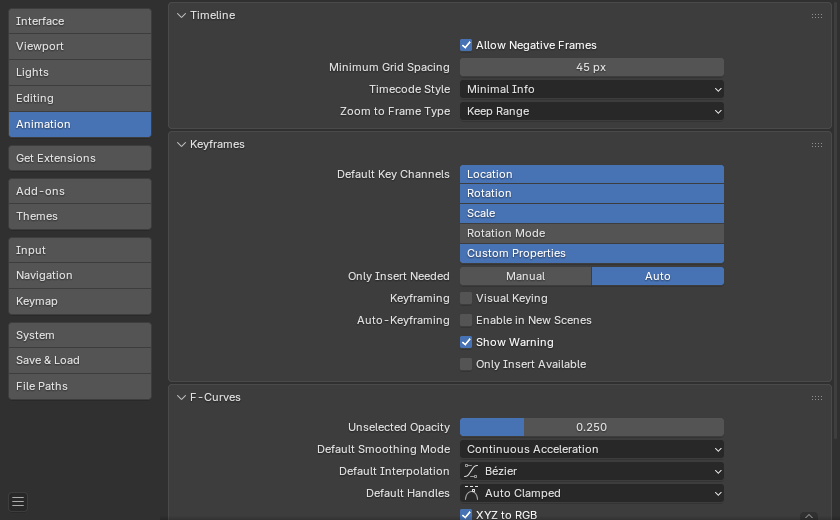
Blender Preferences Animation section.
Timeline
- Minimum Grid Spacing
The minimum number of pixels between grid lines.
- Timecode Style
Format of timecodes displayed when not displaying timing in terms of frames.
- Minimal Info:
Most compact representation, uses ’+’ as separator for sub-second frame numbers, with left and right truncation of the timecode as necessary.
- SMPTE (Full):
Full SMPTE timecode (format is HH:MM:SS:FF).
- SMPTE (Compact):
SMPTE timecode showing minutes, seconds, and frames only – hours are also shown if necessary, but not by default.
- Compact with Decimals:
Similar to SMPTE (Compact), except that the decimal part of the second is shown instead of frames.
- Only Seconds:
Direct conversion of frame numbers to seconds.
- Zoom to Frame Type
Defines what time range (around the cursor) will be displayed when the View Frame Numpad0 is performed.
- Keep Range:
The currently displayed time range is preserved.
- Seconds:
The number of seconds specified in the Zoom Seconds field will be shown around the cursor.
- Avainkehyksiä:
The number of animation keyframes defined in the Zoom Keyframes field will be shown around the cursor.
Edistynyt
- Allow Negative Frame
Playback and animations can occur during negative frame ranges.
Varoitus
Negative frames can cause issues with audio playback and exporters.
Avainkehyksiä
These settings control Keyframes which are the building blocks for animations.
- Default Key Channels
Which channels to insert keys at when no keying set is active.
- Location:
Insert keyframes for an object’s Location.
- Rotation:
Insert keyframes for an object’s Rotation.
- Scale:
Insert keyframes for an object’s Scale.
- Rotation Mode:
Insert keyframes for an object’s Rotation Mode.
- Custom Properties:
Insert keyframes for Custom Properties.
- Only Insert Needed
This will only insert keyframes if the value of the property is different.
- Manual:
When keying manually, skip inserting keys that don’t affect the animation.
- Auto:
Auto-Keying will skip inserting keys that don’t affect the animation.
- Keyframing – Visual Keying
When an object is using constraints, the object property value does not actually change. Visual Keying will add keyframes to the object property, with a value based on the visual transformation from the constraint.
- Auto-Keyframing
- Enable in New Scenes
Enables Auto Keyframe by default for new scenes.
- Show Warning
Displays a warning at the top right of the 3D Viewport, when moving objects, if Auto Keyframe is on.
- Only Insert Available
This will only add keyframes to channels of F-Curves that already exist.
Katso myös
Learn more about Auto-Keyframing.
F-Curves
These settings control how F-Curves look and their default behavior.
- Unselected Opacity
Controls the opacity of unselected F-Curves against the background of the Graph Editor.
- Default Smoothing Mode
Controls the behavior of automatic curve handles for newly created F-Curves.
- Default Interpolation
Controls the default Interpolation for newly created keyframes.
- Default Handles
Controls the default Handle for newly created F-Curves.
- XYZ to RGB
Color for X, Y, or Z animation curves (location, scale or rotation) is the same as the color for the X, Y, and Z axis.
- Channel Group Colors
Display groups and channels with colors matching their corresponding groups.
- Only Show Selected F-Curve Keyframes
Only shows the keyframes markers on the selected curves.
- F-Curve High Quality Drawing
Display F-Curves using Anti-Aliasing and other effects (disable for a better performance).