Defocus Node

The Defocus Node blurs areas of an image based on a Z depth map or mask input.
It is typically used to emulate depth of field (DOF) using a post-processing method with a Z-buffer input. But also allows to blur images that are not based on Z depth too.
Inputs
- Image
Standard color input.
- Z
Z-buffer input, but could also be a (grayscale) image used as a mask, or a single value input.
Properties
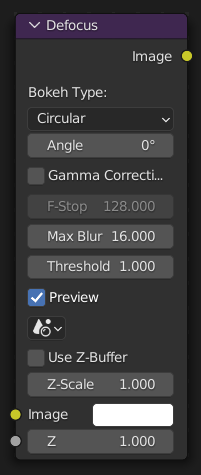
- Bokeh Type
The number of iris blades of the virtual camera’s diaphragm.
Disk (to emulate a perfect circle), Triangle (3 blades), Square (4 blades), Pentagon (5 blades), Hexagon (6 blades), Heptagon (7 blades) or Octagon (8 blades).
- Angle
This slider is deactivated, if the Bokeh Type is set to Disk. It can be used to add a rotation offset to the Bokeh shape. The value is the angle in degrees.
- Gamma Correction
Applies a gamma correction on the image before and after blurring it.
- F-Stop
This option controls the amount of focal blur in the same way as a real camera. It simulates the aperture f of a real lens’ iris, without modifying the luminosity of the picture. The default value 128 is assumed to be infinity: everything is in perfect focus. Half the value will double the amount of blur. This slider is deactivated, if No Z-buffer is enabled.
- Max Blur
This value limits the amount of blur by setting a maximum blur radius. Can be used to optimize the performance. The default value of 0 means no limit.
- Threshold CPU Compositor Only
Some artifacts, like edge bleed, may occur, if the blur difference between pixels is large. This value controls how large that blur difference considered to be safe.
Vihje
Only change this value, if there is an occurring problem with an in-focus object.
- Preview CPU Compositor Only
If enabled a limited amount of (quasi-)random samples are used to render the preview. This way of sampling introduces additional noise, which will not show up in the final render.
- Scene
To select the linked scene.
- No Z-buffer
Should be activated for a non Z-buffer in the Z input. No Z-buffer will be enabled automatically whenever a node that is not image based is connected to the Z input.
- Z Scale
Only active when No Z-buffer is enabled. When No Z-buffer is used, the input is used directly to control the blur radius (similar to F-Stop when using the Z-buffer). This parameter can be used to scale the range of the Z input.
Outputs
- Image
Standard color output.
Examples

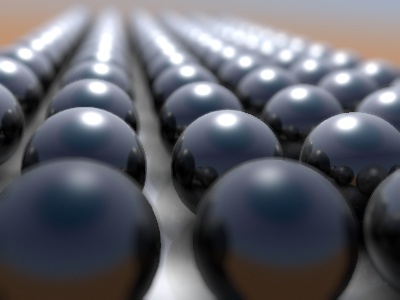
In this blend-file example, the ball array image is blurred as if it was taken by a camera with an f-stop of 2.8 resulting in a fairly narrow depth of field centered on 7.5 units from the camera. As the balls recede into the distance, they get blurrier.
No Z-Buffer Examples
Sometimes might want to have more control to blur the image. For instance, you may want to only blur one object while leaving everything else alone (or the other way around), or you want to blur the whole image uniformly all at once. The node, therefore, allows you to use something other than an actual Z-buffer as the Z input. For instance, you could connect an Image node and use a grayscale image where the color designates how much to blur the image at that point, where white is the maximum blur and black is no blur. Or, you could use a Time node to uniformly blur the image, where the time value controls the maximum blur for that frame. It may also be used to obtain a possibly slightly better DoF blur, by using a fake depth-shaded image instead of a Z-buffer. (A typical method to create the fake depth-shaded image is by using a linear blend texture for all objects in the scene or by using the ”fog/mist” fake depth shading method.) This also has the advantage that the fake depth image can have Anti-Aliasing, which is not possible with a real Z-buffer.
The parameter No Z-buffer, becomes then the main blur control. The input has to be scaled, because usually the value of a texture is only in the numeric range 0.0 to 1.0.
Camera Settings

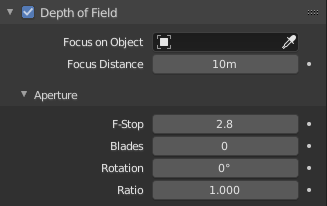
Distance setting in the Camera Depth of Field panel.
The Defocus node uses the actual camera data in your scene if supplied by a Render Layer node.
To set the point of focus, the camera now has a Distance parameter, which is shorthand for Depth of Field Distance. Use this camera parameter to set the focal plane of the camera (objects Depth of Field Distance away from the camera are in focus). Set Distance in the main Camera edit panel; the button is right below the Depth of Field.
To make the focal point visible, enable the camera Limits option, the focal point is then visible as a yellow cross along the view direction of the camera.
Hints
- Preview
In general, use preview mode, change parameters to your liking, only then disable preview mode for the final render.
- Edge Artifacts
For minimum artifacts, try to setup your scene such that differences in distances between two objects that may visibly overlap at some point are not too large.
- ”Focus Pull”
Keep in mind that this is not real DoF, only a post-processing simulation. Some things cannot be done which would be no problem for real DoF at all. A typical example is a scene with some object very close to the camera, and the camera focusing on some point far behind it. In the real world, using shallow depth of field, it is not impossible for nearby objects to become completely invisible, in effect allowing the camera to see behind them. Hollywood cinematographers use this visual characteristic to achieve the popular ”focus pull” effect, where the focus shifts from a nearby to a distant object, such that the ”other” object all but disappears. Well, this is simply not possible to do with the current post-processing method in a single pass. If you really want to achieve this effect, quite satisfactorily, here is how:
Split up your scene into ”nearby” and ”far” objects, and render them in two passes.
Now, combine the two results, each with their own ”defocus” nodes driven by the same Time node, but with one of them inverted (e.g. using a Map Value node with a Size of -1). As the defocus of one increases, the defocus on the other decreases at the same rate, creating a smooth transition.
- Aliasing at Low f-Stop Values
At very low values, less than 5, the node will start to remove any oversampling and bring the objects at DoF Distance very sharply into focus. If the object is against a contrasting background, this may lead to visible stair-stepping (aliasing) which OSA is designed to avoid. If you run into this problem:
Do your own OSA by rendering at twice the intended size and then scaling down, so that adjacent pixels are blurred together.
Use the Blur node with a setting of 2 for X and Y.
Set DoF Distance off by a little, so that the object in focus is blurred by the tiniest bit.
Use a higher f-stop, which will start the blur, and then use the Z socket to a Map Value to a Blur node to enhance the blur effect.
Rearrange the objects in your scene to use a lower-contrast background.
- No Z-Buffer
A final word of warning, since there is no way to detect if an actual Z-buffer is connected to the node, be very careful with the No Z-buffer switch. If the Z scale value happens to be large, and you forget to set it back to some low value, the values may suddenly be interpreted as huge blur radius values that will cause processing times to explode.