Node Wrangler#
Node Wrangler provides various tools that help you to work with nodes quickly and efficiently.
While many of this add-on's functions work in all supported node editors (Compositor, Shader, Geometry Nodes, and Texture Nodes) some functions only work in specific node editors, and some functions work differently per editor. Functions that only work in specific editors are marked with labels (Compositor, Shader, Geometry Nodes, Texture Nodes). Functions without labels should work for all node editors.
有効化方法#
Open Blender and go to the Preferences, then the Add-ons tab.
Find Node Wrangler and enable the add-on.
使用方法#
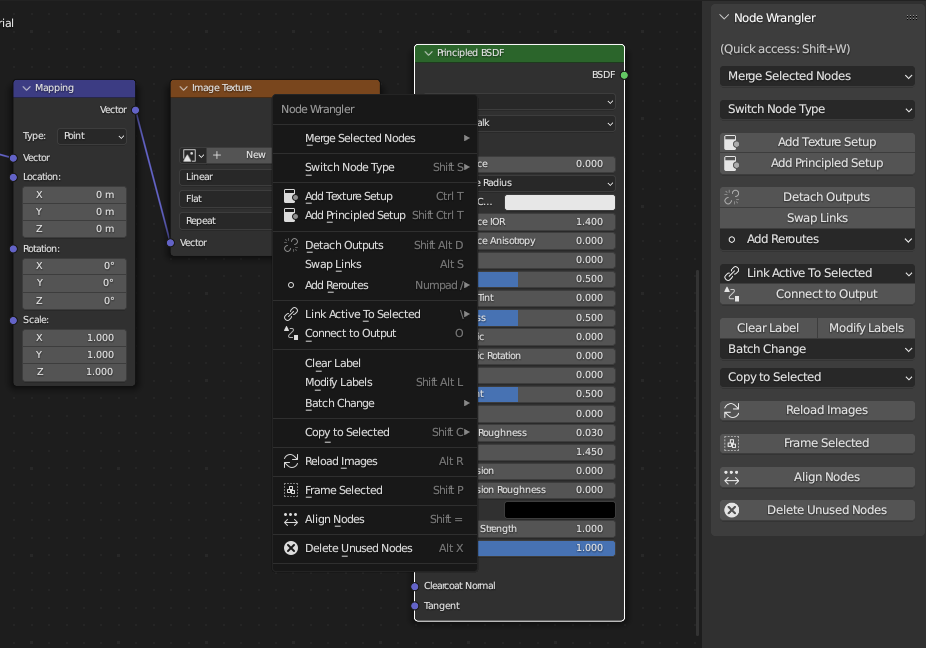
Use the panel in Sidebar of the node editor or press Shift-W to bring up the quick access menu. You can also look up the shortcut list in the add-on preferences panel.

You can access most functions from the sidebar panel or quick access menu.#
Description(詳細)#
Lazy Connect#
参照
- ショートカットキー:
Alt-RMB-drag, Shift-Alt-RMB-drag
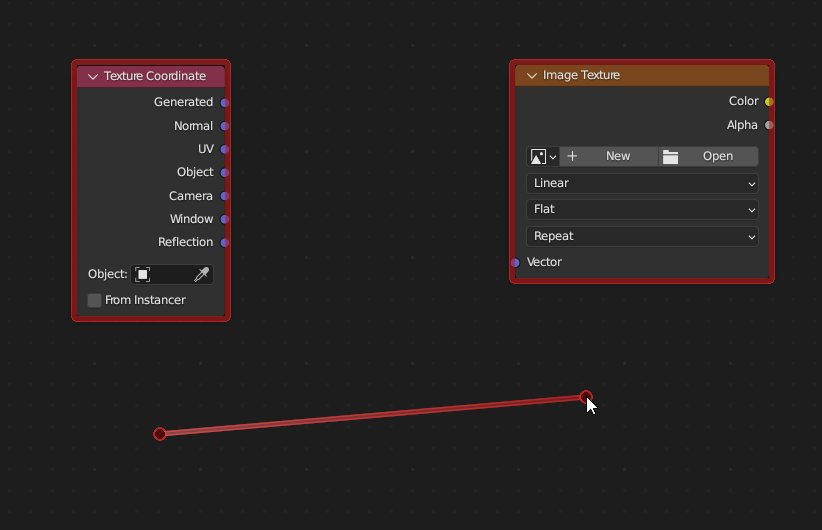
Connect two nodes without even clicking the sockets. Just drag the cursor from one node to another while holding Alt-RMB. It will select the nodes nearest the start and end points of the drag for connection, so you don't even have to click on the nodes.

Selection can be lazy.#
It tries to connect the best-matched sockets possible, based on their names, types, and whether they are open or not.
For a more precise connection, you can alternatively use Shift-Alt-RMB. It brings up menus of available inputs and outputs before connection, so you can select the exact sockets to connect. It's especially useful when working with a large node tree since you can make connections without frequently zooming in and out.
Lazy Mix#
参照
- ショートカットキー:
Shift-Ctrl-RMB-drag
Connect the outputs of two nodes into an appropriate "mix" type of node. This is the "lazy" way of selecting nodes and executing the Mix function from Merge with Automatic Type Detection.
Merge(マージ)#
参照
- Menu(メニュー):
Connect outputs of the selected nodes into a "mix" type of node (Mix, Math, Z-Combine, Alpha Over, Mix Shader, Add Shader, Join Geometry).
注釈
Merge currently does not support outputs of Integer, String, or Boolean types from Geometry Nodes.
There are automatic and manual ways of merging. The automatic ways let the add-on determine which "mix" node to use based on the types of outputs to merge. The manual ways let you decide and force connections even if the types of outputs and the "mix" node are not compatible.
注釈
Generally, the modifier part of the shortcut signifies the type of "mix" node you want to use (Ctrl for automatic detection, Ctrl-Alt for the Mix node, and Shift-Ctrl for the Math node), the non-modifier part signifies the mode of "mix" node you want to set (NumpadPlus for add, NumpadMinus for subtract, NumpadSlash for divide, and NumpadAsterisk for multiply).
Merge with Automatic Type Detection#
The automatic merge functions determine the type of "mix" node to use based on the types of outputs to merge. If it has a Color output, it will use the Mix node. It will use the Math node if both outputs are of Value type. Add Shader, Mix Shader, and Join Geometry nodes will also be used for specific cases.
- モード
- Add Ctrl-=, Ctrl-NumpadPlus
Merge into Mix or Math nodes, then set blend mode or math operation as Add. If the outputs are Shaders, it will use Add Shader node instead.
- Multiply Ctrl-8, Ctrl-NumpadAsterisk
Merge into Mix or Math nodes, then set blend mode or math operation as Multiply.
- Subtract Ctrl-Minus, Ctrl-NumpadMinus
Merge into Mix or Math nodes, then set blend mode or math operation as Subtract.
- Divide Ctrl-Slash, Ctrl-NumpadSlash
Merge into Mix or Math nodes, then set blend mode or math operation as Divide.
- Mix Ctrl-0, Ctrl-Numpad0
Merge into Mix node, then set blend mode as Mix. If the outputs are Shaders, it will use Mix Shader node instead. If the outputs are Geometry, it will use Join Geometry node.
Merge Using Mix Node#
参照
- Menu(メニュー):
Use the Mix nodes for merging, regardless of the selected nodes. You can choose the mode of the node via the menu. You can quickly set some operations by using corresponding shortcuts.
Add: Ctrl-Alt-=, Ctrl-Alt-=
Substract: Ctrl-Alt-Minus, Ctrl-Alt-NumpadMinus
Multiply: Ctrl-Alt-8, Ctrl-Alt-NumpadAsterisk
Divide: Ctrl-Alt-Slash, Ctrl-Alt-NumpadSlash
Merge Using Math Node#
参照
- Menu(メニュー):
Use the Math nodes for merging, regardless of the selected nodes. You can choose the mode of the node via the menu. You can quickly set some operations by using corresponding shortcuts.
Add: Shift-Ctrl-=, Shift-Ctrl-=
Substract: Shift-Ctrl-Minus, Shift-Ctrl-NumpadMinus
Multiply: Shift-Ctrl-8, Shift-Ctrl-NumpadAsterisk
Divide: Shift-Ctrl-Slash, Shift-Ctrl-NumpadSlash
Greater than: Ctrl-Comma
Less than: Ctrl-Period
Merge Using Z-Combine Node#
Compositor
参照
- Menu(メニュー):
- ショートカットキー:
Ctrl-NumpadPeriod
Use the Z-Combine nodes for merging. If possible, Image and Z-Depth outputs will be linked. If the current node editor is not Compositor, this will execute the Mix function from the automatic merge.
Merge Using Alpha Over Node#
Compositor
参照
- Menu(メニュー):
- ショートカットキー:
Ctrl-Alt-0
Use the Alpha Over nodes for merging. If the current node editor is not Compositor, this will execute the Mix function from the automatic merge.
Batch Change Blend Mode / Math Operation#
参照
- Menu(メニュー):
Change the blend mode or math operation of the selected Mix and Math nodes at once. You can use Alt-Up or Alt-Down to cycle through previous or next blend modes or math operations. You can also quickly set some operations by using corresponding shortcuts.
Add: Alt-=, Alt-=
Substract: Alt-Minus, Alt-NumpadMinus
Multiply: Alt-8, Alt-NumpadAsterisk
Divide: Alt-Slash, Alt-NumpadSlash
Greater than: Alt-Comma
Less than: Alt-Period
Change Mix Factor#
参照
- ショートカットキー:
Alt-Left, Shift-Alt-Left, Alt-Right, Shift-Alt-Right, Shift-Ctrl-Alt-Left, Shift-Ctrl-Alt-0, Shift-Ctrl-Alt-Right, Shift-Ctrl-Alt-1
Change the Factor value of the selected Mix and Mix Shader nodes with shortcuts.
Increase Factor by 0.1: Alt-Right
Decrease Factor by 0.1: Alt-Left
Increase Factor by 0.01: Shift-Alt-Right
Decrease Factor by 0.01: Shift-Alt-Left
Set Factor to 0.0: Shift-Ctrl-Alt-Left, Shift-Ctrl-Alt-0
Set Factor to 1.0: Shift-Ctrl-Alt-Right, Shift-Ctrl-Alt-1
Delete Unused Nodes#
参照
- Menu(メニュー):
- ショートカットキー:
Alt-X
Clean up your node tree. Delete all nodes that don't contribute to the final result.
Swap Links#
参照
- Menu(メニュー):
- ショートカットキー:
Alt-S
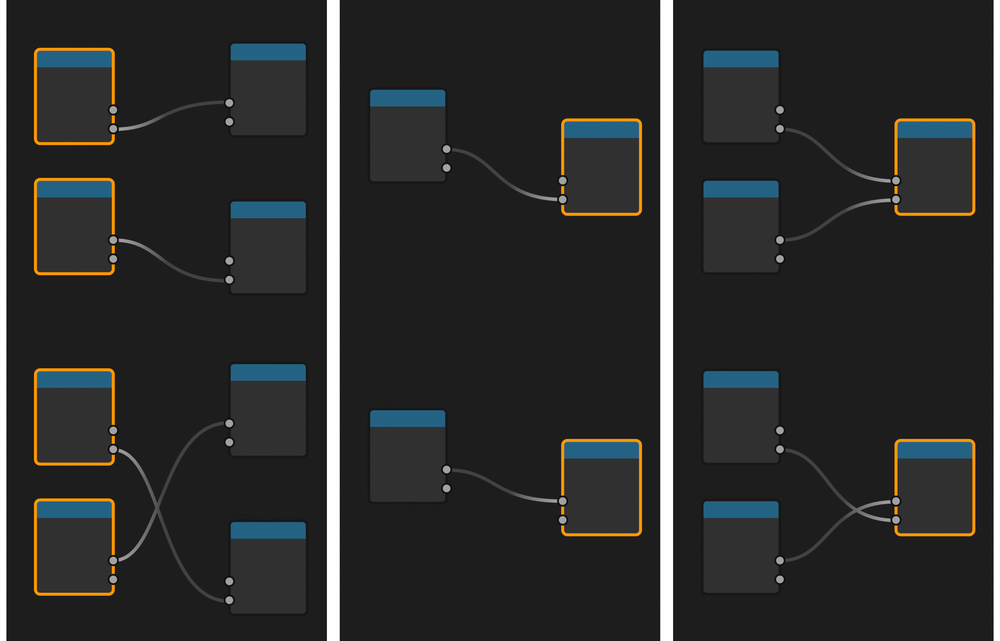
When two nodes are selected, this swaps each other's output link. Note that some output connections can be lost if the two nodes have a different number of connected outputs.
With one node selected, if the node has one linked input, it cycles the link through the available input sockets. If the node has two linked inputs, it swaps those two links. If there are more than two inputs linked, it swaps the two inputs with matching types (the Mix node's two Color inputs, for example).

Swap works differently depending on the selected nodes and their links.#
Backdrop(背景)のリセット#
Compositor
参照
- Menu(メニュー):
- ショートカットキー:
Z
Reset the position and scale of the backdrop.
Viewer Focus#
Compositor
参照
- ショートカットキー:
LMB-LMB
Set the viewer's tile center to the mouse position.
This shortcut allows you to rapidly adjust and prioritize what portions of the backdrop get recalculated first. By prioritizing a certain area, you can make adjustments to the composite and see the results faster without having to wait for the whole image to render.
Add Attribute Node#
Shader
参照
- Menu(メニュー):
Add an Attribute node with the selected attribute.
Preview Node Output#
Shader Geometry Nodes
参照
- ショートカットキー:
Shift-Ctrl-LMB for Shader, Shift-Alt-LMB for Geometry Nodes
Connect an output of the selected node to the final output of the node tree (the Material Output or World Output for Shader, the final Group Output for Geometry Nodes) to preview its output in the viewport. You can cycle through the available outputs by clicking it again while holding the modifier keys.
参考
While in Shader, any output can be connected to the final output, in Geometry Nodes, only Geometry outputs can be connected to the final output. To preview other types of outputs in Geometry Nodes, use its own Viewer Node.
参考
Also check out Connect to Output. It is a similar function but has different behaviors. It also works in all node editors.
Frame Selected(選択を表示)#
参照
- Menu(メニュー):
- ショートカットキー:
Shift-P
Insert the selected nodes into a Frame node.
Reload Images#
Compositor Shader Texture Nodes
参照
- Menu(メニュー):
- ショートカットキー:
Alt-R
Reload all of the images used in the node tree. This lets you reload the images without using the Image Editor.
Copy Settings(設定をコピー)#
参照
- Menu(メニュー):
- ショートカットキー:
Shift-C
Copy the settings of the active node to all selected nodes of the same type.
Reset Nodes#
参照
- ショートカットキー:
Backspace
Revert the settings of the selected nodes to default while maintaining connections.
Copy Label#
参照
- Menu(メニュー):
- ショートカットキー:
Shift-V, Shift-C
Copy custom labels to all of the selected nodes. You can copy them from the active node (Shift-V), from the nodes that are linked to the selected ones, or from the names of the sockets that the selected nodes are linked to. Shift-C will bring up a submenu with all available options.
Clear Label#
参照
- Menu(メニュー):
- ショートカットキー:
Alt-L
Clear the custom labels of selected nodes and revert them back to their default node names.
Modify Labels#
参照
- Menu(メニュー):
- ショートカットキー:
Shift-Alt-L
Batch rename the custom labels of selected nodes. You can add text to the beginning and the end and replace parts of the text.
Add Texture Setup#
Shader
参照
- Menu(メニュー):
- ショートカットキー:
Ctrl-T
Add a setup of a texture node, Texture Coordinate, and Mapping nodes to any shader node. If you select a texture node, it will only add the Texture Coordinate and Mapping nodes. For a background shader it will add an Environment Texture node.
Add Principled Texture Setup#
Shader
参照
- Menu(メニュー):
- ショートカットキー:
Shift-Ctrl-T
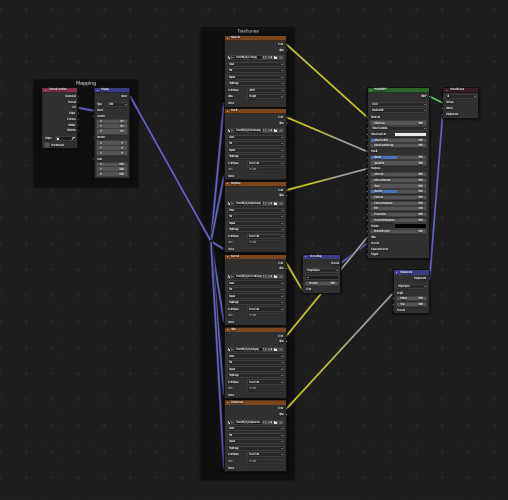
Add a principled texture setup from the selected texture files. Select a Principled BSDF node, select Add Principled Setup from the quick access menu (or press Shift-Ctrl-T), and select texture files. It automates the process of adding Image Texture nodes, loading images, selecting the appropriate Color Space, and connecting their outputs to the Principled BSDF node.
It detects the type of textures by looking at their file names. You can edit the tags used for this matching process in the add-on preferences.

Setting up these textures can take dozens of clicks, even with Node Wrangler's other tools. With Principled Texture Setup, you can reduce that to a few clicks.#
Add Reroutes to Outputs#
参照
- Menu(メニュー):
- ショートカットキー:
Slash
Add reroute nodes to each output of the selected nodes.
Link Active to Selected#
参照
- Menu(メニュー):
- ショートカットキー:
Backslash
Link the active node to the selected nodes based on various criteria.
- To All Selected
Link the active node to all selected nodes. (K) You can force it to replace existing links. (Shift-K)
- Use Node Name/Label
Link only to the selected nodes that have the same label as the active node. (') You can force it to replace existing links. (Shift-')
- Use Outputs Names
Link only when the name of the outputs matches the name or label of the selected nodes. (;) You can force it to replace existing links. (Shift-;) This is handy for replacing sources at the same time. (For example, connecting outputs from Render Layer to image (multi-layer EXR) in Compositor.)
Align Nodes#
参照
- Menu(メニュー):
- ショートカットキー:
Shift-=
Align the selected nodes horizontally or vertically. The effect is similar to scaling nodes on an axis (S X 0 or S Y 0), but it places the nodes at an even distance.
Select within Frame (Parent/Children)#
] -- Select all direct child nodes of the selected frame.
[ -- Select the direct parent frame node of the selected nodes.
Detach Outputs#
参照
- Menu(メニュー):
- ショートカットキー:
Shift-Alt-D
Detach the selected node's outputs while leaving linked inputs intact.
Connect to Output#
参照
- Menu(メニュー):
- ショートカットキー:
O
Connect the output of the selected node to the final output of the node tree (Composite in Compositor, Material Output or World Output in Shader, the final Group Output in Geometry Nodes, Output in Texture Nodes), or, if the node is inside a group, to the Group Output.
Add Image Sequence#
Compositor Shader
参照
- Menu(メニュー):
for Compositor, or for Shader
Add an Image Sequence by only selecting one image from a sequence of image files. It will automatically detect the length of the sequence and set the node appropriately.
Add Multiple Images#
Compositor Shader
参照
- Menu(メニュー):
for Compositor, or for Shader
Select multiple images and add a node for each image. (Useful for importing multiple render passes or renders for image stacking.)
参考
Please see the old Wiki for the archived original docs.
参照
- Category(カテゴリー):
Node(ノード)
- Description(詳細):
Various tools to enhance and speed up node-based workflow.
- Location(位置、場所):
or see the shortcuts of individual tools.
- File(ファイル):
node_wrangler.py
- Author(作者):
Bartek Skorupa, Greg Zaal, Sebastian Koenig, Christian Brinkmann, Florian Meyer
- License(ライセンス):
GPL
- Note(メモ):
このアドオンはBlenderにバンドルされています。