Assignment
Reference
- Panel:
Materials are data-blocks that can be created and then assigned to one or more objects. An object can also have multiple materials assigned in different material slots, which correspond to different parts of an object. If a smooth transition between materials is desired, then mixing shader nodes with a Mix shader is a better solution.
Material Slots
Material slots link materials to objects and meshes. By default objects only have a single material slot, which assigns a material to the entire object. If different parts of the mesh need different materials, multiple material slots can be created.
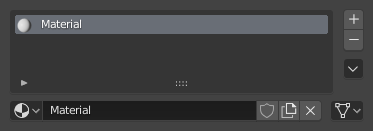
Material slots panel.
Slot List
The object's material slots and active material displayed in a List View.
- (Add Material Slot)
Add a new material slot on the object.
- (移除材質槽)
Remove a material slot from the object.
- (Material Specials)
- Copy Material
Copy material shader nodes and settings to clipboard.
- Paste Material
Paste material shader nodes and settings from clipboard.
- Copy Material to Selected
Copy the same material assignment from the active to other selected objects.
- Remove Unused Slots
Removes all material slots not assigned to the object.
- 移除所有材質
Clears all material slots from the active object. The material data-blocks remain available in the blend file but are no longer assigned.
Data-Block
- Material
The Material Data-Block Menu for the selected material slot. Here new materials can be created, or existing materials can to the material slot.
- Link
Specifies whether the material is to be linked to the object or to the object data.
The Link selector has two choices, Data and Object. These two menu choices determine whether the material is linked to the object or to the data (e.g. a mesh or curve). The Data menu item determines that this material will be linked to the mesh's data-block which is linked to the object's data-block. The Object menu item determines that the material will be linked to the object's data-block directly.
This has consequences of course. For example, different objects may share the same mesh data-block. Since this data-block defines the shape of the object any change in Edit Mode will be reflected on all of those objects. Moreover, anything linked to that mesh data-block will be shared by every object that shares that mesh. So, if the material is linked to the mesh, every object will share it.
On the other hand, if the material is linked directly to the object data-block, the objects can have different materials and still share the same mesh.
Short explanation: If connected to the object, you can have several instances of the same Object Data using different materials. If linked to mesh data, you cannot. See Data System for more information.
編輯模式
To assign materials to different parts of a mesh, enter Edit Mode on the mesh. Additional buttons will then appear in the material slots panel.
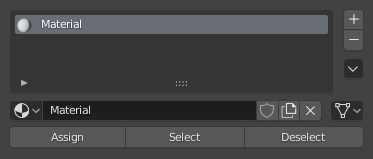
Material slots panel in Edit Mode.
- Assign
Assign active material slot and material to the selected faces in the mesh, strokes in a Grease Pencil, and similar for other object types.
- Select
Select faces assigned to the active material slot.
- Deselect
Deselect faces assigned to the active material slot.
Reusing Existing Materials
Blender is built to allow you to reuse anything, including material settings, between many objects. Instead of creating duplicate materials, you can simply reuse an existing material. There are several ways to do this using the Material's data-block menu:
Single Object -- With the object selected, click the sphere located to the left of the Material name. A pop-up appears showing all the materials available in the current blend-file. To use one, just click on it.
Tip
Searching for Materials
The search field at the bottom of the material list allows you to search the names in the list. For example, by entering "wood" all existent materials are filtered so that only materials containing "wood" are displayed in the list.
Multiple Objects -- In the 3D Viewport, with Ctrl-L you can quickly link all selected objects to the material (and other aspects) of the active object. Very useful if you need to set a large number of objects to the same material; just select all of them, then the object that has the desired material, and Ctrl-L links them to that "parent".
Deleting a Material
To delete a material, select the material and click X in the Available Materials List entry.
Although the material will seem to disappear immediately, the Delete action can depend on how the material is used elsewhere.
If the material is linked to the object and there are other objects which use this material, then the material will be removed from that object (but remain on all its other objects).
If the "Fake User" button has been lit in the Available Materials list, then the material will be retained when the file is saved, even if it has no users.
Only if it has 0 "real" users, and no "Fake" user, will the material be permanently deleted. Note that it will still remain in the Materials list until the blend-file is saved, but will have disappeared when the file is reloaded.
Multiple Materials
Normally, different colors or patterns on an object are achieved by adding textures to your materials. However, in some applications you can obtain multiple colors on an object by assigning different materials to the individual faces of the object.
To apply several materials to different faces of the same object, you use the Material Slots options in the Materials header panel.
The workflow for applying a second material to some faces of an object covered by a base material is as follows:
In Object Mode, create a base material.
Go into Edit Mode and Face Select (a new list will appear below the Active Material list with Assign, Select, Deselect buttons).
Select the faces to be colored with the second material.
In the Object Material Slots list, create a new slot or select an existing material.
Click the Assign button, and the material will appear on the selected object faces.