介紹
Reference
- Panel:
Grease Pencil has their own set of modifiers. Modifiers are automatic operations that affect an object in a non-destructive way. With modifiers, you can perform many effects automatically that would otherwise be too tedious to do manually and without affecting the base geometry of your object.
With Geometry Nodes, it is possible to create custom Grease Pencil modifiers.
They work by changing how an object is displayed and rendered, but not the geometry which you can edit directly. You can add several modifiers to a single object forming the modifier stack and Apply a modifier if you wish to make its changes permanent.
There are four types of modifiers for Grease Pencil:
- Edit
These are tools similar to the Deform ones (see below), however, they usually do not directly affect the geometry of the object, but some other data, such as vertex groups.
- Generate
The Generate group of modifiers includes constructive tools that either change the general appearance of or automatically add new geometry to an object.
- Deform
The Deform group of modifiers only changes the shape of an object without adding new geometry,
- 色彩
The Color group of modifiers change the object color output.
Interface

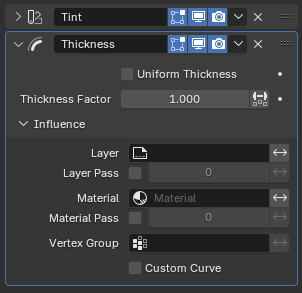
Panel layout (Thickness modifier as an example).
Each modifier's interface shares the same basic components like modifiers for meshes.
See Modifiers Interface for more information.
Note
Grease Pencil strokes, unlike meshes, still can not be edited directly in the place.
Applying Modifiers
Applying a modifier makes the effects of the modifier "real"; converts the strokes to match the applied modifier's results, and deletes the modifier.
When applying a modifier to an object that shares Object Data between multiple objects, the object must first be made a Single User which can be performed by confirming the pop-up message.
Warning
Applying a modifier that is not first in the stack will ignore the stack order (it will be applied as if it was the first one), and may produce undesired results.
Reference
- Panel:
- Apply (Active Keyframe) Ctrl-A
Applies the modifier for the current keyframe.
- Apply (All Keyframes)
Applies the modifier for all keyframes.
Note
With Geometry Nodes it is possible to add new layers to the geometry. When applying, this will create a single keyframe on the first frame of evaluation. Layers with duplicated names in evaluated geometry will be deduplicated.
It is also possible to have layers with empty names. When applying these get renamed to Layer (and Layer.001 etc. when such a layer already exists in the original geometry).
Influence Filters
Most of the modifiers share some special properties that restrict the effect only to certain items.
- Layer
Restricts the effect only to one layer or to any layers that share the same material Pass Index.
- Material
Restricts the effect only to material that share the same material or material Pass Index.
- 頂點組
Restricts the effect only to a vertex group.
- Custom Curve
When enabled, use a custom curve to shape the effect along the strokes from start to end points.
The Invert toggle <-> allows you to reverse the filters behavior.