Asset Browser (Navigateur d’assets)#
This section describes the Asset Browser, which is the main interface for organizing and using assets.
The Asset Browser was introduced in Blender 3.0, and will be improved and expanded over multiple upcoming releases.
Voir aussi
- Bibliothèques d’Assets
Pour des informations générales sur le système de bibliothèque d’assets de Blender, y compris comment créer et éditer des assets et les choix de conception.
- Catalogues d’assets
Pour organiser les assets.
- Pose Library
Construit au-dessus du navigateur d’assets.
Interface#

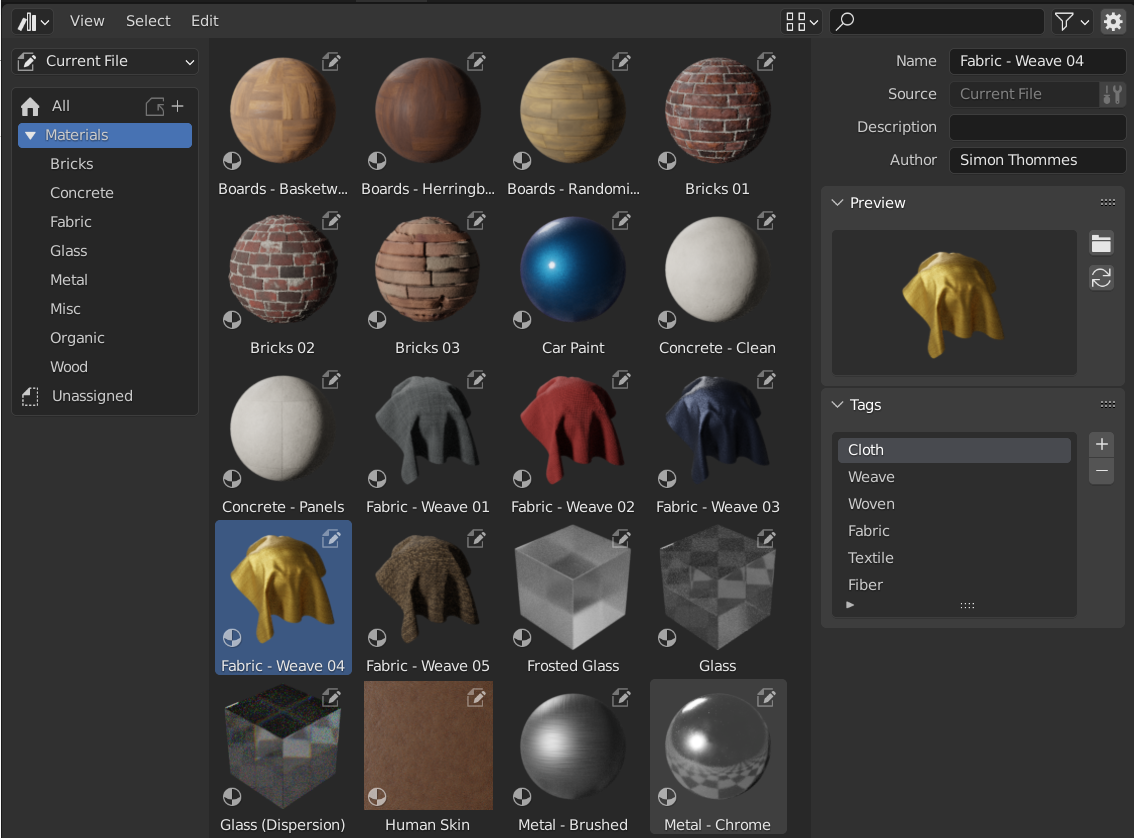
Navigateur d’assets, affichant les matériaux dans une bibliothèque d’assets.#
Région principale#
The main region of the Asset Browser acts similar to the Navigateur de fichiers built into Blender. It shows the assets contained in the selected catalog.
Click an asset to select and activate it. Box select by dragging LMB or extend the selection with Shift-LMB to select multiple assets. Every asset has a context menu.
Source List Region#
The Source List region can be used for navigating and Using Assets.
- Asset Library
Shows the active asset library, and allows switching between asset libraries. The library « Current File » is special, and will always show the assets from the current blend-file, regardless of whether it is part of an asset library or not.
- Copy Asset Bundle to Library
Shown when the Library selector is set to Current File, the current blend-file file is considered an Asset Bundle, and is not yet located inside any asset library.
The Copy Asset Bundle operator makes it simple to copy the file into the asset library. The catalogs of the asset bundle will be merged into the asset library.
- Catalog
Tree view that shows the catalogs of the active asset library. Selecting a catalog limits shown assets to assets only from the selected library.
Catalogs can be renamed by double clicking on there name. Catalogs can also be nested inside others by dragging and dropping one catalog into another. The « All » catalogs is built-in asset library that contains all other asset libraries.
Les modules complémentaires (add-ons) et les fonctionnalités telles que la Pose Library peuvent afficher des panneaux personnalisés ici.
Région des détails de l’asset#
The Asset Details region on the right shows metadata of the active asset. Only metadata of assets contained in the current blend-file can be edited.
- Name
The asset data-block name. This name is unique for the asset data type within the same blend-file.
- Source
Le chemin complet du fichier-blend qui contient l’asset.
- Open Blend File
This button will start a new Blender instance and open the blend-file that contains the asset. In the background Blender will keep monitoring that new Blender instance; when it is quit, the Asset Browser will be refreshed to show any updated assets.
- Description
Optional field for the asset description. Not used by Blender itself.
- Auteur
Champ facultatif pour l’auteur de l’asset. Non utilisé par Blender lui-même.
Preview#
Affiche l’image d’aperçu de l’asset. Voir Aperçus des assets.
- Load Custom Preview
Ouvre une fenêtre avec le navigateur de fichiers pour sélectionner une image pour l’aperçu de l’asset.
- Generate Preview
Generate/update a preview for the asset.
- Preview
Menu d’opérateurs de prévisualisation supplémentaires.
- Render Active Object
Generates a preview by based on the 3D Viewport’s Active object. This is useful for node groups, particularly for geometry nodes, which cannot automatically generate their own preview.
Utilisation des assets#
As a general rule, an asset can be used by dragging it from the Asset Browser to the desired location. Objects and worlds can be dragged from the Asset Browser into the scene, Materials can be dragged onto the object that should use them. Geometry nodes can also be dragged onto objects to add a Modificateur Geometry Nodes. The use of pose assets is different, and is described in Pose Library.
Plusieurs événements peuvent se produire lorsqu’un asset est utilisé, selon la configuration suivante du navigateur d’assets :
- Import Method
Determines how data is managed when an asset is imported. This option can be found in the center of the Asset Browser header.
- Follow Preferences:
Use the import method set in the Preferences.
- Link:
Identique à
L’asset sera lié au fichier-blend actuel et sera donc en lecture seule. Les modifications ultérieures apportées au fichier d’asset seront reflétées dans tous les fichiers qui lui sont liés.
- Append:
Identique à
Tout l’asset et toutes ses dépendances seront ajoutés au fichier actuel. Faire glisser un matériau dans la scène trois fois se traduira par trois copies indépendantes. Faire glisser un objet dans la scène trois fois entraînera également trois copies indépendantes.
“Dependencies” dans ce cas signifie tout ce à quoi l’asset fait référence. Pour un objet, cela peut être son maillage et ses matériaux, mais aussi d’autres objets utilisés par des modificateurs, des contraintes ou des pilotes.
Étant donné que le fichier possède désormais sa propre copie de l’asset, les modifications ultérieures apportées au fichier d’asset ne seront pas reflétées dans le fichier auquel il est ajouté (append).
- Append (Reuse Data):
Spécifique au navigateur d’assets.
La première fois qu’un asset est utilisé, il sera ajouté, y compris ses dépendances, comme décrit précédemment. Cependant, Blender gardera une trace de son origine et la prochaine fois que l’asset sera utilisé, autant de données que possible seront réutilisées. Faire glisser un matériau dans la scène trois fois ne le chargera qu’une seule fois et affectera simplement le même matériau trois fois. Faire glisser un objet dans la scène trois fois créera trois copies de l’objet, mais toutes les copies partageront leurs données de maillage, leurs matériaux, etc.
Étant donné que le fichier possède désormais sa propre copie de l’asset, les modifications ultérieures apportées au fichier d’asset ne seront pas reflétées dans le fichier auquel il est ajouté (append).
Astuce
Instancing Collections
Imite l’option Instance Collections lors de l'ajout à partir du navigateur de fichiers
Some asset types such as collections can be created as an instanced collection. This is done by enabling the Instance option after dragging collection assets into the 3D Viewport. By enabling this option an empty object is added that uses an instance of the collection. If this option is disabled then the full collection hierarchy will be added to the scene.
Les collection assets du fichier actuel seront toujours instanciées.
Notez que toutes les opérations régulières de Blender sont disponibles une fois que l’asset a été ajouté au fichier actuel. Par exemple, vous pouvez choisir de lier un objet à la scène ; cela liera également son Mesh et ses Materials. Par la suite, vous pouvez rendre l’objet lui-même local (), tout en gardant le maillage et les matériaux liés aux fichiers d’assets. Cela se traduira par un objet local, donc modifiable et maintiendra automatiquement le maillage et les matériaux à jour avec toutes les modifications apportées à la bibliothèque d’assets.
Aperçus des assets#

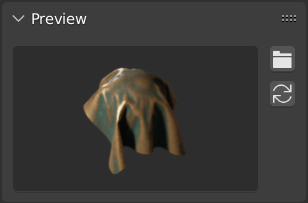
Panneau d’aperçu dans le navigateur des assets.#
Preview images are typically automatically generated when you mark a data-block as asset. The auto-generated preview tries to capture the object from the front. However this only works if the geometry is laid out so that it matches what Blender considers to be the front. That is, the geometry that should be the front needs to point down the -Y axis of the object. The rotation may have to be applied to get the expected result. Collection assets use the global -Y axis as the front (instead of the local one, as collections themselves don’t have a rotation).
It’s also possible to load image files from drive, to replace the auto-generated previews.
Pour des aperçus des assets de pose, voir Contrôler l’apparence des images d’aperçu.
Ensembles d’assets#
Les Asset Bundles sont des fichiers-blend qui ne font référence à aucun autre fichier et dont le nom se termine par _bundle.blend. Toutes les textures et autres fichiers externes doivent être compressés dans le fichier-blend actuel.
Les Asset Bundles peuvent être installés via le Asset Browser :
Ouvrez le fichier blend de regroupement d’assets.
Switch its Asset Browser to Current File (if it’s not set at that already).
Cliquez sur Copy Bundle to Asset Library.
Choisissez la bibliothèque d’assets dans laquelle le copier.
A File Browser will open, showing the files of the selected asset library. Choose the desired location of the blend-file, and click the Copy to Asset Library button.
Le fichier-blend sera enregistré à l’emplacement choisi et tous les catalogues de l’ensemble d’assets seront fusionnés dans la bibliothèque d’aassets cible.
Note
Le mot “asset” et le mot “bundle” sont tous deux couramment utilisés, et pas nécessairement avec la même signification que celle décrite ici. Tout ce qui est présenté comme un “asset bundle” n’aura pas la fonctionnalité “Copy to Asset Library”; pour cela, le fichier “bundle” doit adhérer à la définition ci-dessus.