Timeline#
The Timeline editor, identified by a clock icon, is used for manipulating keyframes and scrubbing the Playhead.

The Timeline.#
The Timeline gives the user a broad overview of a scene’s animation, by showing the current frame, the keyframes of the active object, the start and end frames of your animation sequence, as well as markers set by the user.
The Timeline includes Transport Controls, to play, pause, and skip through an animation sequence.
It also includes tools for manipulating Keyframes, Keying Sets, and Markers.
Main View#
The main Timeline region displays the animation frames over time.

Here you can see the Keyframes (diamond shapes), Playhead (blue handle), Scrollbar (along the bottom).
Adjusting the View#
The Timeline can be panned by holding MMB, then dragging the area left or right.
You can zoom the Timeline by using Ctrl-MMB, the mouse Wheel, or pressing NumpadMinus and NumpadPlus.
You can also use the scrollbars, located at the bottom or the right of the editor, to pan and zoom the view.
Указатель воспроизведения#
The Playhead is the blue vertical line with the current frame number at the top.

Указатель воспроизведения.#
The Playhead can be set or moved to a new position by pressing or holding LMB in scrubbing area at the top of the timeline.
The Playhead can be moved in single-frame increments by pressing Left or Right, or you can jump to the beginning or end frame by pressing Shift-Left or Shift-Right.
Frame Range#
By default, the Frame Range is set to start at frame 1 and end at frame 250. You can change the frame range in the top right of the Timeline header, or in the Output Properties.
Keyframes#
For the active and selected objects, keyframes are displayed as diamond shapes.
You can click to select one at a time, or select several by holding Shift, or by dragging a box around the keyframes. You can then move single keys by dragging them, and you can move multiple keys by pressing G and scale them with S.
Only Selected Channels can be enabled. . For Armatures, this will display the object keyframes, and the keyframes for the active and selected pose bones.
Markers#
Дополнительную информацию смотрите на странице Страница маркеров </animation/markers>.
Главная панель редактора#
Popovers#
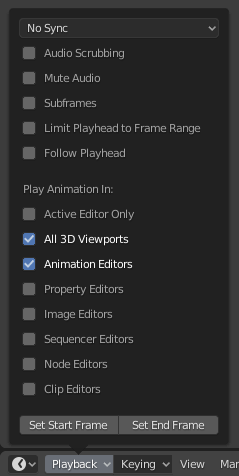
Playback Popover#

Всплывающее окно Воспроизведение содержит параметры, управляющие воспроизведением анимации.
- Sync

3D-вьюпорт красный FPS.#
When you play an animation, the frame rate is displayed at the top left of the 3D Viewport. If the scene is detailed and playback is slower than the set Frame Rate, these options are used to synchronize the playback.
- Play Every Frame
Plays every frame even if playback is slow.
- Frame Dropping
Drop frames if playback becomes slower than the scene’s frame rate.
- Sync to Audio
Drop frames if playback becomes too slow to remain synced with audio.
- Audio
- Scrubbing
If your animation has sound, this option plays bits of the sound wave while you move the Playhead with LMB or keyboard arrows.
- Отключение
Mute the sound from any audio source.
- Playback
- Limit Playback to Frame Range
Don’t allow selecting frames outside of the playback range using the mouse.
- Follow Current Frame
Animation editors can be setup to always follow the time indicator as animation is being played back. Following will be done when animating and changing frame: When the cursor reaches the end of the screen, the next range of frames of the same width will be displayed.
- Воспроизвести в
- Активный редактор
While playing, updates the Timeline, if Animation Editors and All 3D Viewports disabled.
- 3D Viewport
While playing, updates the 3D Viewport and the Timeline.
- Animation Editors
While playing, updates the Timeline, Dope Sheet, Graph Editor, Video Sequencer.
- Редактор изображений
Редактор изображений в режиме Маски.
- Редактор свойств
When the animation is playing, this will update the property values in the UI.
- Movie Clip Editor
While playing, updates the Movie Clip Editor.
- Редакторы нодов
While playing, updates the Node properties for the node editors.
- Video Sequencer
While playing, updates the Video Sequencer.
- Show (Показывать)
- Подрамники (Subframes)
Display and allow changing the current scene subframe.
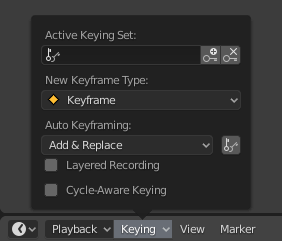
Keying Popover#

The Keying popover contains options that affect keyframe insertion.
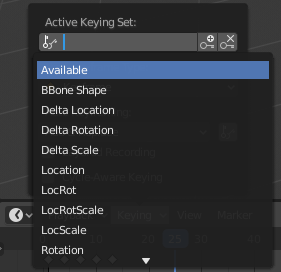
- Active Keying Set

Timeline Keying Sets.#
Keying Sets are a set of keyframe channels in one. They are made so the user can record multiple properties at the same time. With a keying set selected, when you insert a keyframe, Blender will add keyframes for the properties in the active Keying Set. There are some built-in keying sets, LocRotScale, and also custom keying sets. Custom keying sets can be created in the Keying Set panel.
- Insert Keyframes (plus icon)
Insert keyframes on the current frame for the properties in the active Keying Set.
- Delete Keyframes (minus icon)
Delete keyframes on the current frame for the properties in the active Keying Set.
- Новый тип ключевого кадра
Keyframe Types on insertion.
- Cycle-Aware Keying
When inserting keyframes into trivially cyclic curves, special handling is applied to preserve the cycle integrity (most useful while tweaking an established cycle):
If a key insertion is attempted outside of the main time range of the cycle, it is remapped back inside the range.
When overwriting one of the end keys, the other one is updated accordingly.
In addition, when adding a new curve into an action with a Manual Frame Range and Cyclic Animation enabled, the curve is automatically made cyclic with the period matching the frame range. For convenience this check and conversion is also done before adding the second keyframe to such a curve.
Auto Keying Popover#

Timeline Auto Keyframe.#
The record button (⏺) enables Auto Keyframe: It will add and/or replace existing keyframes for the active object when you transform it in the 3D Viewport. For example, when enabled, first set the Playhead to the desired frame, then move an object in the 3D Viewport, or set a new value for a property in the UI.
When you set a new value for the properties, Blender will add keyframes on the current frame for the transform properties. Other use cases are Fly/Walk Navigation to record the walk/flight path and Lock Camera to View to record the navigation in camera view.
Примечание
Note that Auto Keyframe only works for transform properties (objects and bones), in the 3D Viewport (i.e. you can’t use it e.g. to animate the colors of a material in the Properties…).
- Режим
This controls how the auto keyframe mode works. Only one mode can be used at a time.
- Add & Replace:
Добавить или заменить существующие ключевые кадры.
- Replace:
Only replace existing keyframes.
- Only Active Keying Set
When enabled, new keyframes for properties will be inserted into the active Keying Set.
- Layered Recording
Adds a new NLA Track and strip for every loop/pass made over the animation to allow non-destructive tweaking.
Элементы Управления Заголовком#
Элементы управления заголовком временной шкалы.

Timeline header controls.#
1. Popovers for Playback and Keying, 2. Transport Controls, 3. Frame Controls
Управление перемещения#
These buttons are used to set, play, rewind, the Playhead.

Управление перемещения.#
- Jump to Start (❙⏴) Shift-Left
This sets the cursor to the start of frame range.
- Jump to Previous Keyframe (◆⏴) Down
This sets the cursor to the previous keyframe.
- Перемотка назад (|перемотка|) Shift-Ctrl-Пробел
This plays the animation sequence in reverse. When playing the play buttons switch to a pause button.
- Играть (|играть|) Пробел
This plays the animation sequence. When playing the play buttons switch to a pause button.
- Jump to Next Keyframe (⏵◆) Up
This sets the cursor to the next keyframe.
- Jump to End (⏵❙) Shift-Right
This sets the cursor to the end of frame range.
- Пауза (|пауза|) Пробел
This stops the animation.
Элементы управления кадром#
- Current Frame Alt-Wheel
The current frame of the animation/playback range. Also the position of the Playhead.
- Диапазон предварительного просмотра (значок часов)
This is a temporary frame range used for previewing a smaller part of the full range. The preview range only affects the viewport, not the rendered output. See Set Preview Range P.
- Начальный кадр
The start frame of the animation/playback range.
- End Frame
Конечный кадр диапазона анимации/воспроизведения.

