Edición#
Transformación#
Referencia
- Modo:
Modo Edición
- Menú:
Una curva-f podrá ser editada transformando las posiciones de sus fotogramas clave.
- Mover, Rotar, Escalar
De forma similar a otros elementos de Blender, los claves podrán ser movidos, rotados o escalados como se describe en Transformaciones básicas.
- Extender E
Permitirá mover rápidamente los claves seleccionados que se encuentren a un lado u otro del Cursor de tiempo. Esto podrá resultar de utilidad en caso de ser necesario, por ejemplo, mover todos los claves que se encontraran después de un cierto instante en el tiempo hacia la derecha, para generar más espacio para nuevos claves.
Para usar este operador, seleccionar primero los claves deseados y colocar el puntero del ratón hacia la derecha o izquierda del Cursor de tiempo. Luego, presionar E, mover el ratón para desplazar (sólo) los claves que estén de ese lado del Cursor de tiempo y, finalmente, presionar LMB para confirmar (o RMB para cancelar).
Truco
También será posible cambiar directamente las propiedades Fotograma y Valor del clave activo, desde , si se deseara especificar valores numéricos exactos.
Mientras se esté transformando fotogramas clave, será posible mantener presionada la tecla Mayús para modificarlos más lentamente y con mejor precisión o Ctrl para modificarlos con mayor rapidez.
Adherir#
Referencia
- Menú:
- Atajo:
Mayús-S
Además de usar los operadores de adherencia de este menú, también será posible activar la Adherencia en el encabezado.
- Selección al fotograma actual
Adherirá los claves seleccionados al fotograma actual.
- Selección al valor Y del cursor
Asignará a los claves seleccionados el valor Y del Cursor 2D.
- Selección al fotograma más cercano
Adherirá los claves seleccionados al fotograma (entero) más cercano (usado para corregir desplazamientos accidentales hacia sub fotogramas).
- Selección al segundo más cercano
Adherirá los claves seleccionados al segundo más cercano. Será posible utilizar la opción para ver el tiempo en segundos (en vez de en fotogramas) en la parte superior del editor.
- Selección al marcador más cercano
Adherirá los claves seleccionados al marcador más cercano.
- Aplanar asas
Aplana las asas Bezier para los fotogramas clave seleccionados.
- Igualar asas
Se asegurará de que las asas de los fotogramas clave seleccionados tengan la misma longitud, haciéndolas opcionalmente horizontales. Las asas de tipo Automática, Automática limitada o Vector, serán convertidas a Alineada.
- Lado
Permitirá especificar las asas de qué lado afectar (izquierdo, derecho o ambos).
- Longitud de asas
Longitud para las asas Bezier de los claves seleccionados.
- Aplanar
Hace que el valor (Y) de las asas sea el mismo que el de sus respectivos fotogramas clave.
- Cursor a selección (XY) Ctrl-G
Ubicará el cursor en el punto medio de los fotogramas clave seleccionados.
- Cursor a selección (Y)
Ubicará el valor Y del cursor en el valor promedio de los fotogramas clave seleccionados.
Voltear#
Referencia
- Menú:
- Atajo:
Ctrl-M
Permitirá voltear los claves seleccionados con respecto a un punto de referencia específico.
- Tiempo, en torno al fotograma actual
Volteará el tiempo de los claves seleccionados, en torno al fotograma actual.
- Valor, en torno al valor Y del cursor
Volteará el valor de los claves seleccionados, en torno al valor Y del Cursor.
- Tiempo, en torno al fotograma cero
Volteará el tiempo de los claves seleccionados, en torno al fotograma cero.
- Valor, en torno al valor Y cero
Volteará el valor de los claves seleccionados, en torno al valor cero. (Esto cambiará el signo de los valores, manteniendo intactas sus magnitudes).
- Tiempo, en torno al primer marcador seleccionado
Volteará el tiempo de los claves seleccionados, en torno al primer marcador seleccionado.
Saltar a seleccionados#
Referencia
- Menú:
- Atajo:
Ctrl-G
Ubicará el Cursor 2D en el tiempo y valor promedios de los claves seleccionados.
Insertar#
Referencia
- Menú:
- Atajo:
I
Permitirá insertar nuevos fotogramas clave, agregándolos a la selección actual.
- Todos los canales
Insertará un fotograma clave en todas las curvas-f visibles y editables, utilizando el valor actual de cada curva.
- Sólo canales seleccionados
Insertará un fotograma clave en los canales seleccionados, utilizando el valor actual de cada canal.
- Sólo curva-f activa
Insertará un fotograma clave en la curva-f activa, utilizando el valor actual de la curva.
- En el cursor (curva-f activa)
Insertará un clave en la curva-f activa, con el mismo valor Y del Cursor 2D.
- En el cursor (canales seleccionados)
Insertará un clave en los canales seleccionados, con el mismo valor Y del Cursor 2D.
Copiar / Pegar#
Referencia
- Menú:
,
- Atajo:
Ctrl-C, Ctrl-V
Será posible utilizar Ctrl-C para copiar los claves seleccionados y Ctrl-V para pegarlos. Luego de realizar el pegado, el panel Ajustar última operación proporcionará algunas opciones adicionales:
- Desplazar fotogramas
Permitirá desplazar en el tiempo los claves pegados, de manera que…
- Fotograma Inicio
…el primer clave pegado quede en el fotograma actual.
- Fotograma (fin)
…el último clave pegado quede en el fotograma actual.
- Relativo a fotograma
…los claves pegados queden en la misma posición relativa con respecto a donde se encontraba el Cursor de tiempo en el momento en que fueron copiados.
- Sin desplazamiento
…los claves permanezcan en sus fotogramas originales.
- Desplazar valores
Permitirá desplazar el valor de los claves pegados, de manera que…
- Clave a izquierda
…el valor del primer clave pegado coincida con el valor del clave que se encuentre a la izquierda del Cursor de tiempo.
- Clave a derecha
…el valor del último clave pegado coincida con el valor del clave que se encuentre a la derecha del Cursor de tiempo.
- Valor del fotograma actual
…el valor del primer clave pegado coincida con el valor de la curva en el fotograma actual.
- Valor Y del cursor
…el valor del primer clave pegado coincida con el valor Y del Cursor 2D.
- Sin desplazamiento
…los claves pegados mantengan sus valores originales.
- Tipo
- Mezclar
Superpondrá los claves pegados con los ya existentes, sobrescribiendo únicamente los claves que compartan el mismo fotograma.
- Sobrescribir todo
Reemplazará todos los claves ya existentes por los nuevos.
- Sobrescribir rango
Reemplazará los claves ya existentes por los nuevos, dentro del rango pegado.
- Sobrescribir rango completo
Reemplazará los claves ya existentes por los nuevos, dentro del rango de todos los claves copiados (incluso los de otros canales).
- Opuesto
Cuando se hubieran copiado claves de uno o más huesos simétricamente dispuestos, activar esta opción permitirá pegar los claves de los huesos de la izquierda en las curvas de los de la derecha y viceversa. Adicionalmente, los valores serán invertidos, simetrizando efectivamente la animación.
Duplicar#
Referencia
- Menú:
- Atajo:
Mayús-D
Duplicará los claves seleccionados, pudiendo reposicionarlos moviendo el ratón.
Borrar#
Referencia
- Menú:
- Atajo:
X, Suprimir
Al presionar X o Suprimir se abrirá un menú emergente desde donde será posible eliminar los claves seleccionados.
Tipo de asa#
Referencia
- Menú:
- Atajo:
V
Establecerá el tipo de asa para los claves seleccionados.
Modo de interpolación#
Referencia
- Menú:
- Atajo:
T
Establecerá el modo de interpolación para los claves seleccionados. Esto determinará la interpolación de la curva entre cada clave y el siguiente.
Aplicación de la interpolación#
Referencia
- Menú:
- Atajo:
Ctrl-E
Establecerá la aceleración para los claves seleccionados. (Sólo válida para los modos de interpolación Curvatura (según intensidad) y Efectos de tipo dinámico). En el panel Ajustar última operación será posible determinar si los cambios deberán ser aplicados al lado izquierdo, el derecho o a ambos lados de cada clave seleccionado.
Densidad#
Diezmar#
Referencia
- Menú:
- Menú:
Permitirá simplificar la curva-f eliminando los claves que menos influyan en su forma.
- Modo
Permitirá determinar cómo se escogerá la cantidad de claves a ser eliminados.
- Proporción
Borrará un determinado porcentaje de claves.
- Eliminar
El porcentaje de claves a eliminar.
- Margen de error
Borrará tantos claves como sea posible, asegurándose de que la forma de la curva-f no cambie más allá de una cierta cantidad.
- Margen de error máximo
Qué tanto podrá desviarse la curva-f diezmada de la original.
Capturar claves#
Referencia
- Menú:
- Atajo:
Mayús-Alt-O
Creará un clave en cada fotograma.
Ver también
Capturar canales, que ofrece opciones sobre el rango a capturar y la forma de hacerlo.
Eliminar claves#
Referencia
- Menú:
- Atajo:
X
Buscará claves redundantes, entre los seleccionados, para eliminarlos. Un clave será considerado redundante cuando tenga un valor muy similar al de los claves cercanos – aún en el caso de que los segmentos de curva en su entorno no fueran planos.
Truco
Es probable que este operador modifique la forma de las curvas afectadas, por lo que será mejor utilizarlo después de, por ejemplo, haber insertado claves de forma masiva en todos los huesos de un esqueleto (lo que crearía claves inútiles en huesos que no se hubieran movido) y antes de retocar manualmente las curvas.
- Umbral
Umbral de valor. Al aumentarlo, se eliminarán claves que tengan valores menos similares a los de sus claves cercanos.
- Canales
Permitirá eliminar considerando todos los claves de los canales seleccionados (incluso los claves no seleccionados). En caso de que en una curva-f quedara un solo clave, la curva será completamente eliminada.

Fundido#
Referencia
- Menú:
- Atajo:
Alt-D
Permitirá ajustar los valores de los claves seleccionados en un cierto porcentaje. Seleccionar un operador de fundido, mover el ratón a izquierda o derecha para ajustar el factor y, finalmente, hacer clic con LMB para confirmar (o con RMB para cancelar).
Varios de los operadores de fundido funcionan basándose en los claves adyacentes. Esto significa que dividirán los claves seleccionados en grupos contiguos, tomando luego en cuenta los claves no seleccionados que se encuentren inmediatamente antes o después de cada grupo.
Intermedio#
Referencia
- Menú:
Permitirá establecer el valor de los claves seleccionados a un valor interpolado entre sus claves adyacentes.
- Factor
Cuando esté en -1, el valor de los claves será establecido al valor del adyacente izquierdo.
Cuando esté en 1, el valor de los claves será establecido al valor del adyacente derecho.
Para otros valores, el valor de los claves será establecido a una interpolación entre sus dos claves adyacentes, en donde 0 representará el valor promedio entre ambos.
Fundir a cercano#
Referencia
- Menú:
Moverá cada clave seleccionado hacia el valor del clave adyacente a izquierda o derecha, según un cierto porcentaje.
- Fundido
Con valores negativos, cada clave moverá el porcentaje de fundido hacia el valor del clave adyacente a su izquierda.
Con valores positivos, cada clave moverá el porcentaje de fundido hacia el valor del clave adyacente a su derecha.
Cuando el valor sea cero, cada clave mantendrá su valor original.
Fundir a valor predefinido#
Referencia
- Menú:
Moverá cada clave seleccionado hacia el valor predefinido de la propiedad, según un cierto porcentaje.
- Factor
Define en qué medida cambiará el valor de los claves, desde 0 (sin cambios) hasta 1 (restableciéndolo a su valor predefinido).
Ver también
El operador Restablecer a valor predefinido permitirá restablecer cualquier propiedad a su valor predefinido sin necesidad de que ésta contenga fotogramas clave.
Acelerar#
Referencia
- Menú:
Provocará que los claves seleccionados describan una curva de tipo S. Mientras el deslizador se encuentre visible (luego de ser activado el operador, pero antes de confirmar los cambios con LMB), será posible presionar Tab para alternar cuál de las siguientes opciones editar:
- Flexión de la curva
Un valor negativo otorgará más influencia al lado izquierdo, mientras que uno positivo se lo dará al derecho. Un valor de 0 producirá una curva balanceada.
- Definición
Un valor bajo producirá una curva diagonal casi recta, mientras que un valor alto producirá una elevación o caída súbita de la curva.
Fundir desplazamiento#
Referencia
- Menú:
Moverá los claves seleccionados hacia arriba o abajo – todos la misma magnitud – hasta que el primero o el último coincida con su adyacente a izquierda o derecha, respectivamente.
- Factor de desplazamiento
Cuando esté en -1, el primer clave seleccionado quedará alineado a su adyacente de la izquierda.
Cuando esté en 1, el último clave seleccionado quedará alineado a su adyacente de la derecha.
Cuando esté en 0, no se producirán cambios.
Fundir a aceleración#
Referencia
- Menú:
Permitirá fundir los claves seleccionados a una curva con aceleración de «partida o «llegada».
- Fundido
Cuando esté en -1, los claves seleccionados describirán una curva con aceleración de «partida», con cambios moderados al comienzo y grandes hacia el final.
Cuando esté en 1, los claves seleccionados describirán una curva con aceleración de «llegada», con grandes cambios al comienzo y moderados hacia el final.
Cuando esté en 0, no se producirán cambios.
Coincidir con pendiente#
Referencia
- Menú:
Permitirá fundir los claves seleccionados hasta formar una línea recta que se alinee con los dos claves adyacentes a izquierda o derecha.
- Factor
Los valores negativos permitirán usar los dos claves a la izquierda de la selección.
Los valores positivos permitirán usar los dos claves a la derecha de la selección.
Cuando el valor esté en cero, no se producirán cambios.
Empujar / Tirar#
Referencia
- Menú:
Permitirá hacer que los claves seleccionados se acerquen o alejen de la línea recta imaginaria que une al primero y el último.
- Factor
Cuando el valor esté en 0, los claves se encontrarán sobre la línea recta.
Cuando el valor esté en 1, los claves mantendrán sus valores originales.
Cuando el valor esté en 2, el valor de cada clave se encontrará dos veces más lejos de la línea recta que antes.
Sesgar claves#
Referencia
- Menú:
Permitirá sesgar los claves seleccionados – esto es, cambiar sus valores en una cierta magnitud que irá aumentando a medida que se extiendan en el tiempo, a partir de un cierto clave de referencia. De forma predefinida, este clave de referencia será el que se encuentre más a la izquierda de los seleccionados, pero podrá usarse el de más a la derecha, presionando la tecla D.
- Factor de sesgo
Permitirá definir la magnitud del sesgo. Valores negativos moverán los claves hacia abajo, mientras que valores positivos los moverán hacia arriba.
- Dirección
Permitirá escoger si usar el clave seleccionado de más a la izquierda o más a la derecha, como referencia.
Escalar desde promedio#
Referencia
- Menú:
Permitirá escalar los claves seleccionados de forma vertical, usando el promedio de sus valores como pivote.
- Factor
Cuando el valor esté en 0, todos los claves quedarán en el valor promedio.
Cuando el valor esté en 1, los claves mantendrán sus valores originales.
Cuando el valor esté en 2, el valor de cada clave quedará al doble de distancia vertical del promedio, que originalmente.
Escalar desde adyacente#
Referencia
- Menú:
Permitirá escalar los claves seleccionados de forma vertical, usando un clave adyacente a la selección como pivote. De forma predefinida, éste será el clave adyacente a la izquierda de la selección, sin embargo podrá usarse el de la derecha, presionando la tecla D.
- Factor
El factor de escala a ser aplicado.
- Clave de referencia
Permitirá escoger si usar el clave adyacente a la izquierda o a la derecha de la selección, como referencia.
Desplazar tiempo#
Referencia
- Menú:
Permitirá desplazar los valores de los claves seleccionados de manera que la curva-f resultante pareciera moverse en el tiempo. Funcionará mejor en curvas con una alta densidad de claves.
A medida que partes de la curva original parezca «abandonar» el rango de tiempo de los claves seleccionados, «volverá a aparecer» por el lado opuesto con un desplazamiento vertical, de manera que los extremos permanezcan conectados sin que se produzcan saltos.
- Desplazar fotogramas
Permitirá definir la cantidad de fotogramas que se desplazará la curva-f. El deslizador estará limitado al rango entre -10 y 10, sin embargo será posible ingresar valores por fuera de ese rango, de forma directa.
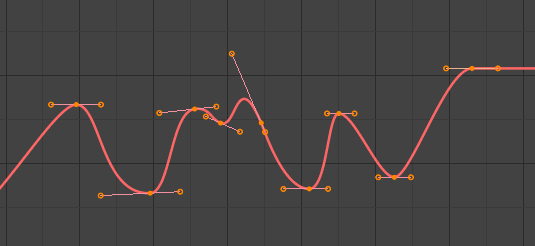
Suavizado#
Referencia
- Menú:
- Atajo:
Alt-S
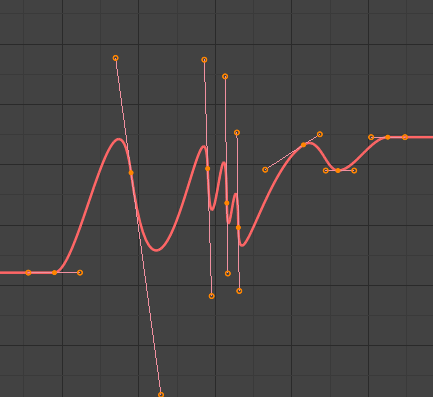
Suavizar (gaussiano)#
Referencia
- Menú:
Permitirá suavizar los claves seleccionados usando un núcleo Gaussiano. Hacer clic en la opción del menú, mover el ratón a izquierda o derecha para ajustar la intensidad y, finalmente, hacer clic con LMB para confirmar (o con RMB para cancelar).
- Factor
Permitirá definir la intensidad de aplicación del suavizado.
- Sigma
The shape of the gaussian distribution. Lower values mean a sharper curve, giving keys that are close to each other more weight. A high value behaves like a simple average filter.
- Ancho del filtro
Un filtro más ancho analizará más claves, produciendo un resultad más suave. Con un ancho de 1, el filtro sólo tomará en cuenta a los claves inmediatamente adyacentes, a izquierda y a derecha, para obtener un promedio ponderado.

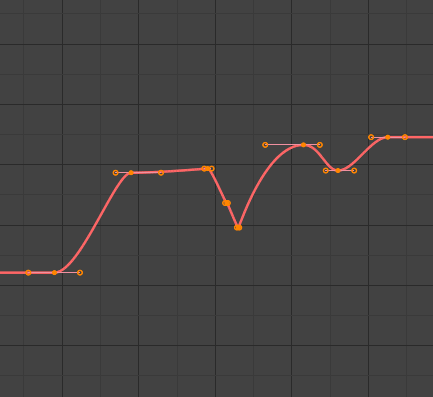
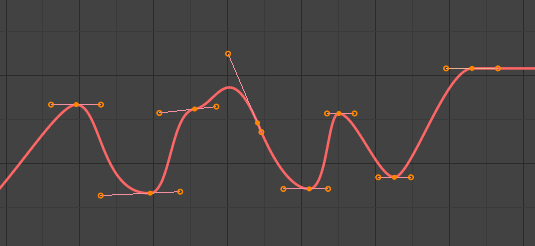
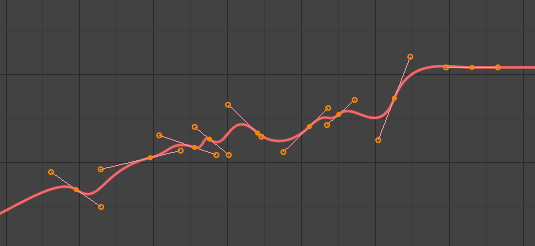
Curva-f luego de la aplicación del Suavizado (gaussiano), con la curva original superpuesta, para poder comparar.#
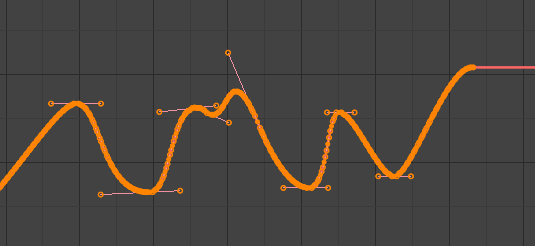
Suavizar (antiguo)#
Referencia
- Menú:
- Atajo:
Alt-O
También existe una opción para suavizar las curvas seleccionadas, pero habrá que tener precaución: su algoritmo parece dividir a la mitad la distancia entre cada clave y el valor lineal promedio de la curva (sin ninguna posibilidad de configuración), ¡lo que producirá un suavizado bastante intenso! Nótese que tanto el primero, como el último clave parecerían no verse afectados de ninguna manera por este operador.
Suavizar (Butterworth)#
Referencia
- Menú:
Permitirá suavizar los claves seleccionados, mediante un filtro Butterworth. Hacer clic en la opción del menú, mover el ratón a izquierda o derecha para ajustar la frecuencia y, finalmente, hacer clic con LMB para confirmar (o con RMB para cancelar).
Este filtro resultará ideal para suavizar grandes cantidades de datos, dado que preservará los picos de la animación. La desventaja es que podría llegar a introducir un efecto dominó, cuando los valores de los claves cambien de manera rápida.
- Frecuencia de corte (Hz)
Cuanto más bajo sea el valor, más suave será la curva. Existe un máximo implícito que, una vez alcanzado, ya no producirá cambios sobre la curva; éste se encontrará aproximadamente en la mitad de la frecuencia de muestreo. La frecuenta de muestreo, en este caso, será la velocidad de fotogramas de la escena, multiplicada por el valor de la propiedad Muestras por fotograma de este operador.
- Orden de filtrado
Valores más altos producirán un corte de frecuencia más abrupto.
- Muestras por fotograma
Antes de que el filtro se aplique, la curva será remuestreada usando este intervalo, para evitar errores cuando existan espacios no homogéneos entre los fotogramas. En caso de que los claves se encontraran en sub-fotogramas, p.ej: un archivo a 60fps dentro de una escena a 30fps, este valor se elevará a 2.
- Fundido
Un valor entre 0 y 1 que determinará el grado de incidencia de la curva original y la suavizada en la curva resultante.
- Fundido Entrante/Saliente
La cantidad de fotogramas al inicio y al final de la selección de claves, que se usará como transición entre la curva original y la suavizada. Esto podrá ayudar a reducir saltos en la animación, en los límites de la selección. Cuando el valor esté en 1, sólo se mantendrán intactos el primero y el último fotograma de la selección.