Uso Básico
Basic Rig Generation
Add a meta-rig structure from the menu.
Edit the bone positions to match the character geometry.
In the armature properties click on the Generate Rig button to generate the rig.
Add a Predefined Meta-Rig
Referência
- Mode:
Modo de Objeto
- Menu:
- Atalho:
Shift-A
Rigify stores all the information required to generate complex rig controls and mechanism in more simple armatures called «meta-rigs».
The predefined meta-rigs can be found in the Add menu. Currently available meta-rig types are:
Basic Human (doesn’t include face and fingers)
Basic Quadruped
Human
Cat
Wolf
Horse
Shark
Edit Bone Positions
To correctly match your character, meta-rig bones must be moved to correct positions. This can be achieved in two different ways: Pose Mode or Edit Mode.
Nota
Rigify assumes that 1 unit corresponds to 1 meter. So a human is about 2 units tall. If your character is in a different scale and you are more familiar with modeling rather than rigging, it is suggested to scale it to Rigify dimensions before positioning the meta-rig bones. If you want to scale the character’s geometry, we suggest you to first scale up the character in Object Mode, then apply the geometry scale with the Apply Scale tool.
Rigify Human Alignment Tips
Limbs: Keep the legs as straight as possible in the front view (Rigify human works better in predictable cases). Give the knee and the elbow a slight bend angle (Rigify needs to know where your knee/elbow is pointing).
Torso: Keep the spine as straight as possible in the front view (Rigify human works better in predictable cases). The last bone of the spine is the head. By default the next two bones (top to bottom) are considered the neck bones. It is suggested to keep the neck bones as aligned as possible while editing.
Face: Positioning face bones can be tricky if you are not an expert in bone editing and they are almost useless if you plan to make facial animation through shape keys. Consider removing face features from your character if they aren’t really needed. If you don’t need the face all the face bones can be deleted. All the face bones are in the Face armature bone collection by default. You can select them by displaying only that collection, selecting all of its content and then deleting the bones in Edit Mode to correctly remove the face.
If you want to scale all the face bones at once, consider scaling the face master bone in Pose Mode (see Pose Mode matching method). The face master bone is placed in the same position of the head bone. To select it easily, hide all other bone collections.
For more tips, see the Positioning Guide.
Pose Mode Matching (Basic)
Enter the meta-rig Pose Mode. Rotate, scale, and translate the bones in the correct position. When bones are in correct positions (always staying in Pose Mode) use .
Nota
Connected bones cannot be translated in Pose Mode. You can scale the parent bones to match the general length and then refine child bones scale. For more detailed information on armature modes please refer to the armatures section.
Edit Mode Matching (Advanced)
Some basic armature display setup is suggested before entering bone Edit Mode.
With the meta-rig selected, go in the Properties and click on the Object tab. Scroll down to the display panel and enable X-ray and under Maximum Draw Type selector select Wire. This way the bones will always be drawn in wireframe on top of your geometry.
Then, always in the Properties click on the Armatures tab and under display check the Axis checkbox. This way you the bones rotation axes will be displayed during the edit process.
For more detailed information on armature display modes please refer to the Display panel page.
Generating the Rig
With the bones in the correct positions, jump back in Object Mode, go to the Armature tab, scroll down to the bottom and click on the Generate Rig button to finalize the rig creation. The generation process will take from few seconds to one minute depending on rig complexity and hardware specifications of your machine. If the generated rig needs tweaking, you can modify the meta-rig accordingly and then click again on the generate button. If the rig already exists, Rigify will simply overwrite it retaining all your modifiers and constraints and – where possible – all the previously generated features.
For information about additional generation options, see the Advanced Rig Generation section.
Dica
If the metarig uses the legacy face rig, you can use the Upgrade Face Rig button that appears above Generate Rig to automatically upgrade to the new modular face system.
The upgrade will preserve compatibility with existing skinning, but existing poses and animations will likely not be compatible due to subtle changes in control behavior.
Nota
To make the rig overwriting work as expected, you need to have both the rig and the meta-rig visible before generating again. Rigify will try to unhide them in simple cases, but will abort generation if that fails.
Aviso
As with all Python add-ons, Blender interface cannot be updated until the Python script execution is over. Wait until the rig appears to see the results.
Aviso
Rigify is designed assuming a workflow where the meta-rig is kept available to allow re-generating the main rig whenever it is necessary to make changes to it. Removing the meta-rig after generating the main rig, or significantly modifying the generated rig is not advised: it will make it impossible to introduce features added in later versions of Rigify, or easily adapt it to breaking changes in later Blender versions. In general, automatic version update scripts will be provided for meta-rigs when necessary, but not generated rigs.
Binding the Geometry to the Rig
To bind the geometry to the rig you can use your preferred tools. Just few things you have to know:
All the deforming bones are in the DEF bone collection.
Eyes and Teeth bones of the legacy face are not deforming. You are supposed to bind the eyes and teeth geometry through Child Of constraints.
Usually armature deform with automatic weights do a really good job out of the box if you correctly place your bones (and there is enough topology to work with!).
For more detailed information on bone collections, Armature modifier and weight painting refer to the Blender manual.
Advanced Rig Generation
Advanced Options Features
By using options in the Advanced sub-panel, it is possible to:
Generate more than one rig per scene.
Update/Override a specific rig.
Force previously generated widget objects to be overwritten.
Choose whether to use linked duplicates for left and right side widgets.
Execute a script data-block after generation.
Advanced Options Sub-Panel
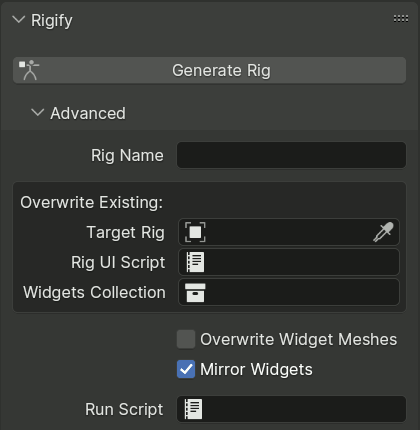
Advanced rig generation options are by default hidden in a sub-panel. Click on the Advanced line to open it.
Some of the options will be automatically set by Rigify if they have no value when a rig is generated, while others are fully controlled by the user.
- Rig Name
When a brand new rig is generated, as opposed to overwriting an existing one, the value of this option is used to name it.
If this field is empty, the new object will be named based on the name of the metarig according to the following rules:
If the name contains
META, it is replaced withRIG.If the name contains
metarig, it is replaced withrig.Otherwise,
RIG-is prepended to the name.
When overwriting an existing rig object specified by the Target Rig option, its name is not changed, allowing it to be freely renamed without having to keep the value of this option in sync.
- Target Rig auto
This option specifies the generated rig to overwrite when re-generating from this metarig.
If the option is not set, Rigify will generate a new rig object and store it in this option.
Nota
When the option isn’t set, Rigify will create a brand new rig object even if an object with a matching name already exists.
- Rig UI Script auto
This option specifies the generated script data block to overwrite when re-generating, and works in the same manner as Target Rig.
The script controls the UI in the 3D Viewport that allows conveniently switching visible bone collections, changing custom properties, converting between IK and FK and so on.
- Widgets Collection auto
This reference specifies the collection containing generated widgets, and works in the same manner as Target Rig.
- Overwrite Widget Meshes
If enabled, Rigify will generate new widgets every time the rig is re-generated. By default, it tries to reuse the already generated widget objects that exist in the widget collection, allowing them to be manually edited to fit the character better.
- Mirror Widgets
When enabled, Rigify generates widgets for left and right side bones as linked duplicates, using negative X scale to flip the right side version. This enforces symmetry and reduces the number of meshes to adjust to fit the character.
When reusing an already generated widget, Rigify detects if it was originally generated mirrored by checking object scale to avoid flipping existing controls. Therefore switching to mirrored widgets for an existing character requires deleting the right side widgets, or Force Widget Update.
- Run Script
It is possible to configure Rigify to execute a Python script contained in a text data-block after generation in order to apply user-defined customizations. The script is executed with the generated rig active and selected in Object Mode.
The simplest use of this may be adjusting properties of generated constraints when Rigify rig types don’t have any relevant meta-rig settings. That can be done by using the Copy Full Data Path context menu option on the property, pasting it into the script and making an assignment, e.g.:
import bpy

bpy.data.objects["rig"].pose.bones["MCH-spine.003"].constraints[0].influence = 0.6
Doing such changes via a script ensures they aren’t lost if the rig is re-generated.
Users familiar with Rigify scripting can import Rigify utility modules, and access the generator instance through
rigify.get_generator(). Yet note that, since generation is already finished, the only use of that is reading data created in the generation process.
Library Linking
When linking a rig into another file, you generally want to create a collection that includes the generated rig and the character mesh. You do not need to include the meta-rig or the widget object collection. You then link in the collection and run Make Library Override.
The rig_ui_template.py text data-block responsible for the rig UI
will be automatically linked along with the rig, you don’t need to link it separately.
However, the script will not run until you run it manually from the Text editor or save and restart Blender.