Object Modes
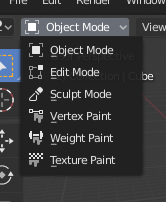
O menu de seleção Mode.
Modes allow editing different aspects of objects. While Object Mode allows you to position/rotate/scale them, Edit Mode allows changing their geometry, Pose Mode allows posing them, and so on.
You can change the current mode using the Mode selector in the 3D Viewport header. Which modes are available depends on the object’s type. The complete list is shown below.
Apart from using the selector, you can also press Ctrl-Tab to bring up a pie menu around the cursor for faster access. (If the selected object is an Armature, this shortcut will instead switch between Object Mode and Pose Mode.)
Pressing Tab will toggle Edit Mode for objects that support it.
Os modes podem afetar muitas coisas no Blender:
Each mode changes the header and Toolbar to show its own unique set of menus and tools. This also means it affects the available keyboard shortcuts.
Modes can completely change the look of the viewport. For example, Weight Paint mode will shade the object to show its vertex weights, which are not normally visible.
Modes can affect other editors. For example, the UV Editor can only be used if the 3D Viewport is in Edit Mode. In the Properties editor, too, certain buttons and panels can only be used in certain modes.
Lista de Object Mode
Ícone |
Nome |
Detalhes |
|---|---|---|
|
The default mode, available for all object types. Allows editing position, rotation and scale, duplicating objects, and so on. |
|
|
A mode for editing an object’s shape (vertices/edges/faces for meshes, control points for curves/surfaces, points/strokes for Grease Pencil, etc.). |
|
|
Provides an alternative toolset for editing an object’s shape (only for meshes). |
|
|
A mesh-only mode that allows you to set your mesh’s vertex colors (i.e. to «paint» them). |
|
|
Um modo somente para malhas, dedicado a pintura e definição dos pesos de influência dos vértices. |
|
|
A mesh-only mode that allows you to paint a texture directly on the model, in the 3D Viewport. |
|
|
A mesh-only mode dedicated to particle systems, useful for editable systems (hair). |
|
|
An armature-only mode, dedicated to posing. |
|
|
A Grease Pencil-only mode, dedicated to creating Grease Pencil strokes. |
|
|
A Grease Pencil-only mode, used to deform and shape existing strokes more organically. |
|
|
A Grease Pencil-only mode, dedicated to modifying individual strokes and points of Grease Pencil objects. |
|
|
A Grease Pencil-only mode, dedicated to adding color the vertices of strokes directly. |
|
|
A Grease Pencil-only mode, dedicated to assigning vertex weights to stroke. |
Nota
The cursor becomes a brush in Paint and Sculpt Modes.
Não entraremos em mais detalhes sobre os usos dos Modes aqui, pois eles são tratados em suas próprias seções.
Dica
Se você estiver lendo este manual e algum botão ou opção de menu estiver referenciado que não aparece em sua tela, pode ser que você não esteja no modo adequado para que essa opção seja válida.
Switching Objects
Referência
- Mode:
Todos Modos
- Atalho:
Alt-Q
If you enter a mode such as Weight Paint for an object and then select another object, Blender will typically switch back to Object Mode. This means that, if you want to weight paint the other object too, you have to enter the mode a second time.
There is a way of avoiding this, however. Once you enter a mode, the Outliner will show a dot next to other objects that also support it. By clicking such a dot, you can switch over to another object without leaving the mode.
Alternatively, you can hover over the other object in the 3D Viewport and press Alt-Q.
Veja também
Lock Object Modes for preventing accidental mode changes.
Edição de Multi-Object
Edit Mode and Pose Mode let you work with multiple objects even more easily than described above, as they can have multiple objects in the mode at the same time.
There are two ways of accomplishing this:
If you’re not yet in the mode, you can simply select all the objects and enter it.
If you’re already in the mode, you can bring other objects into it by clicking Ctrl-LMB on the dot in the Outliner. Removing objects from the mode works in the same way.
Some points of note:
The Properties Editor editor will only ever show the details (shape keys, UV maps…) of the active object, not of all the selected ones.
Selecting any element from an object will make it the active one.
There are limits to the edits you can make. For example, you can’t create an edge that connects vertices from different objects.