Add-on Tutorial
Intended Audience
This tutorial is designed to help technical artists or developers learn to extend Blender. An understanding of the basics of Python is expected for those working through this tutorial.
Prerequisites
Before going through the tutorial you should…
Be familiar with the basics of working in Blender.
Know how to run a script in Blender’s Text editor.
Have an understanding of Python primitive types (integer, Boolean, string, list, tuple, dictionary, and set).
Be familiar with the concept of Python modules.
Have a basic understanding of classes (object orientation) in Python.
Suggested reading before starting this tutorial.
Dive Into Python sections (1, 2, 3, 4, and 7).
Blender API Quickstart to help become familiar with Blender/Python basics.
To best troubleshoot any error message Python prints while writing scripts, you run Blender from a terminal. See Use The Terminal.
Tip
You can enable Developer Extras in the preferences to enable features that make developing add-ons easier.
Documentation Links
While going through the tutorial, you may want to look into our reference documentation.
Blender API Overview: This document is rather detailed but helpful if you want to know more on a topic.
bpy.contextAPI reference – Handy to have a list of available items your script may operate on.bpy.types.Operator– The following add-ons define operators, these docs give details and more examples of operators.
What is an Add-on?
An add-on is simply a Python module with some additional requirements so Blender can display it in a list with useful information.
To give an example, here is the simplest possible add-on:
bl_info = {
    "name": "My Test Add-on",
    "blender": (2, 80, 0),
    "category": "Object",
}
def register():
    print("Hello World")
def unregister():
    print("Goodbye World")
bl_infois a dictionary containing add-on metadata such as the title, version and author to be displayed in the Preferences add-on list. It also specifies the minimum Blender version required to run the script; older versions won’t display the add-on in the list.
registeris a function which only runs when enabling the add-on, this means the module can be loaded without activating the add-on.
unregisteris a function to unload anything setup by
register, this is called when the add-on is disabled.
Notice this add-on does not do anything related to Blender
(the blender_api:bpy module is not imported for example).
This is a contrived example of an add-on that serves to illustrate the point that the base requirements of an add-on are simple.
An add-on will typically register operators, panels, menu items, etc,
but it’s worth noting that any script can do this,
when executed from the Text editor or even the interactive console –
there is nothing inherently different about an add-on that allows it to integrate with Blender,
such functionality is just provided by the blender_api:bpy module for any script to access.
So an add-on is just a way to encapsulate a Python module in a way a user can easily utilize.
Note
Running this script within the Text editor won’t print anything, to see the output it must be installed through the Preferences. Messages will be printed when enabling and disabling.
Your First Add-on
The simplest possible add-on above is useful as an example but not much else.
This next add-on is simple but shows how to integrate a script into Blender using an Operator
which is the typical way to define a tool accessed from menus, buttons and keyboard shortcuts.
For the first example we will make a script that simply moves all objects in a scene.
Write the Script
Add the following script to the Text editor in Blender:
import bpy

scene = bpy.context.scene
for obj in scene.objects:
    obj.location.x += 1.0
Click the Run Script button, all objects in the active scene are moved by 1.0 unit.
Write the Add-on (Simple)
This add-on takes the body of the script above, and adds it to an operator’s execute() function.
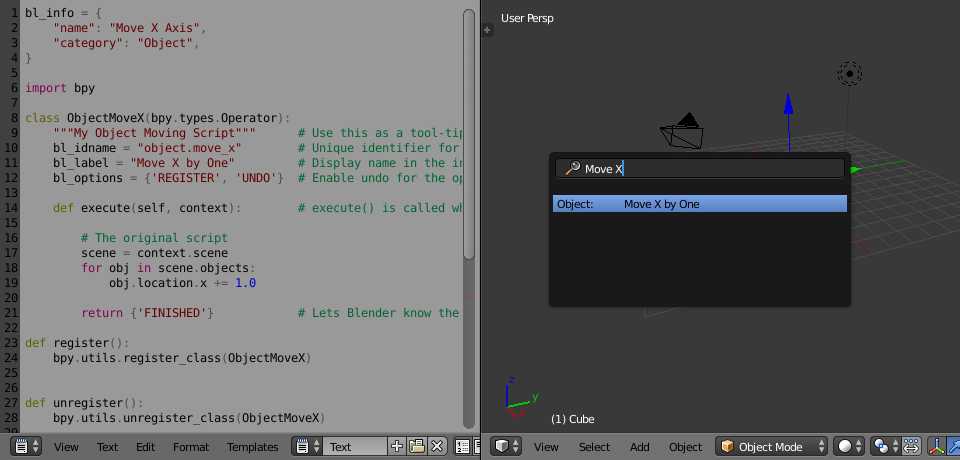
bl_info = {
    "name": "Move X Axis",
    "blender": (2, 80, 0),
    "category": "Object",
}

import bpy


class ObjectMoveX(bpy.types.Operator):
    """My Object Moving Script"""      # Use this as a tooltip for menu items and buttons.
    bl_idname = "object.move_x"        # Unique identifier for buttons and menu items to reference.
    bl_label = "Move X by One"         # Display name in the interface.
    bl_options = {'REGISTER', 'UNDO'}  # Enable undo for the operator.

    def execute(self, context):        # execute() is called when running the operator.

        # The original script
        scene = context.scene
        for obj in scene.objects:
            obj.location.x += 1.0

        return {'FINISHED'}            # Lets Blender know the operator finished successfully.

def menu_func(self, context):
    self.layout.operator(ObjectMoveX.bl_idname)

def register():
    bpy.utils.register_class(ObjectMoveX)
    bpy.types.VIEW3D_MT_object.append(menu_func)  # Adds the new operator to an existing menu.

def unregister():
    bpy.utils.unregister_class(ObjectMoveX)


# This allows you to run the script directly from Blender's Text editor
# to test the add-on without having to install it.
if __name__ == "__main__":
    register()
Note
bl_info is split across multiple lines, this is just a style convention used to more easily add items.
Note
Rather than using bpy.context.scene, we use the context.scene argument passed to execute().
In most cases these will be the same. However in some cases, operators will be passed a custom context
so script authors should prefer the context argument passed to operators.
To test the script, you can copy and paste it into Blender’s Text editor and run it. This will execute the script directly and call register immediately.
However running the script won’t move any objects. For this, you need to execute the newly registered operator.
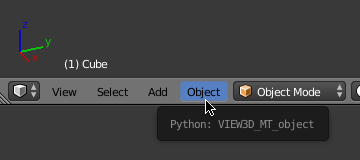
Operator Search menu.
Open the Operator Search menu
and type in “Move X by One” (the bl_label), then Return.
The objects should move as before.
Keep this add-on open in Blender for the next step - Installing.
Install the Add-on
Once you have your add-on within in Blender’s Text editor, you will want to be able to install it so it can be enabled in the Preferences to load on startup.
Even though the add-on above is a test, let’s go through the steps anyway so you know how to do it for later.
To install the Blender text as an add-on, you will first have to save it on drive. Take care to obey the naming
restrictions that apply to Python modules and end with a .py extension.
Once the file is on drive, you can install it as you would for an add-on downloaded online.
Open the and select the file.
Now the add-on will be listed and you can enable it by pressing the checkbox, if you want it to be enabled on restart, press Save as Default. The operator can be run in the same way as described in the previous section.
When the add-on is enabled, Blender executes the code and runs the register() function.
When the add-on is disabled, Blender runs the unregister() function.
Note
The destination of the add-on depends on your Blender configuration. When installing an add-on the source and destination paths are printed in the console. You can also find add-on path locations by running this in the Python Console:
import addon_utils
print(addon_utils.paths())
More is written on this topic here: Directory Layout.
Your Second Add-on
For our second add-on, we will focus on object instancing – this is – to make linked copies of an object in a similar way to what you may have seen with the Array modifier.
Write the Script
As before, first we will start with a script, develop it, then convert it into an add-on.
import bpy
from bpy import context

# Get the current scene
scene = context.scene

# Get the 3D cursor location
cursor = scene.cursor.location

# Get the active object (assume we have one)
obj = context.active_object

# Now make a copy of the object
obj_new = obj.copy()

# The new object has to be added to a collection in the scene
scene.collection.objects.link(obj_new)

# Now we can place the object
obj_new.location = cursor
Now try copying this script into Blender and run it on the default Cube. Make sure you click to move the 3D cursor before running as the duplicate will appear at the cursor’s location.
After running, notice that when you go into Edit Mode to change the Cube – all of the copies change. In Blender, this is known as Linked Duplicates.
Next, we’re going to do this in a loop, to make an array of objects between the active object and the cursor.
import bpy
from bpy import context

scene = context.scene
cursor = scene.cursor.location
obj = context.active_object

# Use a fixed value for now, eventually make this user adjustable
total = 10

# Add 'total' objects into the scene
for i in range(total):
    obj_new = obj.copy()
    scene.collection.objects.link(obj_new)

    # Now place the object in between the cursor
    # and the active object based on 'i'
    factor = i / total
    obj_new.location = (obj.location * factor) + (cursor * (1.0 - factor))
Try running this script with the active object and the cursor spaced apart to see the result.
With this script you’ll notice we’re doing some math with the object location and cursor,
this works because both are 3D mathutils.Vector instances,
a convenient class provided by the mathutils module which
allows vectors to be multiplied by numbers and matrices.
If you are interested in this area, read into mathutils.Vector
– there are many handy utility functions such as getting the angle between vectors,
cross product, dot products as well as more advanced functions in mathutils.geometry
such as Bézier spline interpolation and ray-triangle intersection.
For now we will focus on making this script an add-on, but it’s good to know that this 3D math module is available and can help you with more advanced functionality later on.
Write the Add-on
The first step is to convert the script as-is into an add-on:
bl_info = {
    "name": "Cursor Array",
    "blender": (2, 80, 0),
    "category": "Object",
}

import bpy


class ObjectCursorArray(bpy.types.Operator):
    """Object Cursor Array"""
    bl_idname = "object.cursor_array"
    bl_label = "Cursor Array"
    bl_options = {'REGISTER', 'UNDO'}

    def execute(self, context):
        scene = context.scene
        cursor = scene.cursor.location
        obj = context.active_object

        total = 10

        for i in range(total):
            obj_new = obj.copy()
            scene.collection.objects.link(obj_new)

            factor = i / total
            obj_new.location = (obj.location * factor) + (cursor * (1.0 - factor))

        return {'FINISHED'}

def register():
    bpy.utils.register_class(ObjectCursorArray)


def unregister():
    bpy.utils.unregister_class(ObjectCursorArray)


if __name__ == "__main__":
    register()
Everything here has been covered in the previous steps, you may want to try run the add-on still and consider what could be done to make it more useful.
Two of the most obvious missing things are – having the total fixed at 10, and having to access the operator with Operator Search is not very convenient.
Both these additions are explained next, with the final script afterwards.
Operator Property
There are a variety of property types that are used for tool settings, common property types include: int, float, vector, color, Boolean and string.
These properties are handled differently to typical Python class attributes because Blender needs to display them in the interface, store their settings in keymaps and keep settings for reuse.
While this is handled in a fairly Pythonic way, be mindful that you are in fact defining tool settings that are loaded into Blender and accessed by other parts of Blender, outside of Python.
To get rid of the literal 10 for total, we’ll use an operator property.
Operator properties are defined via bpy.props module, this is added to the class body:
# moved assignment from execute() to the body of the class...
total: bpy.props.IntProperty(name="Steps", default=2, min=1, max=100)

# and this is accessed on the class
# instance within the execute() function as...
self.total
These properties from bpy.props are handled specially by Blender
when the class is registered so they display as buttons in the user interface.
There are many arguments you can pass to properties to set limits,
change the default and display a tooltip.
See also
This document doesn’t go into details about using other property types. However, the link above includes examples of more advanced property usage.
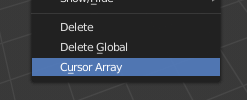
Menu Item
Add-ons can add to the user interface of existing panels, headers and menus defined in Python.
For this example we’ll add to an existing menu.
Menu Identifier.
To find the identifier of a menu, first enable Python Tooltips in the preferences. Then you can hover your mouse over the menu item and the identifier is displayed.
The method used for adding a menu item is to append a draw function into an existing class:
def menu_func(self, context):
    self.layout.operator(ObjectCursorArray.bl_idname)

def register():
    bpy.utils.register_class(ObjectCursorArray)
    bpy.types.VIEW3D_MT_object.append(menu_func)
For docs on extending menus, see: bpy.types.Menu.
Keymap
In Blender, add-ons have their own keymaps so as not to interfere with Blender’s built-in keymaps.
In the example below, a new object mode bpy.types.KeyMap is added,
then a bpy.types.KeyMapItem is added to the keymap which references
our newly added operator, using Shift-Ctrl-T as the key shortcut to activate it.
# store keymaps here to access after registration
addon_keymaps = []

def register():

    # handle the keymap
    wm = bpy.context.window_manager
    km = wm.keyconfigs.addon.keymaps.new(name='Object Mode', space_type='EMPTY')

    kmi = km.keymap_items.new(ObjectCursorArray.bl_idname, 'T', 'PRESS', ctrl=True, shift=True)
    kmi.properties.total = 4

    addon_keymaps.append((km, kmi))


def unregister():

    # handle the keymap
    for km, kmi in addon_keymaps:
        km.keymap_items.remove(kmi)
    addon_keymaps.clear()
Notice how the keymap item can have a total setting different than the default set by the operator,
this allows you to have multiple keys accessing the same operator with different settings.
Note
While Shift-Ctrl-T is not a default Blender key shortcut, it is hard to make sure add-ons will not overwrite each other’s keymaps. Thus at least take care when assigning keys that they do not conflict with important functionality of Blender (see also is key free add-on).
For API documentation on the functions listed above, see:
Bringing It All Together
bl_info = {
    "name": "Cursor Array",
    "blender": (2, 80, 0),
    "category": "Object",
}

import bpy


class ObjectCursorArray(bpy.types.Operator):
    """Object Cursor Array"""
    bl_idname = "object.cursor_array"
    bl_label = "Cursor Array"
    bl_options = {'REGISTER', 'UNDO'}

    total: bpy.props.IntProperty(name="Steps", default=2, min=1, max=100)

    def execute(self, context):
        scene = context.scene
        cursor = scene.cursor.location
        obj = context.active_object

        for i in range(self.total):
            obj_new = obj.copy()
            scene.collection.objects.link(obj_new)

            factor = i / self.total
            obj_new.location = (obj.location * factor) + (cursor * (1.0 - factor))

        return {'FINISHED'}


def menu_func(self, context):
    self.layout.operator(ObjectCursorArray.bl_idname)

# store keymaps here to access after registration
addon_keymaps = []


def register():
    bpy.utils.register_class(ObjectCursorArray)
    bpy.types.VIEW3D_MT_object.append(menu_func)

    # handle the keymap
    wm = bpy.context.window_manager
    # Note that in background mode (no GUI available), keyconfigs are not available either,
    # so we have to check this to avoid nasty errors in background case.
    kc = wm.keyconfigs.addon
    if kc:
        km = wm.keyconfigs.addon.keymaps.new(name='Object Mode', space_type='EMPTY')
        kmi = km.keymap_items.new(ObjectCursorArray.bl_idname, 'T', 'PRESS', ctrl=True, shift=True)
        kmi.properties.total = 4
        addon_keymaps.append((km, kmi))

def unregister():
    # Note: when unregistering, it's usually good practice to do it in reverse order you registered.
    # Can avoid strange issues like keymap still referring to operators already unregistered...
    # handle the keymap
    for km, kmi in addon_keymaps:
        km.keymap_items.remove(kmi)
    addon_keymaps.clear()

    bpy.utils.unregister_class(ObjectCursorArray)
    bpy.types.VIEW3D_MT_object.remove(menu_func)


if __name__ == "__main__":
    register()
In the menu.
Run the script (or save it and add it through the Preferences like before) and it will appear in the Object menu.
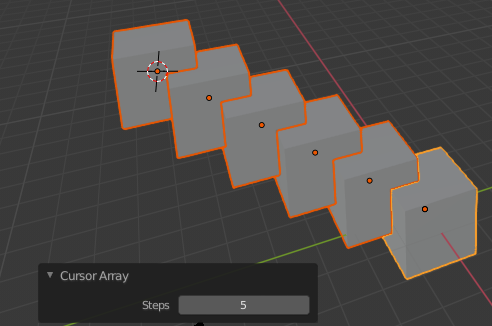
Operator Property.
After selecting it from the menu, you can choose how many instances of the cube you want create.
Note
Directly executing the script multiple times will add the menu each time too. While not useful behavior, there is nothing to worry about since add-ons will not register themselves multiple times when enabled through the Preferences.
Conclusions
Add-ons can encapsulate certain functionality neatly for writing tools to improve your workflow or for writing utilities for others to use.
While there are limits to what Python can do within Blender, there is certainly a lot that can be achieved without having to dive into Blender’s C/C++ code.
The example given in the tutorial is limited, but shows the Blender API used for common tasks that you can expand on to write your own tools.
Further Reading
Blender comes with commented templates which are accessible from the Text editor’s header. If you have specific areas you want to see example code for, this is a good place to start.
Here are some sites you might like to check on after completing this tutorial.
Blender/Python API Overview – For more background details on Blender/Python integration.
How to Think Like a Computer Scientist – Great info for those who are still learning Python.
Blender Development – Blender Development, general information and helpful links.
Blender Developer Forum – Forum where people ask Python development questions.