Workflow
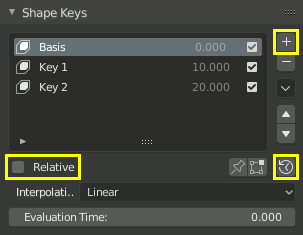
Shape keys are created and managed in the Shape Keys panel, found in the Object Data tab of the Properties editor (for example, the Mesh tab for mesh objects).
A shape key is edited by selecting it in the panel and then moving the object’s vertices to new positions in the 3D Viewport.
The panel also contains controls to adjust the Value (influence or weight) of each shape key. This allows you to view a shape in isolation, or see how it combines with other active shape keys.
Adding and Removing Vertices
It is not possible to add or remove vertices in a shape key. The number of vertices and their connectivity is defined by the object’s topology (mesh, curve, surface, or lattice). A shape key only stores the positions of existing vertices, so all shape keys always include every vertex.
When new vertices are added, all existing shape keys will record them at their creation position. Although it is technically possible to add or delete vertices after creating shape keys, it is best practice to finalize the mesh topology before creating shape keys.
Adding Shape Keys
When adding a new shape key with the button next to the list, the new shape will be a copy of the Basis shape, regardless of the current visible result in the 3D Viewport.
When adding a new shape key via , the new shape is created from the currently visible vertex configuration (including the influence of other shape keys).
For facial animation with relative shape keys, a common technique is to first create a shape key with a complex extreme pose (e.g. anger or surprise). You can then break it down into smaller components by applying a temporary vertex group to the complex shape and creating a copy with New Shape from Mix. This helps reduce conflicts between shape keys that would otherwise produce double effects.
Relative Shape Keys
In Object Mode, add a new shape key in the Shape Key panel ().
Basis is the rest shape. “Key 1”, “Key 2”, etc. will be the new shapes.
Switch to Edit Mode, select “Key 1” in the panel.
Modify the mesh as desired (do not add or remove vertices).
Select “Key 2”. The mesh resets to the Basis shape.
Modify “Key 2” as desired, then repeat for additional shape keys.
Switch back to Object Mode.
Adjust the Value sliders for “Key 1”, “Key 2”, etc. to blend between shapes.
The example below shows, from left to right: Basis, “Key 1”, “Key 2”,
and a mix of “Key 1” (1.0) and “Key 2” (0.8) in Object Mode.
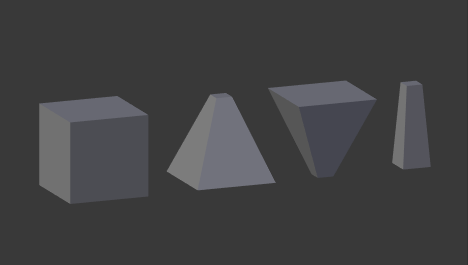
Relative shape keys example.
For practical examples, see Combining Shape Keys and Drivers.
Absolute Shape Keys
Absolute shape keys workflow.
Add a sequence of shape keys as described above.
Disable the Relative checkbox.
Click the Reset Timing button.
Switch to Object Mode.
Drag Evaluation Time to scrub through the sequence of shapes.
Tip
By animating the Evaluation Time with a driver or keyframes, you can create shape key animations.
See also
Shape key operators are available in Edit Mode which provide additional modeling tools for controlling shape keys: