Curve Structure
Splines
Splines are the fundamental components of curve objects, defining their shapes. A curve object can consist of multiple splines, similar to how a mesh object can contain multiple disconnected meshes. Each spline’s shape is determined by its Control Points. Splines come in several types: Poly, Bézier, and NURBS, each with its own algorithm for representing curves, as described in the Spline Types section.
Splines have unique properties that can be adjusted in Edit Mode via the Active Spline panel.
Control Points
Splines are made up of control points, which connect to form the spline. Control points can be selected and transformed to adjust the spline’s shape. This is analogous to vertices in a mesh object.
See also
Spline Types
Poly
Poly splines are the simplest type, with no interpolation between control points. They are used when converting meshes to curves for accurate representation of the original mesh. While Poly splines are precise, Bézier or NURBS splines are generally preferred for smooth curves.
Bézier
Bézier splines use control points and handles to define their shape. A curve segment exists between two control points, with the handles controlling the curvature.
In the illustration below, the control points are at the center of the pink lines, while the handles extend outward. The arrows represent the curve normals, indicating direction and tilt.
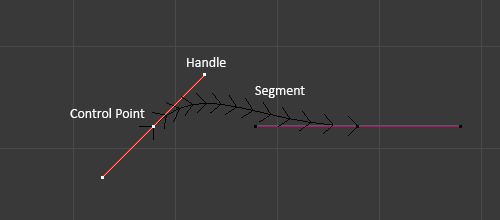
Bézier Curve in Edit Mode.
Handle Types
Bézier curves support four handle types, which can be changed with V:
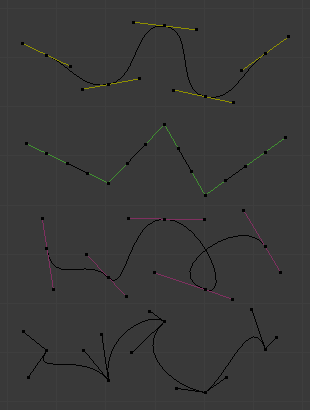
Bézier Curve Handle Types.
- Automatic:
Automatically adjusts handle length and direction for the smoothest curve. Displayed as yellow handles. Converts to Aligned when moved.
- Vector:
Handles point directly toward adjacent control points, enabling straight lines or sharp corners. Displayed as green handles. Converts to Free when moved.
- Aligned:
Handles remain on a straight line, ensuring smooth, continuous curves. Displayed as purple handles.
- Free:
Handles move independently, allowing for asymmetric curves. Displayed as black handles.
Note
When a control point is selected, its handles are highlighted in red, altering their usual color. For example, Vector handles (normally green) appear yellow when selected, which can be confused with Automatic handles.
To disable this effect, adjust the color settings in under Theme Preferences.
NURBS
NURBS (Non-Uniform Rational B-Splines) are mathematically precise splines, offering exact shapes. Unlike Bézier curves, which approximate shapes (e.g., a Bézier circle approximates a perfect circle), NURBS can represent exact geometry.
For more information, refer to the Wikipedia page.
NURBS control points have a unique weight property that determines their influence on the curve. This weight differs from the Goal Weight used in soft body simulations. Weights can be adjusted in the W field of the Transform panel.
Note
If all control points have the same weight, their influences cancel out. Differences in weight cause the curve to move toward or away from specific control points.