Image Settings

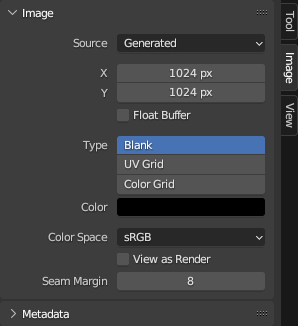
Image tab.
Source
Select the type of image to use. For images that come from files, see Supported Graphics Formats.
Single Image
A single, static image.
Image Sequence
An animation where each frame is stored in a separate file. See Opening an Image Sequence. For options, see Movie below.
Movie
A video file. Note that if you want to do motion tracking and video compositing rather than simply using the video as a texture, you should load it into the Movie Clip Editor instead.
Note
The options below are for preview purposes only; they don’t affect the 3D Viewport or the render. For that, see the Image Texture Node.
Note
Blender plays all videos at the scene frame rate, not their original frame rate, meaning they’ll be faster or slower than intended if these frame rates don’t match up. To work around this, see the Offset field of the Image Texture Node linked above.
- Frames
How many frames of the video to play. Past this point, the video will be paused (unless Cyclic is enabled).
- Match Movie Length
Sets the Frames to the number of frames in the video file.
- Start
Scene frame at which the video should start playing.
- Offset
Number of frames to offset the video to an earlier point in time. (Put differently: how many frames at the start of the video to skip.)
- Cyclic
Start over after the last frame to create a continuous loop.
- Auto Refresh
Play the video in the Image Editor when the scene animation is playing. (The mouse cursor should be in the Image Editor or the Timeline when starting playback for this to work.)
- Deinterlace
Apply deinterlacing to interlaced (analog) video.
Generated
Image generated by Blender.
- X, Y
The width and height of the image in pixels.
- Float Buffer
Creates a 32-bit image. This has a larger file size, but holds much more color information than the standard 8-bit image. For close-ups and large gradients, it may be better to use a 32-bit image.
- Type
- Blank:
Creates a blank image of a single specified color.
- UV Grid:
Creates a checkerboard pattern with a colored cross (+) in each square.
- Color Grid:
Creates a more complex colored grid with letters and numbers denoting locations. It could be used to check for stretching or distortion in the UV mapping.
- Color
The fill color when creating a Blank image.
Common Options
- File
Used for replacing or packing files.
- Pack
Embed the resource into the current blend-file. See Packed Data.
- Path
Path to the linked file.
- Open
Opens the File Browser to select a file from a drive.
- Reload
Reloads the file. Useful when it has been reworked in an external application.
- Use Multi-View
See Multi-View.
- Color Space
The Color Space the image file was saved in. This is used for converting the image to linear color (which is the color space Blender works with).
Textures and final renders are often stored in sRGB, while OpenEXR images are stored in a linear color space. Some images such as normal, bump or stencil maps do not strictly contain “colors” and should never have a color conversion applied to them. For such images, the color space should be set to Non-Color.
The list of color spaces depends on the active OCIO config. The default supported color spaces are described in detail here: Default OpenColorIO Configuration.
- Alpha
How the image uses its Alpha Channel. This option is only available if the image format supports transparency.
- Straight:
Store RGB and alpha channels separately with alpha acting as a mask, also known as unassociated alpha. Commonly used by image editing applications and file formats like PNG. This preserves colors in parts of the image with zero alpha.
- Premultiplied:
Store RGB channels with alpha multiplied in, also known as associated alpha. The natural format for renders and used by file formats like OpenEXR. This can represent purely emissive effects like fire correctly, unlike straight alpha.
- Channel Packed:
Different images are packed in the RGB and alpha channels, and they should not affect each other. Channel packing is commonly used by game engines to save memory.
- None:
Ignore alpha channel from the file and make image fully opaque.
- Half Float Precision
Load the image with a bit depth of only 16 bits per channel instead of 32, which saves memory.
- View as Render
Apply the color management settings when displaying this image on the screen.
- Seam Margin
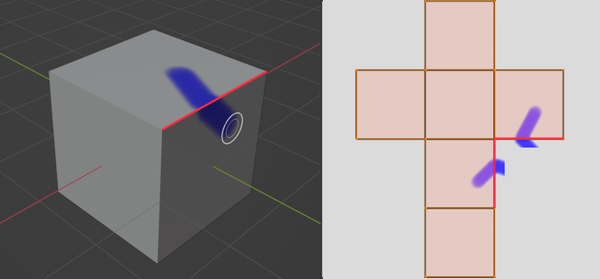
The thickness of the margin around UV islands for texture painting to bleed into. This margin ensures that no unpainted pixels remain at the island border.

Painting a stroke across a seam in 3D space makes it extend past the UV island borders in the texture, until it gets cut off at the margin.
A higher value will result in a thicker margin, which can be useful if you intend to create mipmaps of the texture. However, this may also reduce painting performance.
Note
This setting only affects Sculpt Mode, where texture painting support is currently experimental. In Texture Paint Mode, a fixed margin is used instead.