Introduction
A Keyframe is simply a marker of time which stores the value of a property.
For example, a Keyframe might define that the horizontal position of a cube is at 3 m on frame 1.
The purpose of a Keyframe is to allow for interpolated animation, meaning, for example, that the user could then add another key on frame 10, specifying the cube’s horizontal position at 20 m, and Blender will automatically determine the correct position of the cube for all the frames between frame 1 and 10 depending on the chosen interpolation method (e.g. Linear, Bézier, Quadratic, etc.).
An overview of existing keyframes can be seen via the Dope Sheet editor.
Visualization
There are some important visualization features in the 3D Viewport that can help animation.
When the current frame is a keyframe for the current active object, the name of this object (shown in the upper left corner of the 3D Viewport) turns yellow.
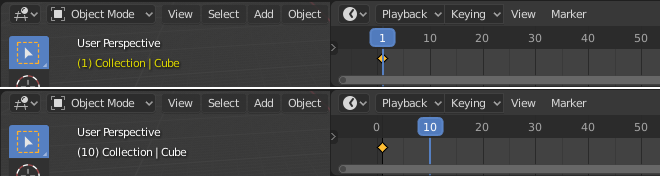
Top: Current frame is a keyframe for Cube. Bottom: Current frame isn’t a keyframe.
Interpolation
Keyframe interpolation is represented and controlled by animation curves, also known as F-Curves. These curves can be viewed and modified via the Graph Editor.
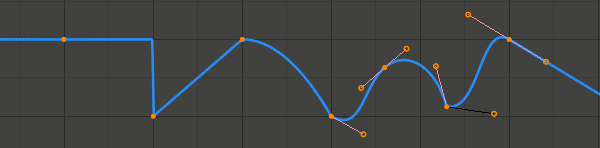
Constant, Linear, Quadratic and Bézier interpolation, with Linear extrapolation.
The X axis of the curve corresponds to time, while Y represents the value of the property. Keyframes themselves define points of the curve, while interpolation is controlled by additional parameters.
The Interpolation Mode is the main setting that specifies for each keyframe how the curve is interpolated from that key to the next one. There are a number of modes with fixed shapes, e.g. Constant, Linear, Quadratic etc, and a free form Bézier mode.
Extrapolation specifies how the curve extends before the first, and after the last keyframe. The main available choices are Constant and Linear; it is also possible to configure the curve to loop.
Bézier interpolation is controlled by handles, which have a handle type and position. The position of Free and Aligned handles must be set manually from the Graph editor, while Vector, Automatic and Auto Clamped handles are computed automatically from keyframe values.
Interpolation, Extrapolation and Handle Type can also be changed from the Dope Sheet editor.
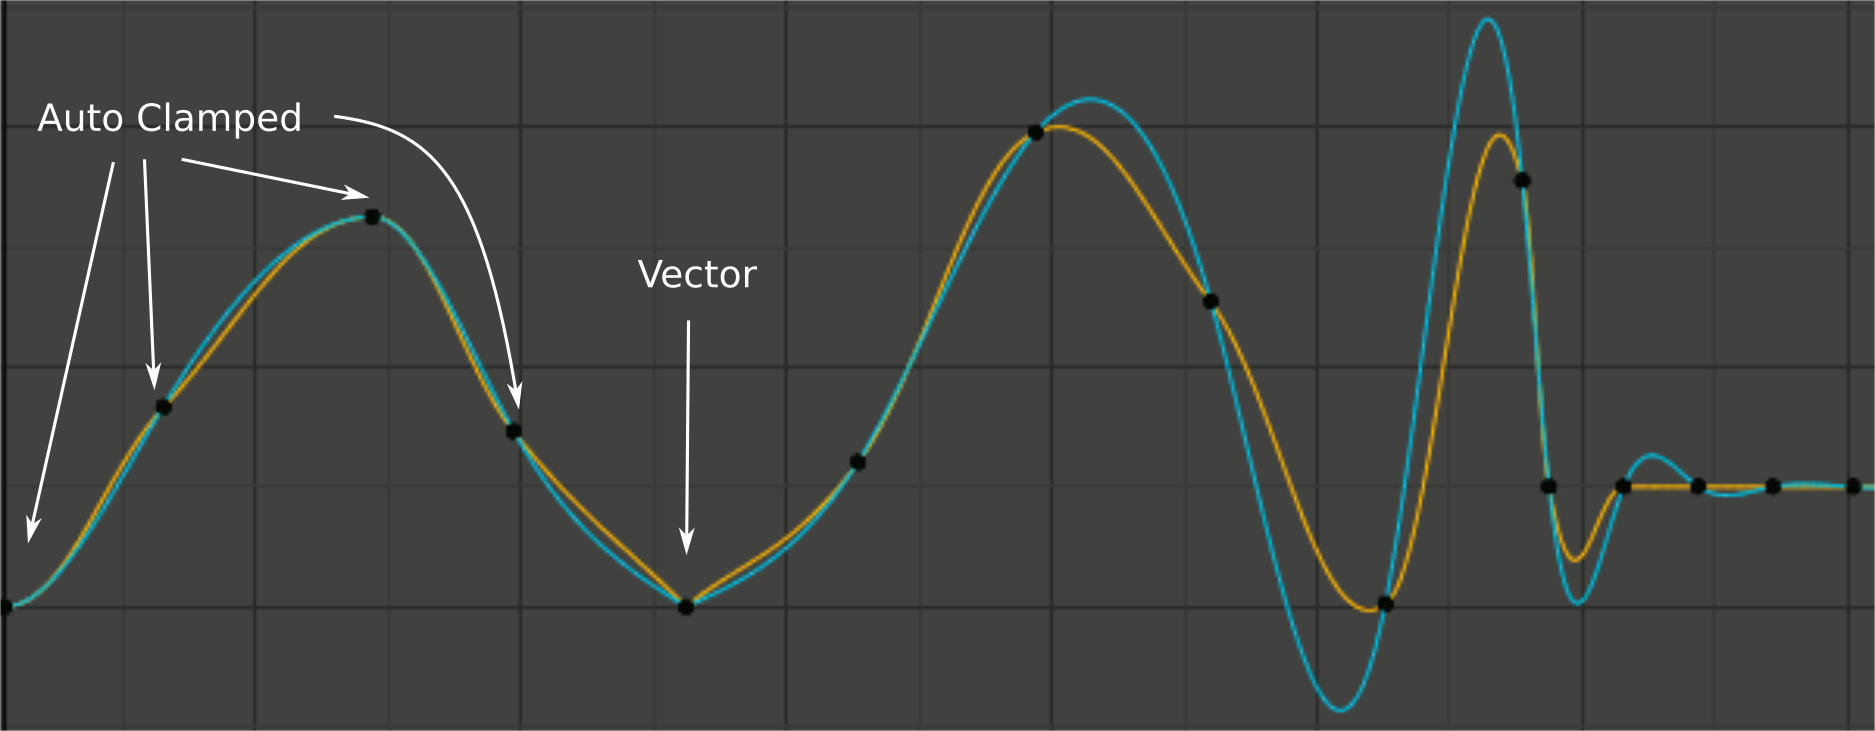
Handle smoothing modes. Red: None, Green: Continuous Acceleration.
The method how the three automatic handle types are computed is controlled by the per-curve Auto Handle Smoothing setting. The None mode resembles how most other software works and only considers the values of the immediately adjacent keys. The Continuous Acceleration mode considers the shape of the whole curve, which produces smoother results out of the box, but means that changes in one key affect interpolation over a larger section of the curve; it also tends to overshoot more with Automatic handles.
Keyframe Types
For visually distinguishing regular keyframes from different animation events or states (extremes, breakdowns, or other in-betweens) there is the possibility of applying different colors on them for visualization.

Left: not selected; Right: selected.
- Keyframe (white / yellow diamond)
Normal keyframe.
- Breakdown (small cyan diamond)
Breakdown state. e.g. for transitions between key poses.
- Moving Hold (dark gray / orange diamond)
A keyframe that adds a small amount of motion around a holding pose. In the Dope Sheet it will also display a bar between them.
- Extreme (big pink diamond)
An ‘extreme’ state, or some other purpose as needed.
- Jitter (tiny green diamond)
A filler or baked keyframe for keying on ones, or some other purpose as needed.
- Generated (dark diamond)
A key generated by some tool, for example Copy Global Transform: Fix to Camera. This keyframe type indicates to Blender and add-ons that it is safe to remove and re-generate them, so be careful when manually marking your hand-made animation with this type.
Handles & Interpolation Mode Display
Dope Sheet can display the Bézier handle type associated with the keyframe, and mark segments with non-Bézier interpolation. This facilitates basic editing of interpolation without the use of the Graph Editor.
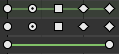
The icon shape represents the type of the Bézier Handles belonging to the keyframe.
From top: summary, Bézier, linear.
Circle |
Auto Clamped (default) |
Circle With Dot |
Automatic |
Square |
Vector |
Clipped Diamond |
Aligned |
Diamond |
Free |
If the handles of a keyframe have different types, or in case of summary rows representing multiple curves, out of the available choices the icon that is furthest down the list is used. This means that if a grouped row uses a circle icon, it is guaranteed that none of the grouped channels have a non-auto key.
Horizontal green lines mark the use of non-Bézier Interpolation. The line is dimmed in summary rows if not all grouped channels have the same interpolation.
Display of this information can be disabled via the Show Handles and Interpolation option of the Dope Sheet’s View Menu.