Subdivision Surface Modifier
The Subdivision Surface modifier (often shortened as slang to “Subdiv” or “Subsurf”) is used to split the faces of a mesh into smaller faces, giving it a smooth appearance. It enables you to create complex smooth surfaces while modeling simple, low-vertex meshes. It avoids the need to save and maintain huge amounts of data, and gives a smooth “organic” look to the object.
As with any modifier, order of execution (position in the modifier stack) has an important bearing on the results.
Keep in mind that this is a different operation than its companion, Smooth Shading. You can see the difference between the two in the grid image below.
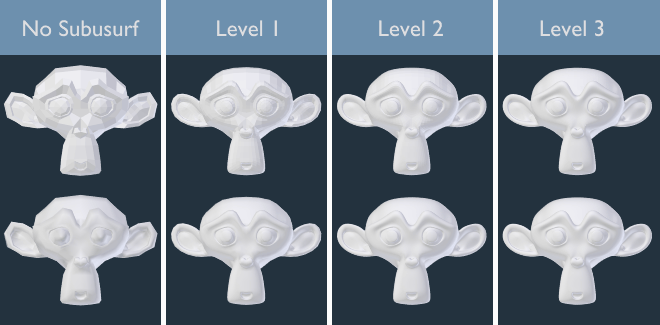
Subdivision levels 0 to 3, without and with Smooth Shading.
Tip
The Subdivision Surface modifier does not allow you to edit the new subdivided geometry without applying it, but the Multiresolution modifier does (in Sculpt Mode).
Note
This modifier uses the OpenSubdiv library as a backend.
Options
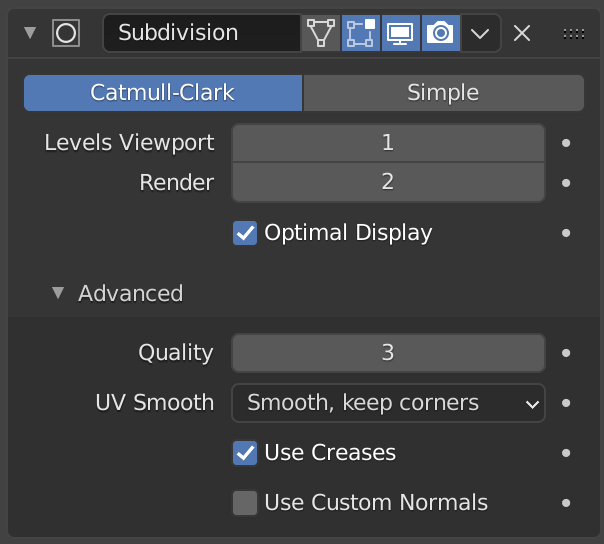
The Subdivision Surface modifier.
- Catmull-Clark
Subdivides and smooths the surfaces to create a more pleasant looking mesh. According to its Wikipedia page, the “arbitrary-looking formula was chosen by Catmull and Clark based on the aesthetic appearance of the resulting surfaces rather than on a mathematical derivation.”
- Simple
Only subdivides the surfaces, this often does not provide any smoothing unless the surface is non-coplanar (the same as the Subdivide operator, in Edit Mode). To work around this behavior for non-coplanar geometry, triangulate to ensure all geometry is coplanar.
Simple mode can be used, for example, to increase the base mesh resolution when using displacement maps.
- Levels Viewport, Render
The number of subdivision levels shown in the 3D Viewport or the final render.
Warning
Higher levels of subdivisions results in more vertices, which means higher memory consumption (both system RAM, and video memory for display). This can cause Blender to hang or crash if not enough memory is available.
Tip
The right combination of these settings will allow you to keep a fast and lightweight approximation of your model when interacting with it in the 3D Viewport, but use a higher quality version when rendering.
Be careful not to set the Viewport subdivisions higher than the Render subdivisions, this would mean that the quality in the 3D Viewport will be higher than the rendered.
- Optimal Display
When rendering the wireframe of this object, the wires of the new subdivided edges will be skipped (only displays the edges of the original geometry).
Advanced
- Use Limit Surface
Places vertices at the surface that would be produced with infinite levels of subdivision (smoothest possible shape).
- Quality
When Use Limit Surface is enabled this property controls how precisely vertices are positioned on the limit surface (relatively to their theoretical position of an infinitely subdivided mesh). It can be lowered to get a better performance.
Using higher values does not necessarily mean real improvement in quality, ideal results might be reached well before the maximum Quality value.
Note
This value can affect the accuracy of Edge Creases; using a higher Quality value will allow for a wider range of crease values to work accurately.
- UV Smooth
Controls how subdivision smoothing is applied to UVs.
- None:
UVs remain unchanged.
- Keep Corners:
UV islands are smoothed, but their boundary remain unchanged.
- Keep Corners, Junctions:
UVs are smoothed, corners on discontinuous boundary and junctions of three or more regions are kept sharp.
- Keep Corners, Junctions, Concave:
UVs are smoothed, corners on discontinuous boundary, junctions of three or more regions and darts and concave corners are kept sharp.
- Keep Boundaries:
UVs are smoothed, boundaries are kept sharp.
- All:
UVs and their boundaries are smoothed.
- Boundary Smooth
Controls how open boundaries (and corners) are smoothed.
- All:
Smooth boundaries, including corners.
- Keep Corners:
Smooth boundaries, but corners are kept sharp.
- Use Creases
Use the Weighted Edge Creases values stored in edges to control how smooth they are made.
- Use Custom Normals
Interpolates existing Custom Split Normals of the resulting mesh. Otherwise, new faces will have the overall normal orientation of that original face.
Adaptive Subdivision
Cycles Only
- Adaptive Subdivision
Subdivide objects based on their distance to the camera, automatically adding more or less detail. Particularly useful for fine displacement detail.
- Adaptive Space
- Pixel:
Subdivide polygons to reach a specified pixel size on screen.
- Object:
Subdivide to reach a specified edge length in object space. This is required to use adaptive subdivision for instanced meshes.
- Pixel Size
Target polygon pixel size for adaptive subdivision.
- Edge Length
Target object space edge length.
Limitations
Multi-view renders can have some inconsistencies between views.
Instancing does not work well with Pixel space subdivision. Subdivision will be based on the original object position relative to the camera, and it is recommended to use Object space instead.
Keyboard Shortcuts
To quickly add a Subdivision Surface modifier to one or more objects, select the object(s) and press Ctrl-1. That will add a Subdivision Surface modifier with Viewport subdivisions set to 1. You can use other numbers too, such as Ctrl-2, Ctrl-3, etc, to add a modifier with that number of subdivisions. Adding a Subdivision Surface modifier in this fashion will not modify the Render subdivisions.
If an object already has a Subdivision Surface modifier, doing this will simply change its subdivision level instead of adding another modifier.
Control
Catmull-Clark subdivision rounds off edges, and often this is not what you want. There are several solutions that allow you to control the subdivision.
Weighted Edge Creases
Weighted edge creases for subdivision surfaces allows you to change the way the Subdivision Surface modifier subdivides the geometry to give the edges a smooth or sharp appearance.
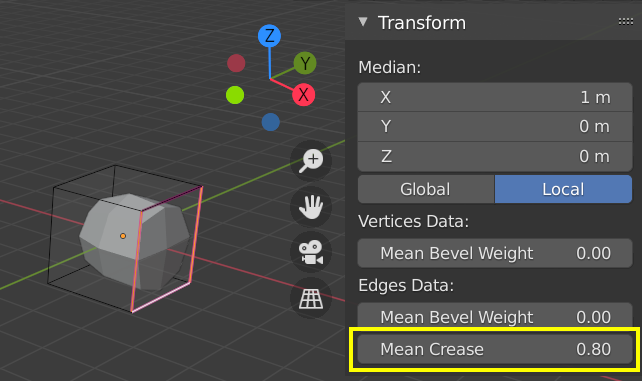
A subdivided cube with creased edges.
The crease weight of selected edges can be changed in the Transform panel, Sidebar of the 3D Viewport. The scale-like dedicated tool Shift-E can also be used to adjust the crease weight. A higher value makes the edge “stronger” and more resistant to the smoothing effect of subdivision surfaces.
Edge Loops
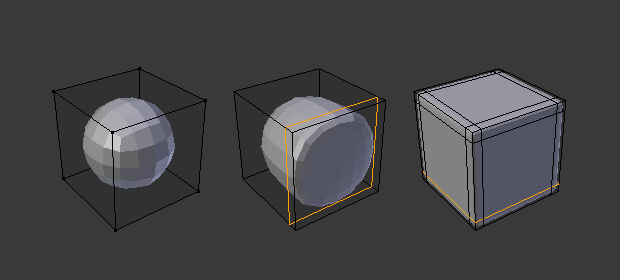
Subdivision Level 2 cube, the same with an extra Edge Loop, and the same with six extra Edge Loops.
The Subdivision Surface modifier demonstrates why good, clean topology is so important. As you can see in the figure, it has a drastic effect on a default cube. Until you add in additional loops (with e.g. Loop Cut and Slide), the shape is almost unrecognizable as a cube.
A mesh with deliberate topology has good placement of edge loops, which allow the placement of more loops (or their removal) to control the sharpness/smoothness of the resultant mesh.
Known Limitations
Non-Contiguous Normals
Abrupt normal changes will prevent portions of the mesh from producing a smooth subdivision. Instead, these portions with non-contiguous normals will be subdivided using the “Simple” subdivision method.

A quick way to fix this is to Recalculate Normals. If this does not work you may have to manually flip the normals.