Tabs & Panels
Tabs
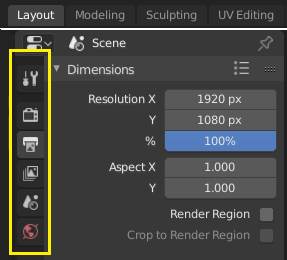
Top: Horizontal Tab header in the Topbar. Bottom: Vertical Tab header shows tab icons in the Properties.
Tabs are used to control overlapping sections in the user interface. The content of only one Tab is visible at a time. Tabs are listed in a Tab header, which can be horizontal or vertical.
Switching/Cycling
Vertical tabs can be switched with Ctrl-Wheel from anywhere in the tab. You can also cycle through tabs with Ctrl-Tab and Shift-Ctrl-Tab, or press down LMB and move the mouse over the tab header icons. Pressing NumpadPeriod scrolls to the active tab in case it is out of view.
Note, these shortcuts do not apply to Workspace tabs; see Workspace controls.
Panels
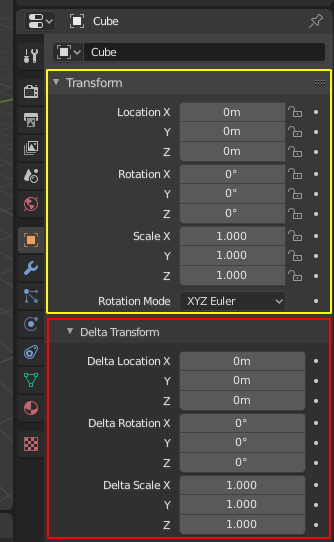
Panels in Properties.
A panel is highlighted in yellow and a subpanel in red.
The smallest organizational unit in the user interface is a panel. The panel header shows the title of the panel. It is always visible. Some panels also include subpanels.
Collapsing and Expanding
A panel can either be expanded to show its contents, or collapsed to hide its contents. An expanded panel is indicated by a down-arrow (▼) in the panel header, while a collapsed panel is shown with a right-arrow (►).
Clicking LMB on the panel header expands or collapses it.
Pressing A expands/collapses the panel under the mouse pointer.
Clicking Ctrl-LMB on the header of a collapsed panel will expand it and collapse all others.
Clicking Ctrl-LMB on the header of an expanded panel will expand/collapse all its subpanels.
Dragging with LMB over the headers will expand or collapse many at once.
Position
You can change the position of a panel within its region by clicking and dragging the grip widget (::::) on the right side of its header.
Pinning
Sometimes it is desirable to view panels from different tabs at the same time. Like, for instance, having access to a camera’s properties, while other objects are selected. This has been solved by making panels pinnable.
A pinned panel remains visible regardless of which tab has been selected. You can pin a panel by clicking on the pin icon in its header. Panels that do not have a pin icon can be pinned by RMB on the panel header and selecting Pin, or by pressing Shift-LMB.
Note
Pinning is not available for all panels. For example, it’s available in the Sidebar but not in the Properties editor.
Presets
Panels in Blender provide a Presets menu () for quickly reusing common settings. Presets can save time by storing frequently used configurations, which can then be reapplied with a single click.

Example Presets menu.
- Selector
A list of available presets. Selecting one will apply the stored values to the relevant properties.
- Preset Name
The name to use when adding a new preset.
- (Add)
Create a new preset using the current settings, the preset is then saved and appears in the list for future reuse.
- (Remove)
Deletes the selected preset.
Presets are stored as Python files in Blender’s configuration directory. Advanced users can edit these preset files directly to fine-tune settings or copy them to other systems.