Weight Paint Tools

Draw

Paints a specified weight over the object.

Blend

The brush Blend Modes defines in which way the weight value is applied to the vertex group while painting.

Mix

In this Blending mode the Weight value defines the target weight that will eventually be reached when you paint long enough on the same location of the mesh. And the strength determines how many strokes you need to place at the target weight. Note that for strength = 1.0 the target weight is painted immediately and for Weight = 0.0 the brush just does nothing.

Add

In this Blending mode the specified weight value is added to the vertex weights. The strength determines which fraction of the weight gets added per stroke. However, the brush will not paint weight values above 1.0.

Subtract

In this Blending mode the specified weight value is subtracted from the vertex weights. The strength determines which fraction of the weight gets removed per stroke. However, the brush will not paint weight values below 0.0.

Lighten

In this Blending mode the specified weight value is interpreted as the target weight. Very similar to the Mix Blending mode, but only weights below the target weight are affected. Weights above the target weight remain unchanged.

Darken

This Blending mode is very similar to the Lighten Blending mode. But only weights above the target weight are affected. Weights below the target weight remain unchanged.

Multiply

Multiplies the vertex weights with the specified weight value. This is somewhat like subtract, but the amount of removed weight is now dependent on the Weight value itself.

Blur

Smooths out the weighting of adjacent vertices. In this mode the Weight Value is ignored. The strength defines how much the smoothing is applied.

Blur

Smooths out the weighting of adjacent vertices. In this mode the Weight Value is ignored. The strength defines how much the smoothing is applied.

Average

Smooths weights by painting the average resulting weight from all weights under the brush.

Smear

Smudges weights by grabbing the weights under the brush and “dragging” them. This can be imagined as a finger painting tool.

Gradient

Applies a linear/radial weight gradient; this is useful at times when painting gradual changes in weight becomes difficult. Blends the weights of selected vertices with unselected vertices.

../../_images/sculpt-paint_weight-paint_tools_gradient.png

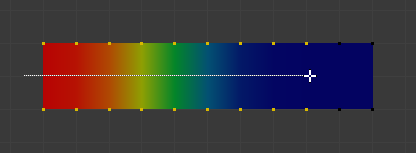
Example of the Gradient tool being used with selected vertices.

Weight

The gradient starts at the current selected weight value, blending out to nothing.

Strength

Lower values can be used so the gradient mixes in with the existing weights (just like with the brush).

Type

The shape of the gradient.

Linear:

Create gradient that forms a straight line. Shift-LMB and drag.

Radial:

Create gradient that forms a circle. Shift-Alt-LMB and drag.

Sample
Weights

Sets the brush Weight as the weight selected under the cursor. The sampled weight is displayed in the tool settings.

Vertex Group

Displays a list of possible vertex groups to select that are under the cursor.

Annotate

Draw free-hand annotation.

Annotate Line

Draw straight line annotation.

Annotate Polygon

Draw a polygon annotation.

Annotate Eraser

Erase previous drawn annotations.