Editing F-Curves
Trasforma
Riferimento
- Modalità:
Modalità Modifica
- Menù:
An F-Curve can be edited by transforming the locations of its keyframes.
- Move, Rotate, Scale
Like other elements in Blender, keyframes can be moved, rotated, and scaled as described in Basic Transformations.
- Extend E
Lets you quickly move the selected keyframes that are on a certain side of the Playhead. This is handy if you need to, say, move all the keyframes after a certain time point to the right to make space for new ones.
To use this operator, first select some or all keyframes and place your mouse cursor to the left or right of the Playhead. Then, press E, move the mouse to move (only) the keyframes on that side of the Playhead, and press LMB to confirm (or RMB to cancel).
Suggerimento
You can also change the Key Frame and Value properties in if you want to specify exact numbers.
While transforming keyframes, you can hold Shift to move them more slowly for better precision, or Ctrl to move them in coarse increments.
Aggancio
Riferimento
- Menù:
- Scorciatoia:
Shift-S
Apart from using the snapping operators in this menu, you can also turn on snapping in the header.
- Selection to Current Frame
Set the selected keyframes” time to the current frame.
- Selection to Cursor Value
Set the selected keyframes” value to that of the 2D Cursor.
- Selection to Nearest Frame
Round the time of each keyframe to the nearest frame.
- Selection to Nearest Second
Round the time of each keyframe to the nearest second. You can use Use Timecode to show seconds instead of frames at the top of the editor.
- Selection to Nearest Marker
Set the time of each keyframe to that of the nearest marker.
- Flatten Handles
Flatten the Bézier handles for the selected keyframes.
- Equalize Handles
Ensure selected keyframes” handles have equal length.
- Side
Which handles to affect (left, right, or both).
- Handle Length
Length to make selected keyframes” Bézier handles.
- Flatten
Make the values of the handles the same as their respective keyframes.
- Cursor to Selected Ctrl-G
Changes the time and value of the 2D Cursor to the average time and value of the selected keyframes.
- Cursor Value to Selection
Changes the value of the 2D Cursor to the average value of the selected keyframes.
Mirror
Riferimento
- Menù:
- Scorciatoia:
Ctrl-M
Mirrors the selected keyframes across a reference point.
- By Times over Current Frame
Mirror horizontally across the current frame.
- By Times over First Selected Marker
Mirror horizontally across the first selected marker.
- By Times over Zero Time
Mirror horizontally across frame 0.
- By Values over Cursor Value
Mirror vertically across the 2D Cursor’s value.
- By Values over Zero Value
Mirror vertically across value 0.
Jump to Selected
Riferimento
- Menù:
- Scorciatoia:
Ctrl-G
Places the 2D Cursor at the average time and value of the selected keyframes.
Insert
Riferimento
- Menù:
- Scorciatoia:
I
Adds new keyframes and selects them. Previously selected keyframes stay selected too.
- All Channels
Insert a keyframe on all visible and editable F-Curves using each curve’s current value.
- Only Selected Channels
Insert a keyframe on the selected F-Curves using each curve’s current value.
- Only Active F-Curve
Insert a keyframe on the active F-Curve using the curve’s current value.
- Active Channels at Cursor
Insert a keyframe on the active F-Curve at the 2D Cursor’s value.
- Selected Channels at Cursor
Insert a keyframe on the selected F-Curves at the 2D Cursor’s value.
Copia/Incolla
Riferimento
- Menù:
,
- Scorciatoia:
Ctrl-C, Ctrl-V
Use Ctrl-C to copy the selected keyframes and Ctrl-V to paste them. After pasting, the Regola Ultima Operazione panel provides some extra options:
- Frame Offset
Offsets the pasted keyframes horizontally so that…
- Frame Start
…the first one lands on the current frame.
- Frame End
…the last one lands on the current frame.
- Frame Relative
…they land at the same distance from the current frame as when they were copied.
- No Offset
…they stay at their original frames.
- Value Offset
Offsets the pasted keyframes vertically so that…
- Left Key
…the first one has the value of the existing keyframe to the left of the Playhead.
- Right Key
…the last one has the value of the existing keyframe to the right of the Playhead.
- Current Frame Value
…the first one has the value of the curve at the current frame.
- Cursor Value
…the first one has the value of the 2D Cursor.
- No Offset
…they keep their original values.
- Tipo
- Mix
Integrates the pasted keyframes with existing ones, only overwriting those that share a frame.
- Overwrite All
Removes all previous keyframes in the target F-Curves.
- Overwrite Range
Within each F-Curve, remove the existing keyframes that are in the range of the keyframes pasted into it.
- Overwrite Entire Range
Within each F-Curve, remove the existing keyframes that are in the range of all pasted keyframes combined.
- Flipped
If you copied keyframes from one or more pairs of symmetrically opposite bones, enabling this option will paste the keyframes of the left bones into the curves of the right ones and vice versa. In addition, the values are inverted, effectively mirroring the animation.
Duplica
Riferimento
- Menù:
- Scorciatoia:
Shift-D
Duplicates the selected keyframes. You can reposition them by moving the mouse.
Cancella
Riferimento
- Menù:
- Scorciatoia:
X, Delete
Pressing X or Delete opens a pop-up menu from where you can delete the selected keyframes.
Handle Type
Riferimento
- Menù:
- Scorciatoia:
V
Sets the handle type of the selected keyframes.
Interpolation Mode
Riferimento
- Menù:
- Scorciatoia:
T
Sets the interpolation mode of the selected keyframes. This determines the curve interpolation between each keyframe and the next.
Easing Type
Riferimento
- Menù:
- Scorciatoia:
Ctrl-E
Sets the easing mode of the selected keyframes. This determines whether easing is applied to the left side, right side, or both sides of the curve segments between each keyframe and the next.
Density
Decimate
Riferimento
- Menù:
- Menù:
Simplifies an F-Curve by removing the keyframes that influence its shape the least.
- Modalità
How to pick the number of keyframes to delete.
- Ratio
Deletes a certain percentage of keyframes.
- Rimuovi
The percentage of keyframes to remove.
- Error Margin
Deletes as many keyframes as possible while ensuring the F-Curve’s shape changes no more than a certain amount.
- Max Error Margin
How much the decimated curve may deviate from the original.
Bake Keyframes
Riferimento
- Menù:
- Scorciatoia:
Shift-Alt-O
Creates a keyframe at every frame.
Vedi anche
Bake Channels, which offers options on what range to bake and how.

Clean Keyframes
Riferimento
- Menù:
- Scorciatoia:
X
Finds redundant keyframes among the selected ones and deletes them. A keyframe is seen as redundant if it has the same value as its neighbors – even if the curve segments around it aren’t flat.
Suggerimento
This operator is likely to change the shape of the affected curves, so it’s best run after e.g. bulk keyframe insertion on all the bones of an armature (which creates useless keyframes on bones that haven’t moved) and before tweaking the curves by hand.
- Threshold
Value threshold. By increasing this, you can also delete keyframes that almost have the same value as their neighbors.
- Channels
Cleans all the keyframes (even unselected ones) in the selected F-Curves. If a curve is left with only one keyframe, it’s deleted entirely.
Blend
Riferimento
- Menù:
- Scorciatoia:
Alt-D
Adjusts the values of the selected keyframes by a certain percentage. Select a blending operator, move the mouse left or right to adjust the factor, and click LMB to confirm (or RMB to cancel).
Several blending operators work based on «neighboring keyframes.» This means that they divide the selected keyframes into contiguous groups, then reference the unselected keyframes immediately before and after each group.
Breakdown
Riferimento
- Menù:
Sets the value of the selected keyframes to an interpolation of their neighbors.
- Fattore
At -1, the keyframes are set to the value of the left neighbor.
At 1, they’re set to the value of the right neighbor.
For other factors, they’re set to an interpolation between the two neighbor values, with 0 being right in the middle.
Blend to Neighbor
Riferimento
- Menù:
Moves each selected keyframe towards the value of the left or right neighbor by a certain percentage.
- Blend
When negative, each keyframe moves Blend percent to the value of the left neighbor.
When positive, they move to the right neighbor.
When zero, they keep their original values.
Blend to Default Value
Riferimento
- Menù:
Moves the selected keyframes towards the property’s default value by a certain percentage.
- Fattore
How much to change the keyframes” values, going from 0 (no change) to 1 (reset to the default value).
Vedi anche
The Reset to Default operator resets any property to its default value without the need of keyframing.
Attenuata
Riferimento
- Menù:
Makes the selected keyframes follow an S-curve. While the slider is visible (so after activating the operator but before confirming with LMB), you can press Tab to toggle which of the following settings to edit:
- Curve Bend
A negative value gives more weight to the left side, while a positive value gives more weight to the right. A value of 0 results in a balanced curve.
- Sharpness
A low value results in an almost straight diagonal line, while a high value results in a steep rise/drop in the curve.
Blend Offset
Riferimento
- Menù:
Moves the selected keyframes up or down – all by the same amount – until the first/last one matches the left/right neighbor.
- Offset Factor
At -1, the first selected key gets aligned to its left neighbor.
At 1, the last selected key gets aligned to its right neighbor.
At 0, nothing changes.
Blend to Ease
Riferimento
- Menù:
Blends the selected keys to either an «ease in» or an «ease out» curve.
- Blend
At -1, the keys will follow an «ease in» curve, with small value changes in the beginning and large changes towards the end.
At 1, the keys will follow an «ease out» curve, with large value changes in the beginning and small changes towards the end.
At 0, nothing changes.
Match Slope
Riferimento
- Menù:
Blends the selected keys towards a straight line going through two keys just outside the current selection.
- Fattore
Negative values use the two keys to the left of the selection.
Positive values use the keys to the right.
At zero, nothing changes.
Push Pull
Riferimento
- Menù:
Moves the selected keys towards, or away from, the straight line going through the first and last selected key.
- Fattore
At 0, the keys will lie on the straight line.
At 1, they keep their original values.
At 2, each key’s value will be twice as far from the straight line as before.
Shear Keys
Riferimento
- Menù:
Shears the selected keyframes – that is, changes their value by an amount that increases as they get further away in time from a reference keyframe. By default, this reference keyframe is the leftmost selected one, but you can instead use the rightmost one by pressing D.
- Shear Factor
How much to shear. Negative values move keyframes downwards, while positive ones move them up.
- Direction
Whether to use the leftmost or the rightmost selected keyframe as a reference.
Scale Average
Riferimento
- Menù:
Scales the selected keyframes vertically, using their average value as the pivot.
- Fattore
At 0, the keyframes will all have the average value.
At 1, they keep their original values.
At 2, each keyframe’s value will be twice as far from the average as before.
Scale from Neighbor
Riferimento
- Menù:
Scales the selected keyframes vertically, using a keyframe just outside the selection as the pivot. By default, this is the neighbor to the left of the selection, but you can instead use the right one by pressing D.
- Fattore
The scale factor to apply.
- Reference Key
Whether to use the left or right neighbor as the pivot.
Time Offset
Riferimento
- Menù:
Shifts the values of the selected keyframes so that the resulting F-Curve appears to move in time. Works best with dense keyframes.
As the curve leaves the selected keyframes” time range on one end, it wraps back in on the other, offset vertically so that the ends connect and there is no jump.
- Frame Offset
By how many frames to shift the F-Curve. The slider is limited to the range -10 … 10, but you can type larger numbers too.
Smooth
Riferimento
- Menù:
- Scorciatoia:
Alt-S
Smooth (Gaussian)
Riferimento
- Menù:
Smooths the selected keyframes using a Gaussian kernel. Click the menu item, move the mouse left or right to adjust the strength, and click LMB to confirm (or RMB to cancel).
- Fattore
How strongly the smoothing should be applied.
- Sigma
The shape of the Gaussian distribution. Lower values mean a sharper curve, giving keys that are close to each other more weight. A high value behaves like a simple average filter.
- Filter Width
A wider filter looks at more keyframes, producing a smoother result. At a width of 1, the filter only looks at the keyframes to the immediate left and right for a weighted average.
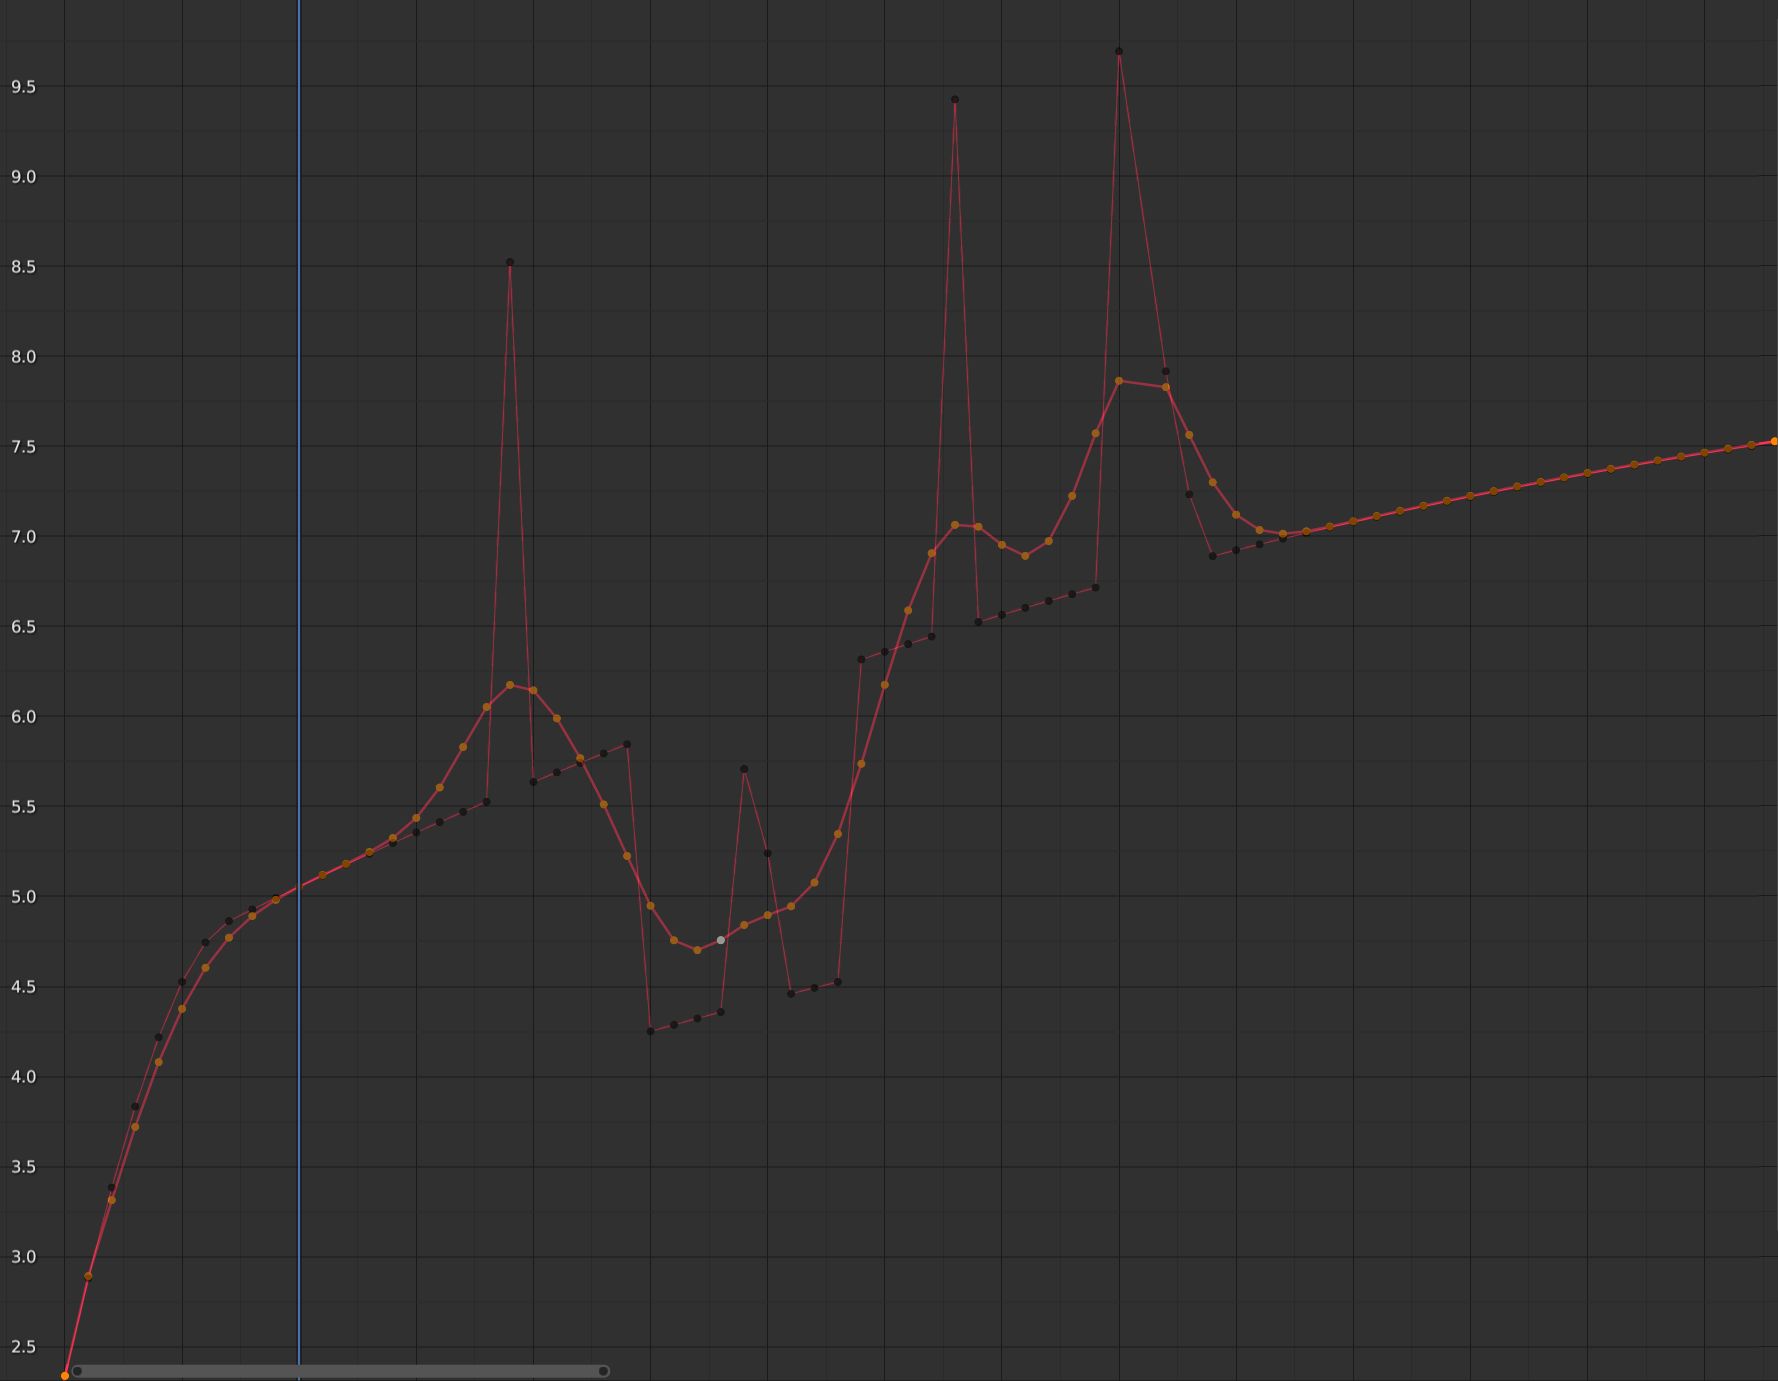
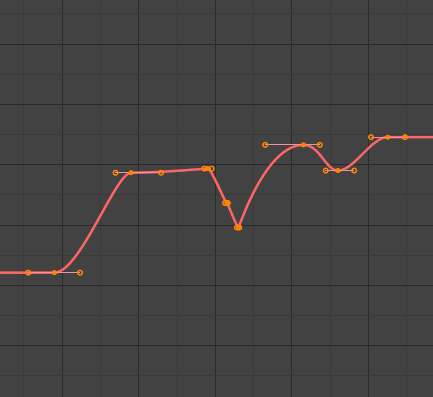
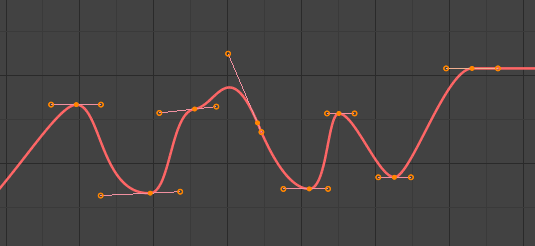
F-Curve after applying the Gaussian Smooth with the original curve overlaid.
Smooth (Legacy)
Riferimento
- Menù:
- Scorciatoia:
Alt-O
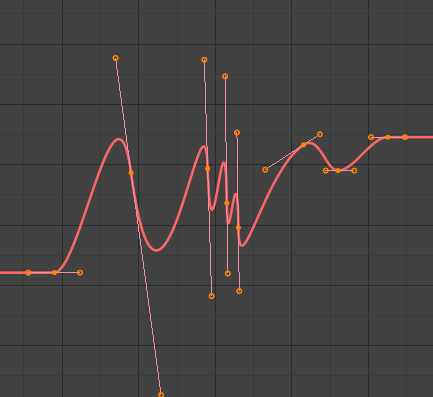
There is also an option to smooth the selected curves, but beware: its algorithm seems to be to halve the distance between each keyframe and the average linear value of the curve, which gives quite a strong smoothing! Note that the first and last keys seem to be never modified by this tool.

Butterworth Smooth
Riferimento
- Menù:
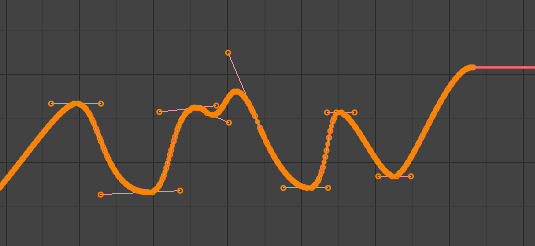
Smooth the selected keyframes using a Butterworth filter. Click the menu item, move the mouse left or right to adjust the frequency, and click LMB to confirm (or RMB to cancel).
This filter is ideal for smoothing large amounts of data because it preserves the peaks of the animation. The downside is that it can introduce a ripple effect when the key values change rapidly.
- Frequency Cutoff
The lower the value, the smoother the curve. There is an implicit maximum at which the value no longer changes the curve, which is at half the sample rate. The sample rate in this case is the scene frame rate multiplied by the Samples per Frame of this operator.
- Filter order
Higher values mean the frequency cutoff is steeper.
- Samples per Frame
Before the filter is applied, the curve is resampled at this interval to avoid errors when there are uneven spaces between frames. If keys are on subframes, e.g. a 60fps file in a 30fps scene, increase this value to 2.
- Blend
A value between 0 and 1 for blending between the original curve and the smoothed one.
- Blend In/Out
The number of frames at the start and end for which to blend between the original and smoothed curve. This can help reduce jumps in the animation at the selection border. At value 1, it only locks the first and last frames of the selection to their original values.