Text Properties
Shape
Riferimento
- Modalità:
Tutte le Modalità
- Pannello:
Most of the settings in the Shape panel are shared with those of Curves data-blocks, please refer to those for details.
- Fill Solver
Triangulation solver used when filling 2D curves.
- Sweep Line:
Fast triangulation method intended for well-behaved outlines. Does not support self-intersecting curves.
- Delaunay:
Uses Constrained Delaunay Triangulation (CDT). More robust and supports self-intersecting curves, at the cost of being slower.
Importante
Most font files contain self-intersecting curves. For this reason, it is recommended to always use Delaunay when working with text objects.
- Fill Rule
Fill rule used by the Delaunay Fill Solver to determine which regions are considered inside.
- Even-Odd:
Alternates inside/outside based on the number of boundary crossings. Overlapping regions may cancel out depending on the crossing count.
- Non-Zero:
Determines inside/outside based on winding direction. Overlapping curves with the same winding direction are filled as a union, while opposite winding directions can create holes.
- Fast Editing
Does not fill the letters in Edit Mode, only show their outline.
Texture Space
Each Object can have an automatically generated UV map, these maps can be adjusted here.
See Generated UV Properties for more information.
Geometria
Riferimento
- Modalità:
Tutte le Modalità
- Pannello:
- Scostamento
Offset the control points of the curves defining the letters, which will make them thinner or thicker. Use with care, it can quickly lead to artifacts…
Extrusion, Taper & Bevel
The remaining settings of that panel, which are used to give volume to the letters, are also shared with the Curves data-blocks, please refer to those for details.
Nota
How the Taper object effect works depends on how the curves defining the letters are built. The results can often look quite random…
Nota
Bevel is applied to the curves defining the letters, which means that usually it will follow their outlines (there will be two parallel beveled curves, and not a single one, as one might expect).
Carattere
Riferimento
- Modalità:
Tutte le Modalità
- Pannello:
Blender comes with a built-in font by default that is displayed in each of the four font style data-block menus. The built-in font is always present and shows in this list as «Bfont». The data-block menu contains a list displaying the currently loaded fonts. Select one for each font style.
To load a different Font, click one of the Load buttons in the Font panel and navigate to a font file. The File Browser will give all valid fonts a capital «F» icon.
If you select a font that is unsupported by Blender, you will get the error Not a valid font.
Nota
Location of Fonts on Unix
Fonts are typically located under /usr/lib/fonts, or some variant like /usr/lib/X11/fonts,
but not always. They may be in other locations as well,
such as /usr/share/local or /usr/local/share, and possibly related sub-trees.
Remember that the same font will be applied to all chars with same style in a text, but that a separate font is required for each style. For example, you will need to load an Italics font in order to make characters or words italic. Once the font is loaded you can apply that font «Style» to the selected characters or the whole object. In all, you would need to load a minimum of four different types of fonts to represent each style (Normal, Italics, Bold, Bold & Italics).
It is important to understand, that Blender does not care what font you load for «normal», «bold», etc., styles. This is how you can have up to four different fonts in use in the same text, but you have to choose between different styles of a same font, or different fonts. Blender has a number of typographic controls for changing the style and layout of text, found in the Font panel.
- Bold
With no text selected, toggles new text to be bold. With text selected, toggles the selected text to be bold.
Bold can also be toggled in the 3D Viewport using Toggle Bold.
- Italic
With no text selected, toggles new text to be italic. With text selected, toggles the selected text to be italic.
Italic can also be toggled in the 3D Viewport using Toggle Italic.
- Underline
With no text selected, toggles new text to be underline. With text selected, toggles the selected text to be underline.
Underline can also be toggled in the 3D Viewport using Toggle Underline.
See also underline settings below.
- Small Caps
With no text selected, toggles new text to be small capitals. With text selected, toggles the selected text to be small capitals.
Small Caps can also be toggled in the 3D Viewport using Toggle Small Caps.
Text can also be set to small caps by selecting it then using Toggle Small Caps.
The size of the Small Caps can be changed with Small Caps Scale.
Trasforma
- Dimensione
Controls the size of the whole text (no way to control each char size independently). Note however, that chars with different fonts (different styles, see below) might have different visible sizes.
- Shear
Controls the inclination of the whole text. As similar as it may seem, this is not the same thing as italics style.
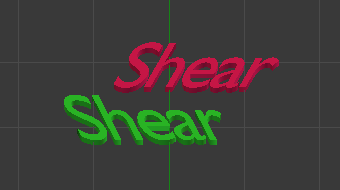
Shear example.
- Object Font
Allows individual objects to be used to render fonts, you can create/model your own complex font inside Blender! This field is used to select the objects prefix name (object «family») to be used to locate the individual characters used for typing. This is quite a complex process, so here are detailed steps to follow:
Create the font characters, each character can be any object type (mesh, curve, etc.). They must all have a name following the naming schema: «common prefix» followed by the «character name» (e.g. «ft.a», «ft.b», etc.).
For the text object, enable Instancing Vertices.
In the Font tab, fill the Object Font field with the «common prefix» of your «font» objects. Now, each time a character in your text matches the suffix part of a «font» object’s name, this object is duplicated on this character.
Nota
The objects are duplicated so that their center is positioned at the lower right corner of the corresponding characters.
- Text on Curve
Select a curve object for the text object to follow.
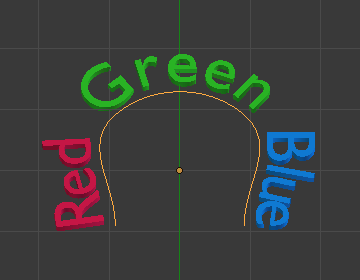
Text on curve.
Suggerimento
You should rather use the Curve modifier, which offers more control, and is the standard way to achieve such effects in modern Blender.
- Underline Position
This allows you to shift vertically the position of the underline.
- Underline Thickness
This controls the thickness of the underline.
- Small Caps Scale
The size reduction applied to uppercase letters when using small caps.
Paragraph
Riferimento
- Modalità:
Tutto
- Pannello:
The Paragraph Panel has settings for the alignment and spacing of text.
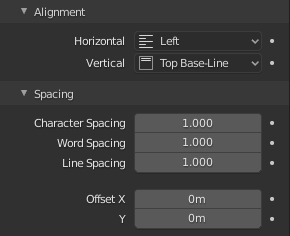
The Paragraph panel.
Allineamento
- Horizontal
- Sinistra:
Aligns text to the left of the frames when using them, else uses the origin of the text object as the starting point of the text (which grows to the right).
- Centro:
Centers text in the frames when using them, else uses the origin of the text object as the mid-point of the text (which grows equally to the left and right).
- Destra:
Aligns text to the right of the frames when using them, else uses the origin of the text object as the ending point of the text (which grows to the left).
- Justify:
Only flushes a line when it is terminated by a word wrap (not by a newline), and uses whitespace instead of character spacing (kerning) to fill lines.
- Flush:
Always flushes the line, even when it is still being typed-in. It uses character spacing (kerning) to fill lines.
Nota
Both Justify and Flush only work within frames.
- Vertical
- Sopra:
With text boxes, aligns the top of the text to the top of the frames.
With no text box, aligns the top of the text to the origin of the object, and grows to the bottom.
- Top Baseline:
With text boxes, aligns the “top” baseline of the text to the top of the frames.
With no text box, aligns the actual baseline of the text to the origin of the object, and grows to the bottom.
Nota
That difference of reference point in the first line depending on usage of boxes or not is indeed confusing.
- Middle:
With text boxes, centers the text in the frames.
With no text box, centers the text on the origin of the object, and grows in both top and bottom directions equally.
- Bottom Baseline:
With text boxes, aligns the baseline of the text to the bottom of the frames.
With no text box, aligns the baseline of the text to the origin of the object, and grows to the top.
- Sotto:
With text boxes, align the bottom of the text to the bottom of the frames.
With no text box, align the bottom of the text to the origin of the object, and grows to the top.
Spacing
- Character Spacing
A factor by which space between each character (kerning) is scaled in width.
In Edit Mode in the 3D Viewport, you can also control individual kerning at text cursor position by pressing Alt-Left / Alt-Right to decrease/increase it.
- Word Spacing
A factor by which whitespace between words is scaled in width.
- Line Spacing
A factor by which the vertical space between lines is scaled.
- Offset X, Y
These settings control the X and Y offset of the text position within the object. This applies relatively to the object’s origin, either to the whole text or, when using text boxes, to each frame.
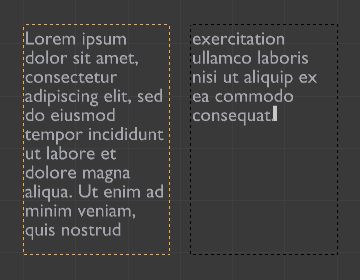
Text Boxes
Riferimento
- Modalità:
Tutto
- Pannello:
Text boxes (or frames) allow you to distribute the text among rectangular areas within a single text object. An arbitrary number of freely movable and re-sizable text frames are allowed per text object.
The text flows continuously from the lowest-numbered frame to the highest-numbered frame with text inside each frame word-wrapped. It flows between frames when a lower-numbered frame cannot fit any more text. If the last frame is reached, text overflows out of it (by default, see options below).
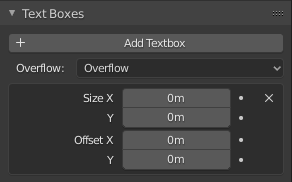
Text Boxes panel.
- Add Textbox
Inserts a new frame, just after the current one (in text flow order). The new frame will have the same size and position as the selected one.
- (Remove Text Block)
Delete the current frame.
- Overflow
How to handle text overflowing available space in the defined boxes.
- Overflow:
Just keep text running out of the last box.
- Scale to Fit:
Scale text to fit into the available space.
- Truncate:
Hide the end of the text that does not fit into the available space.
Nota
It will only truncate in Object Mode, in Edit Mode the whole text remains visible (and overflows as needed).
- Size X, Y
Specifies the width and height of the text box, if set to zero no word wrapping happens (it is ignored, and the whole text box system is disabled if all are set to a null size).
- Offset X, Y
Controls the X and Y offset of the frame, i.e. its position.
Multiple columns, text flowing between boxes.