Editing Strips
조작
Overlap Mode
Overlap Mode defines the result of transforming a strip so that it overlaps another strip.
- Expand:
All strips on the right side of (each) transformed will be shifted forward to accommodate the overlapping strip.
- Overwrite:
The overlapped strip will be overwritten, trimmed or split by the overlapping strip.
- Shuffle:
The overlapping strip will be moved to the nearest free space so that it does not overlap.
Snapping
Snapping can be toggled by clicking (Snap Off) / (Snap On) in the 3D Viewport’s header, or temporarily by holding Ctrl after starting to drag a strip.
The drop-down arrow offers the following options:
- Snap to
- Frame Range
Snaps to the start and end frames of the preview or scene range or when inside a Meta Strip snaps the target to the meta strip’s display range.
- Current Frame
Snaps the transformed selection to the Playhead.
- Hold Offset
Snaps the transformed selection to the Hold Offset.
- Markers
Snaps the transformed selection to Markers.
- Retiming Keys
Snaps the transformed selection to Retiming Keys.
- All Channels
Allows snapping to any strip channel. If disabled, snapping only snaps to strips currently on the same channel as transformed strips.
- Ignore
- Muted Strips
Muted Strips are not considered as snap targets.
- Sound Strips
Sound Strips are not considered as snap targets.
변형
이동
Reference
- Menu:
- 단축키(hotkey):
G
Pressing G moves all the selected strip(s). Move your mouse horizontally (left/right) to change the strip’s position in time. Move vertically (up/down) to change channels.
Holding down Ctrl while dragging enables or disables snapping.
You can also lock the direction to time with X or to change the strip’s channel with Y.
It is possible to move strips using mouse by dragging them while holding LMB. Currently it is possible to move only one strip by dragging.
Start Frame Offset
The Start Frame Offset for that strip can be selected by clicking LMB on the left handle of the strip; holding it down (or pressing G and then moving the mouse left/right) changes the start frame within the strip by the number of frames you move it. The frame number label under the strip displays the start frame of the strip.
If you have a 20-image sequence strip, and drag the left handle to the right by 10 frames, the strip will start at image 11 (images 1 to 10 will be skipped). Use this to clip off a roll-up or undesired lead-in.
Dragging the left handle left will create a lead-in (copies) of the first frame for as many frames as you drag it. Use this when you want some frames for a transition at the start of the clip.
End Frame
The End Frame of the strip could be selected by clicking LMB on the right handle of the strip; holding it down (or pressing G) and then moving the mouse changes the ending frame within the strip. The frame number label over the strip displays the end frame of the strip.
Dragging the right handle to the left shortens the clip; any original images at the tail are ignored. Use this to quickly clip off a roll-down.
Dragging the right handle to the right extends the clip. For movies and images sequences, more of the animation is used until exhausted. Extending a clip beyond its length will render as a copy of the last image. Use this for transitions out of this clip.
참고
Multiple selection
You can select several (handles of) strips by Shift-LMB clicking: when you press G, everything that is selected will move with your mouse – this means that, for example, you can at the same time move a strip, shorten two others, and extend a fourth one.
Move/Extend from Current Frame
Reference
- Menu:
- 단축키(hotkey):
E
With a number of strips selected, pressing E lets you interactively extend the strips. This is similar to moving but is useful for extending (or shortening) time around the current frame.
All selected strip handles to the “mouse side” of the current frame indicator will transform together, so you can change the duration of strips at the current frame.
힌트
Extend is a convenient way to adjust the time of rough edits such as an “animatic” (sequential storyboards). Where it’s possible to select everything and adjust the length of strips around the current frame. This can be especially useful when adding in audio or other elements that could cause the timing to need adjustment.
When performing this operation you may want to enable so markers are updated too.
This simply a convenience operation, instead of manually selecting strips on one side of the current frame, as well as handles on one side of overlapping strips. Then selecting and transforming markers as well. This avoids the manual process, so re-timing can be accessed quickly.
Slip Strip Contents
Reference
- Menu:
- 단축키(hotkey):
S
The Slip Strip Contents operator adjusts the start point of the source media inside a strip, without changing the strip’s position or length on the timeline. This is useful for fine-tuning what portion of the media is shown.
It is commonly used when you want to preserve the strip’s timing in the sequence but choose a different part of the source to display.
- Offset
Number of frames to shift the content forward (positive) or backward (negative) in time.
- Slip Keyframes
If enabled, keyframes on the strip’s properties (e.g. opacity, transform) will be moved along with the content. Disable this to keep keyframes fixed at their original timeline positions.
사용법
Move the mouse left or right to shift the strip’s content, then confirm the operation. Additional options are available during the operation:
Confirm: LMB, Return, Spacebar
Cancel: Esc, RMB
Precision Mode: Hold Shift to enable subframe slipping which slips the audio. The subframe amount is shown in the header as Sound Offset.
Clamp: Press C to clamp the slip range to the strip’s start and end bounds.
Snap Strips to the Current Frame
Reference
- Menu:
- 단축키(hotkey):
Shift-S
Moves the selected strips so that they align with the current frame. The active strip is used as the reference, and the mouse position relative to the playhead determines which side of the strip snaps to the current frame.
When invoked from the menu, click with LMB on either side of the playhead to choose which side to snap.
- Frame
The frame to which the selected strips will be snapped.
- Snap Side
Determines which side of the strip snaps to the frame when no strip handles are selected.
- Keep Offset
If enabled, all selected strips are moved together, preserving their relative timing. If disabled, each strip snaps individually.
Clear Strip Offset
Reference
- Menu:
- 단축키(hotkey):
Alt-O
To reset the (soft) start/end frame handles.
Swap Strip
Reference
- Menu:
- Left Alt-Left
Swaps the active strip with the strip to the left.
- Right Alt-Right
Swaps the active strip with the strip to the right.
Remove Gaps
Reference
- Menu:
- 단축키(hotkey):
Backspace
Remove blank frames between the current frame and the first strip to the left, independent of selection or locked state of strips.
- All Gaps
Remove gaps to the right of the strip along with the left.
Remove Gaps (All)
Reference
- Menu:
Same as Remove Gaps but with All Gaps enabled.
Insert Gaps
Reference
- Menu:
- 단축키(hotkey):
Shift-Equals
Insert blank frames between the current frame and the first strips to the right, independent of selection or locked state of strips.
Retiming Keys
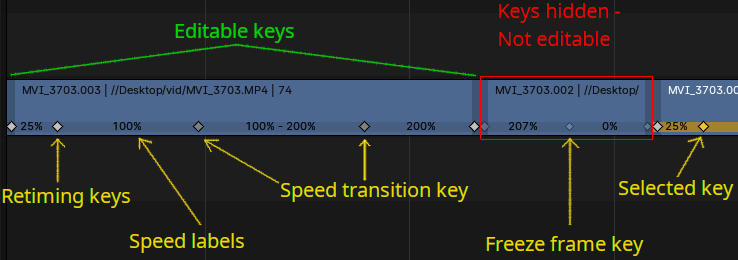
Strips can be sped up or, slowed down by adding and moving retiming keys. Retiming controls can be activated for individual strips, after which keys can be selected and moved.
참고
Only strip content is retimed, existing animation is not handled by the tool.
Effect strips can not be retimed.
힌트
To quickly change selected strip speed, press R and enter desired speed.
Selecting Retiming Keys
Retiming keys are always shown on strip as inactive by default. In order to select retiming keys, Show Retiming Keys must be enabled. This property can also be enabled using Toggle Retiming Keys.
Multiple keys can be selected at once with box selection. Box select will select keys, only if a key is already selected. Otherwise it will select strips only.
Use Ctrl-LMB to select all keys to the right of the selected key.
Moving Retiming Keys
Retiming key can be moved by dragging it with mouse, or by pressing G. The key is mapped to particular frame of strip content, so moving it effectively means moving a frame to a new position and therefore stretching, or contracting time flow.
When a key is moved, this does not affect position of other keys inside of the strip. If strip has more keys inside, multiple keys have to be selected, if only 1 segment has to be retimed. However if there are retiming keys outside of strip boundary, these will be moved along with first or last key in strip in order to preserve existing retiming, that is not visible.
Add Retiming Keys
Reference
- Editor:
Video Sequencer
- Menu:
Retiming key can be added to selected strips from retiming menu or by pressing I and choosing Add Retiming Key option. This adds a key to current frame. This operation will also create keys at strip start and end point, since these keys must be always present.
When keys are selected, strips are deselected, but it is still possible to add new keys. In this case keys will be added to strips where any key is selected.
Add Freeze Frame and Slide
Reference
- Editor:
Video Sequencer
- Menu:
Freeze frame is used to stop strip playback at particular frame for any duration. Freeze frame can be added from strip retiming menu or context menu.
참고
It is not possible to make smooth transition into or from freeze frame.
Add Speed Transition and Slide
Reference
- Editor:
Video Sequencer
- Menu:
It is possible to create smooth transition from one speed to another speed. This can be done by selecting retiming key between 2 segments of different speeds, and choosing Add Speed Transition either from strip retiming menu or context menu. This will create 2 keys, that are linked and always move in opposite direction. If both keys are moved at once, this changes where transition starts and ends.
Delete Retiming Keys
Reference
- Editor:
Video Sequencer
- Menu:
Retiming key can be deleted by selecting and pressing Delete or X. When handle is deleted, strip size will not change, therefore speed will change to average between 2 retimed segments.
참고
When transition key is removed, it will re-create simple retiming key from which transition was created.
Reset Retiming
Reference
- Editor:
Video Sequencer
- Menu:
Reverts all timing to the original strip.
Set Speed
Reference
- Editor:
Video Sequencer
- Menu:
Sets the speed of a retimed segment.
- Speed
The rate compared to the original time.
- Preserve Current retiming
Keeps the speed of the other retiming segments unchanged by adjusting the Duration of the strip instead.
Toggle Retiming Keys
Reference
- Editor:
Video Sequencer
- Menu:
- 단축키(hotkey):
Ctrl-R
Enables the Show Retiming Keys strip property. This allows retiming keys to be shown for the first time and enables interacting with them.
Split
Reference
- Menu:
- 단축키(hotkey):
K
This splits the selected strip in two at the current frame. This will result in two strips which use the same source, fitting the original strip’s timing and length.
힌트
This can be thought of as a quick way to duplicate the current strip, adjusting the start/end frames to form two non-overlapping strips showing the same content as before.
Hold Split
Reference
- Menu:
- 단축키(hotkey):
Shift-K
Like Split, it splits a strip in two distinct strips; however you will not be able to drag the endpoints to show the frames past the split of each resulting strip.
Although you can adjust the Hold Offset number fields in the Strip Info panel.
힌트
This can be thought of as a way to simulate splitting the video file in two parts at the cut-point, replacing the current strip with each.
Duplicate
Reference
- Menu:
- 단축키(hotkey):
Shift-D
Duplicate a strip to make an unlinked copy; drag it to a time and channel, and drop it by LMB click.
For strips that reference an ID, for example scene strips, this will duplicate the scene and use this new scene in the duplicated strip.
Duplicate Linked
Reference
- Menu:
- 단축키(hotkey):
Alt-D
Duplicate a strip to make a linked copy; drag it to a time and channel, and drop it by LMB click.
For strips that reference an ID, for example scene strips, this will use the same scene in the duplicated strip.
Delete
Reference
- Menu:
- 단축키(hotkey):
Delete, X
Delete the selected strip(s).
Update Scene Frame Range
Reference
- Menu:
For Scene strips only – Updates the strip’s Time properties to match the referenced scene’s frame range. This operator should be used when the referenced scene’s length is extended or shortened.
Separate Images
Reference
- Menu:
- 단축키(hotkey):
Y
For images sequence only – Converts the strip into multiple strips, one strip for each frame. Useful for slide shows and other cases where you want to bring in a set on non-continuous images.
- Length
You have to specify the duration you want the resulting strips will be.
Movie Strip
Set Render Size
Reference
- Menu:
Sets the render resolution and aspect to match the strip’s resolution.
Deinterlace Movies
Reference
- Menu:
Converts interlaced video into progressive video.
Effect Strip
Change Effect Type
Reference
- Menu:
Replaces the selected effect strip with another effect type that requires the same number of inputs.
This operator preserves existing input strips and settings where possible, making it quicker to experiment with different effects without manually recreating the setup.
For example, you can switch between effects like Cross, Gamma Cross, and Wipe, since they all use two inputs.
Reassign Inputs
Reference
- Menu:
- 단축키(hotkey):
R
This tool can be used to assign (reconnect) effect strips in a different way. Select three arbitrary strips and press R. If you don’t create a cycle, those will be connected to a new effect chain.
Swap Inputs
Reference
- Menu:
- 단축키(hotkey):
Alt-S
Swaps the first two inputs for the effect strip.
Lock/Mute
- Lock Strips Ctrl-H
Disables the strip from being transformed.
- Unlock Strips Ctrl-Alt-H
Enables disabled strips allowing them to be transformed.
- Mute/Unmute Strips H, Alt-H
Mute or unmute the selected strips.
- Mute/Unmute Deselected Strips Shift-H, Shift-Alt-H
Mute or unmute all strips but the selected.
Inputs
- Reload Strips Alt-R
Reloads the strips from their external saved location.
- Reload Strips and Adjust Length Shift-Alt-R
Reloads the strips from their external saved location and re-adjusts the strip duration.
- Change Path/Files
Changes the source file contained in a selected strip.
- Swap Data
Swaps two sequence strips.
Fades
Reference
- Menu:
This submenu contains tools to add or remove fades to strips. In case of visual strips the tools will animate the opacity or volume in case of audio strips.
- Clear Fades
Removes fade animation from selected sequences.
- Fade In and Out
Fade selected strips in and out.
- Fade In
Fade in selected strips.
- Fade Out
Fade out selected strips.
- From Current Frame
Fade from the current frame to the end of overlapping sequences.
- To Current Frame
Fade from the start of sequences under the Playhead to the current frame.