编辑#
变换#
参考
- 模式:
编辑模式
- 菜单:
An F-Curve can be edited by transforming the locations of its keyframes.
- 移动,旋转,缩放
Like other elements in Blender, keyframes can be moved, rotated, and scaled as described in Basic Transformations.
- 扩展 E
Lets you quickly move the selected keyframes that are on a certain side of the Playhead. This is handy if you need to, say, move all the keyframes after a certain time point to the right to make space for new ones.
To use this operator, first select some or all keyframes and place your mouse cursor to the left or right of the Playhead. Then, press E, move the mouse to move (only) the keyframes on that side of the Playhead, and press LMB to confirm (or RMB to cancel).
Tip
You can also change the Key Frame and Value properties in if you want to specify exact numbers.
While transforming keyframes, you can hold Shift to move them more slowly for better precision, or Ctrl to move them in coarse increments.
吸附#
参考
- 菜单:
- 快捷键:
Shift-S
Apart from using the snapping operators in this menu, you can also turn on snapping in the header.
- 选中项到当前帧
Set the selected keyframes' time to the current frame.
- 选中项到游标值
Set the selected keyframes' value to that of the 2D Cursor.
- 选中项到最近帧
Round the time of each keyframe to the nearest frame.
- 选中项到最近秒
Round the time of each keyframe to the nearest second. You can use to show seconds instead of frames at the top of the editor.
- 选中项到最近标记
Set the time of each keyframe to that of the nearest marker.
- 展平控制柄
展平所选关键帧的 贝塞尔 控制柄。

- 等长化控制柄
确保被选中的关键帧手柄两侧一样长。
- 侧面
哪一侧控制柄将受影响(左、右、两者)。
- 控制柄长度
用于制作所选关键帧的贝塞尔手柄的长度。
- 平化
Make the values of the handles the same as their respective keyframes.
- 游标到选中项 Ctrl-G
Changes the time and value of the 2D Cursor to the average time and value of the selected keyframes.
- 游标值到选中项
Changes the value of the 2D Cursor to the average value of the selected keyframes.
镜像#
参考
- 菜单:
- 快捷键:
Ctrl-M
Mirrors the selected keyframes across a reference point.
- 沿时间轴关于当前帧
Mirror horizontally across the current frame.
- 沿值轴关于游标值
Mirror vertically across the 2D Cursor's value.
- By Times over Zero Time
Mirror horizontally across frame 0.
- By Values over Zero Value
Mirror vertically across value 0.
- 沿时间轴关于第一个选中标记
Mirror horizontally across the first selected marker.
跳转到选定项#
参考
- 菜单:
- 快捷键:
Ctrl-G
Places the 2D Cursor at the average time and value of the selected keyframes.
插入#
参考
- 菜单:
- 快捷键:
I
Adds new keyframes and selects them. Previously selected keyframes stay selected too.
- 全部通道
使用各曲线的当前值在所有可见且可编辑函数曲线内插一个关键帧。
- 仅选择通道
Insert a keyframe on the selected F-Curves using each curve's current value.
- 仅活动函数曲线
在活动的函数曲线上使用曲线当前值插入关键帧。
- 光标位置的活动通道
Insert a keyframe on the active F-Curve at the 2D Cursor's value.
- 光标位置选中的通道
Insert a keyframe on the selected F-Curves at the 2D Cursor's value.
复制/粘贴#
参考
- 菜单:
,
- 快捷键:
Ctrl-C, Ctrl-V
使用 Ctrl-C 复制选定的关键帧,然后 Ctrl-V 将其粘贴。粘贴后,调整上一步操作面板提供了一些额外选项:
- 帧偏移
Offsets the pasted keyframes horizontally so that...
- 起始帧
...the first one lands on the current frame.
- 结束帧
...the last one lands on the current frame.
- 相对帧
...they land at the same distance from the current frame as when they were copied.
- 无偏移
...they stay at their original frames.
- 值偏移
Offsets the pasted keyframes vertically so that...
- 左侧关键帧
...the first one has the value of the existing keyframe to the left of the Playhead.
- 右侧关键帧
...the last one has the value of the existing keyframe to the right of the Playhead.
- 当前帧
...the first one has the value of the curve at the current frame.
- 游标值
...the first one has the value of the 2D Cursor.
- 无偏移
...they keep their original values.
- 类型
- 混合
Integrates the pasted keyframes with existing ones, only overwriting those that share a frame.
- 覆写全部
Removes all previous keyframes in the target F-Curves.
- 覆写范围
Within each F-Curve, remove the existing keyframes that are in the range of the keyframes pasted into it.
- 覆写整个范围
Within each F-Curve, remove the existing keyframes that are in the range of all pasted keyframes combined.
- 翻转
If you copied keyframes from one or more pairs of symmetrically opposite bones, enabling this option will paste the keyframes of the left bones into the curves of the right ones and vice versa. In addition, the values are inverted, effectively mirroring the animation.
复制操作#
参考
- 菜单:
- 快捷键:
Shift-D
复制选定的关键帧。可以通过移动鼠标来重新放置它们。
删除#
参考
- 菜单:
- 快捷键:
X, Delete
按 X 或 Delete 将打开一个弹出菜单,可以从中删除选定的关键帧。
控制柄类型#
参考
- 菜单:
- 快捷键:
V
设置选定关键帧的控制柄类型。
插值模式#
参考
- 菜单:
- 快捷键:
T
Sets the interpolation mode of the selected keyframes. This determines the curve interpolation between each keyframe and the next.
缓动类型#
参考
- 菜单:
- 快捷键:
Ctrl-E
Sets the easing mode of the selected keyframes. This determines whether easing is applied to the left side, right side, or both sides of the curve segments between each keyframe and the next.
密度#
精简#
参考
- 菜单:
- 菜单:
Simplifies an F-Curve by removing the keyframes that influence its shape the least.
- 模式
How to pick the number of keyframes to delete.
- 比率
删除一定百分比的关键帧。
- 移除
The percentage of keyframes to remove.
- 边际误差
Deletes as many keyframes as possible while ensuring the F-Curve's shape changes no more than a certain amount.
- 最大边际误差
How much the decimated curve may deviate from the original.
烘焙关键帧#
参考
- 菜单:
- 快捷键:
Shift-Alt-O
Creates a keyframe at every frame.
See also
Bake Channels, which offers options on what range to bake and how.

清理关键帧#
参考
- 菜单:
- 快捷键:
X
Finds redundant keyframes among the selected ones and deletes them. A keyframe is seen as redundant if it has the same value as its neighbors -- even if the curve segments around it aren't flat.
Tip
This operator is likely to change the shape of the affected curves, so it's best run after e.g. bulk keyframe insertion on all the bones of an armature (which creates useless keyframes on bones that haven't moved) and before tweaking the curves by hand.
- 阈值
Value threshold. By increasing this, you can also delete keyframes that almost have the same value as their neighbors.
- 通道
Cleans all the keyframes (even unselected ones) in the selected F-Curves. If a curve is left with only one keyframe, it's deleted entirely.
混合#
参考
- 菜单:
- 快捷键:
Alt-D
Adjusts the values of the selected keyframes by a certain percentage. Select a blending operator, move the mouse left or right to adjust the factor, and click LMB to confirm (or RMB to cancel).
Several blending operators work based on "neighboring keyframes." This means that they divide the selected keyframes into contiguous groups, then reference the unselected keyframes immediately before and after each group.
间断#
参考
- 菜单:
Sets the value of the selected keyframes to an interpolation of their neighbors.
- 系数
At -1, the keyframes are set to the value of the left neighbor.
At 1, they're set to the value of the right neighbor.
For other factors, they're set to an interpolation between the two neighbor values, with 0 being right in the middle.
混合至邻帧#
参考
- 菜单:
Moves each selected keyframe towards the value of the left or right neighbor by a certain percentage.
- 混合
When negative, each keyframe moves Blend percent to the value of the left neighbor.
When positive, they move to the right neighbor.
当为零时,它们保持原始的值。
混合到默认值#
参考
- 菜单:
Moves the selected keyframes towards the property's default value by a certain percentage.
- 系数
How much to change the keyframes' values, going from 0 (no change) to 1 (reset to the default value).
See also
重置为默认值运算符将任何属性重置为其默认值,无需关键帧。
缓动#
参考
- 菜单:
Makes the selected keyframes follow an S-curve. While the slider is visible (so after activating the operator but before confirming with LMB), you can press Tab to toggle which of the following settings to edit:
- 曲线弯曲
A negative value gives more weight to the left side, while a positive value gives more weight to the right. A value of 0 results in a balanced curve.
- 锐度
A low value results in an almost straight diagonal line, while a high value results in a steep rise/drop in the curve.
混合偏移#
参考
- 菜单:
Moves the selected keyframes up or down -- all by the same amount -- until the first/last one matches the left/right neighbor.
- 偏移系数
At -1, the first selected key gets aligned to its left neighbor.
At 1, the last selected key gets aligned to its right neighbor.
At 0, nothing changes.
混合淡出#
参考
- 菜单:
Blends the selected keys to either an "ease in" or an "ease out" curve.
- 混合
At -1, the keys will follow an "ease in" curve, with small value changes in the beginning and large changes towards the end.
At 1, the keys will follow an "ease out" curve, with large value changes in the beginning and small changes towards the end.
At 0, nothing changes.
匹配坡度#
参考
- 菜单:
Blends the selected keys towards a straight line going through two keys just outside the current selection.
- 系数
Negative values use the two keys to the left of the selection.
Positive values use the keys to the right.
At zero, nothing changes.
推拉#
参考
- 菜单:
Moves the selected keys towards, or away from, the straight line going through the first and last selected key.
- 系数
At 0, the keys will lie on the straight line.
At 1, they keep their original values.
At 2, each key's value will be twice as far from the straight line as before.
切变关键帧#
参考
- 菜单:
Shears the selected keyframes -- that is, changes their value by an amount that increases as they get further away in time from a reference keyframe. By default, this reference keyframe is the leftmost selected one, but you can instead use the rightmost one by pressing D.
- 切变系数
How much to shear. Negative values move keyframes downwards, while positive ones move them up.
- 方向
Whether to use the leftmost or the rightmost selected keyframe as a reference.
平均缩放#
参考
- 菜单:
Scales the selected keyframes vertically, using their average value as the pivot.
- 系数
At 0, the keyframes will all have the average value.
At 1, they keep their original values.
At 2, each keyframe's value will be twice as far from the average as before.
从邻项缩放#
参考
- 菜单:
Scales the selected keyframes vertically, using a keyframe just outside the selection as the pivot. By default, this is the neighbor to the left of the selection, but you can instead use the right one by pressing D.
- 系数
要应用的缩放系数。
- 参考帧
Whether to use the left or right neighbor as the pivot.
时间偏移#
参考
- 菜单:
Shifts the values of the selected keyframes so that the resulting F-Curve appears to move in time. Works best with dense keyframes.
As the curve leaves the selected keyframes' time range on one end, it wraps back in on the other, offset vertically so that the ends connect and there is no jump.
- 帧偏移
By how many frames to shift the F-Curve. The slider is limited to the range -10 ... 10, but you can type larger numbers too.
平滑化#
参考
- 菜单:
- 快捷键:
Alt-S
平滑(高斯)#
参考
- 菜单:
Smooths the selected keyframes using a Gaussian kernel. Click the menu item, move the mouse left or right to adjust the strength, and click LMB to confirm (or RMB to cancel).
- 系数
How strongly the smoothing should be applied.
- 西格玛
The shape of the gaussian distribution. Lower values mean a sharper curve, giving keys that are close to each other more weight. A high value behaves like a simple average filter.
- 过滤宽度
A wider filter looks at more keyframes, producing a smoother result. At a width of 1, the filter only looks at the keyframes to the immediate left and right for a weighted average.

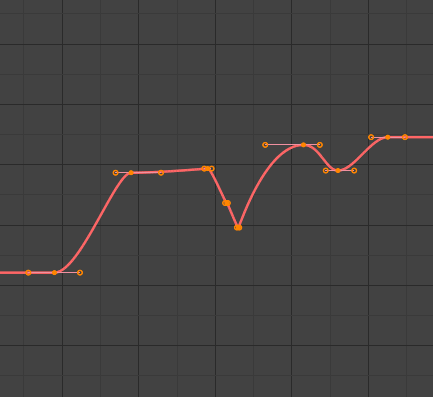
F-Curve after applying the Gaussian Smooth with the original curve overlayed.#
平滑(旧版)#
参考
- 菜单:
- 快捷键:
Alt-O
There is also an option to smooth the selected curves, but beware: its algorithm seems to be to halve the distance between each keyframe and the average linear value of the curve, which gives quite a strong smoothing! Note that the first and last keys seem to be never modified by this tool.

Butterworth 平滑#
参考
- 菜单:
Smooth the selected keyframes using a Butterworth filter. Click the menu item, move the mouse left or right to adjust the frequency, and click LMB to confirm (or RMB to cancel).
This filter is ideal for smoothing large amounts of data because it preserves the peaks of the animation. The downside is that it can introduce a ripple effect when the key values change rapidly.
- 截止频率
The lower the value, the smoother the curve. There is an implicit maximum at which the value no longer changes the curve, which is at half the sample rate. The sample rate in this case is the scene frame rate multiplied by the Samples per Frame of this operator.
- 规律排序
Higher values mean the frequency cutoff is steeper.
- 每帧采样
Before the filter is applied, the curve is resampled at this interval to avoid errors when there are uneven spaces between frames. If keys are on subframes, e.g. a 60fps file in a 30fps scene, increase this value to 2.
- 混合
A value between 0 and 1 for blending between the original curve and the smoothed one.
- 淡入/淡出
The number of frames at the start and end for which to blend between the original and smoothed curve. This can help reduce jumps in the animation at the selection border. At value 1, it only locks the first and last frames of the selection to their original values.