Editing(編集)#
Delete Channels(チャンネルを削除)#
参照
- Menu(メニュー):
- ショートカットキー:
Delete, X
Removes the selected channels from the current action.
警告
Make sure the mouse cursor is hovering over the channel region before using the keyboard shortcuts. If it's hovering over the main region, you'll only delete the selected keyframes, not the full channels.
Un/Group Channels(グループチャンネル/チャンネルをグループ解除)#
参照
- Menu(メニュー):
- ショートカットキー:
Ctrl-Alt-G 、 Ctrl-G
Un/Groups the selected channels into a collection that can be renamed by double-clicking its name. Grouping channels helps keep the view more organized.
Toggle/Enable/Disable Channel Settings(チャンネル設定の切替/有効化/無効化)#
参照
- Menu(メニュー):
- ショートカットキー:
Shift-W 、 Shift-Ctrl-W 、 Alt-W
Toggles, enables, or disables a certain setting for the selected channels:
- Protect(保護)
When a channel is protected (closed padlock icon), it can't be edited. Instead of pressing Shift-W and selecting Toggle, you can also simply press Tab.
- Mute(無効化)
When a channel is muted (empty checkbox), it doesn't affect the animation.
Toggle Channel Editability(チャンネルの編集可否を切替え)#
参照
- Menu(メニュー):
- ショートカットキー:
Tab
編集のためにチャンネルをロックまたはロック解除します。
Extrapolation Mode(外挿モード)#
参照
- Menu(メニュー):
- ショートカットキー:
Shift-E
Changes how the curve behaves before its first keyframe and after its last keyframe.
- Constant(一定):
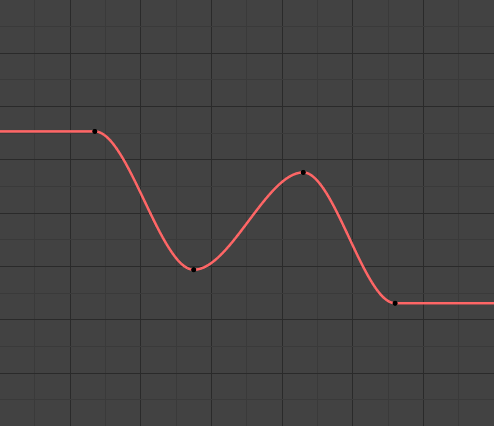
一定の外挿。#
Continue in a straight line, keeping the same value as the first/last keyframe. This is the default.
- Linear(リニア):
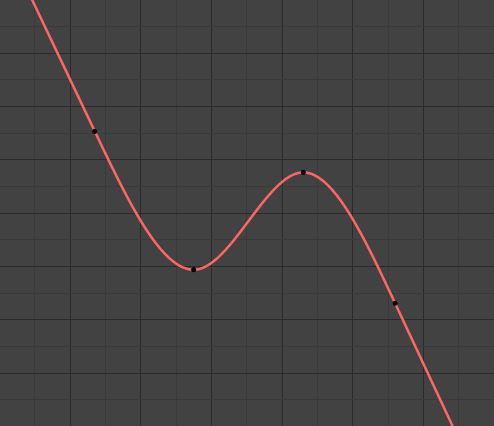
リニアな外挿。#
Continue in a straight line, keeping the same slope as on the first/last keyframe.
- Make Cyclic:
Repeat the whole curve. This works by adding a Cycles modifier.
- Clear Cyclic:
Remove the above modifier, making the curve non-repeating again.
Add F-Curve Modifier(Fカーブモディファイアーを追加)#
参照
- Menu(メニュー):
- ショートカットキー:
Shift-Ctrl-M
Shows a submenu from where you can add a modifier to the active curve. Settings for these modifiers can be found in .
Show/Hide(表示/隠す)#
- Hide Selected Curves(選択中のカーブを隠す) H
選択中のカーブを隠します。
- Hide Unselected(非選択物を隠す) Shift-H
Hides all curves except the selected ones.
- Reveal Curves(カーブを再表示) Alt-H
Shows all previous hidden curves.
Expand/Collapse Channels(チャンネルを展開/折りたたむ)#
参照
- Menu(メニュー):
- ショートカットキー:
NumpadPlus, NumpadMinus
Expands or collapses the selected headers.
Move(移動)#
参照
- Menu(メニュー):
Lets you reorder the selected channels in the list:
To the top Shift-PageUp
Up one line PageUp
Down one line PageDown
To the bottom Shift-PageDown
Revive Disabled F-Curves(無効な F カーブを復活)#
参照
- Menu(メニュー):
Clears the "disabled" tag from all F-Curves to get broken F-Curves working again. (A curve is broken if it references a property that doesn't exist.)
Keys to Samples#
参照
- Menu(メニュー):
- ショートカットキー:
Alt-C
Switches the selected curves from interpolating between a set of keyframes to using a sampled value at each full frame. This is a destructive process that removes the ability to edit the curve. It's mainly used to reduce the file size with large datasets, as samples take up less space than keyframes.
Between samples (on subframes), the curve interpolates linearly.
Samples to Keys#
参照
- Menu(メニュー):
Switches the selected curves from using samples to using keyframes, making them editable. Note that this creates a keyframe on every frame.
Sound to Samples#
参照
- Menu(メニュー):
Creates a sampled curve based on a sound file. Use Samples to Keys if you need to edit it.
- Lowest Frequency(最低周波数)
音声データに適用されるハイパスフィルターのカットオフ周波数。
- Highest Frequency(最高周波数)
音声データに適用されるローパスフィルターのカットオフ周波数。
- Attack Time(アタック時間)
Value for the hull curve calculation that tells how fast the hull curve can rise. The lower the value, the steeper it can rise.
- Release Time(リリース時間)
Value for the hull curve calculation that tells how fast the hull curve can fall. The lower the value, the steeper it can fall.
- Threshold(しきい値)
ハルカーブに影響を与えるのに必要な最小振幅値です。
- Accumulate(蓄積)
出力を生成するのに、ハルカーブ振幅の正の差異のみが集約されます。
- Additive(付加)
ハルカーブ振幅が集約されます。 Accumulate(蓄積) がONの時、正と負の差異の両方が蓄積されます。
- Square(正方形)
出力が矩形カーブになります。負の値が常に-1に、正の値が1になります。
- Square Threshold(矩形のしきい値)
このしきい値より低い値はすべて0になります。
Bake Channels#
参照
- Menu(メニュー):
Generates new keyframes for the selected curves.
- Frame Range(フレーム範囲)
The range that will be baked. Defaults to the scene range or preview range.
- Frame Step
Distance between keyframes. Can be used to create a keyframe every 10 frames or even every half frame.
- Remove Outside Range
Removes existing keys outside the specified baking range.
- Interpolation Type (補間タイプ)
The interpolation type for the new keys.
- Bake Modifiers
If enabled, the new keyframes are based on the modified curve, and the modifiers get deleted.
If disabled, the new keyframes are based on the original curve, and the modifiers stay applied.
Discontinuity (Euler) Filter(不連続(オイラー)フィルター)#
参照
- Menu(メニュー):
Cleans up Euler rotation channels that suffer from Gimbal Lock. The channels of all three euler rotation axes need to be selected for this to work.
Frame Selected Channels#
参照
- Menu(メニュー):
- ショートカットキー:
NumpadPeriod
Pans and zooms the view to show all keyframes of the selected curves. You can also click a channel with Alt-MMB.