はじめに#
Channels Region(チャンネル領域)#

Channels Region(チャンネル領域)。#
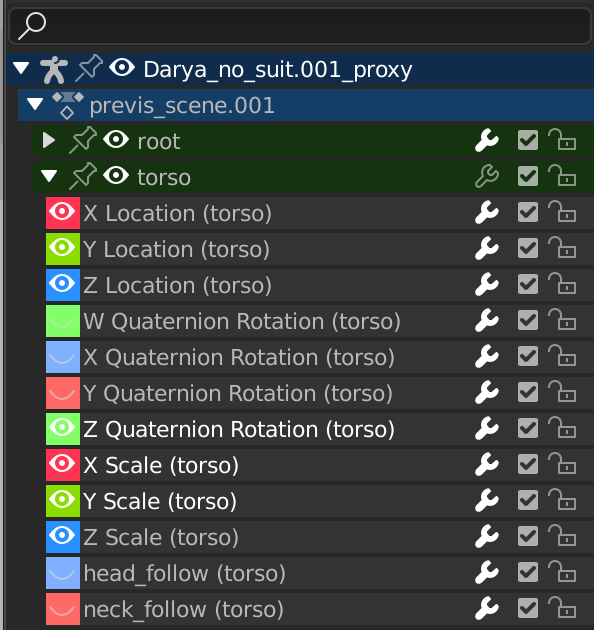
This region is found on the left side of time-based editors like the Timeline(タイムライン), the Dope Sheet Editor, and the Graph Editor. It shows a tree of items (objects, bones...) and their animated properties, with the latter also being called "channels." Each channel has an associated F-curve describing how its value changes over time.
The rows are color-coded as follows:
Dark blue: scenes, objects
Light blue: actions, shape keys etc.
Green: channel groups
Gray: channels
- Search(検索) Ctrl-F
Lets you filter the channels by typing a part of their name. Click the Invert button to instead show channels that don't include the search text.
コントロール#
The headers contain the following toggle buttons:
- Pin(ピン止め) (画鋲アイコン)
Keep the row and its children visible even when selecting a different object.
- Hide(隠す) (目 アイコン)
Hides the keyframes and curve associated with the channel.
- Modifiers(モディファイアー) (レンチ アイコン)
Deactivates the modifiers of the curve.
- Mute (checkbox)
Deactivates the curve, making the animation behave as though it doesn't exist.
- Lock Tab (padlock icon)
Prevent the curve from being edited.
注釈
This also works in the Nonlinear Animation Editor, but note that it only locks the strips there, not the underlying F-curves.
Selection(選択)#
Select single header: click LMB
Add/Remove single header to/from selection: click Ctrl-LMB
Select range: click Shift-LMB
すべて選択: A
Deselect All: press Alt-A or double-tap A
Box Select: drag LMB
Box Add: drag Shift-LMB
Box Remove: drag Ctrl-LMB
Select all keyframes in the channel: double-click LMB on its header.
Editing(編集)#
Rename (anything but a channel): double-click LMB
選択したものを削除: X または、 Delete
選択をロック: Tab
スライダー#

スライダーを表示するアクションエディター。#
If you enable , the region will show a value slider next to each channel. Changing such a slider will change the value of the curve at the current frame, creating a keyframe if one doesn't already exist.