glTF 2.0
Reference
- Category:
Import-Export
- Menu:
Enabling Add-on
This add-on is enabled by default, in case it is not:
Open Blender and go to 애드온(add-on) section of the Preferences.
Search “glTF 2.0” and check the Enable Extension checkbox.
사용법
glTF™ (GL Transmission Format) is used for transmission and loading of 3D models in web and native applications. glTF reduces the size of 3D models and the runtime processing needed to unpack and render those models. This format is commonly used on the web, and has support in various 3D engines such as Unity3D, Unreal Engine 4, and Godot.
This importer/exporter supports the following glTF 2.0 features:
메쉬(Meshes)
Materials (Principled BSDF) and Shadeless (Unlit)
Textures
Cameras
Punctual lights (point, spot, and directional)
Extensions (listed below)
Extras (custom properties)
Animation (keyframe, shape key, and skinning)
메쉬(Meshes)
glTF’s internal structure mimics the memory buffers commonly used by graphics chips when rendering in real-time, such that assets can be delivered to desktop, web, or mobile clients and be promptly displayed with minimal processing. As a result, quads and n-gons are automatically converted to triangles when exporting to glTF. Discontinuous UVs and flat-shaded edges may result in moderately higher vertex counts in glTF compared to Blender, as such vertices are separated for export. Likewise, curves and other non-mesh data are not preserved, and must be converted to meshes prior to export.
GPU Instances
When the option is enable in Exporter, instances are exported using the EXT_mesh_gpu_instancing extension.
There are some limitations, at export:
Instances must be meshes, and don’t have any children themselves
Instances must all be children of the same object.
This extension doesn’t manage material variation. That means that the generated file may include all instances with same materials.
Instances detected are objects sharing the same mesh data.
At import, instances are created by creating objects sharing the same mesh data.
Materials
The core material system in glTF supports a metal/rough PBR workflow with the following channels of information:
Base Color
Metallic
Roughness
Baked Ambient Occlusion
Normal Map (tangent space, +Y up)
Emissive
Some additional material properties or types of materials can be expressed using glTF extensions. The complete list can be found in Extensions part of this documentation.
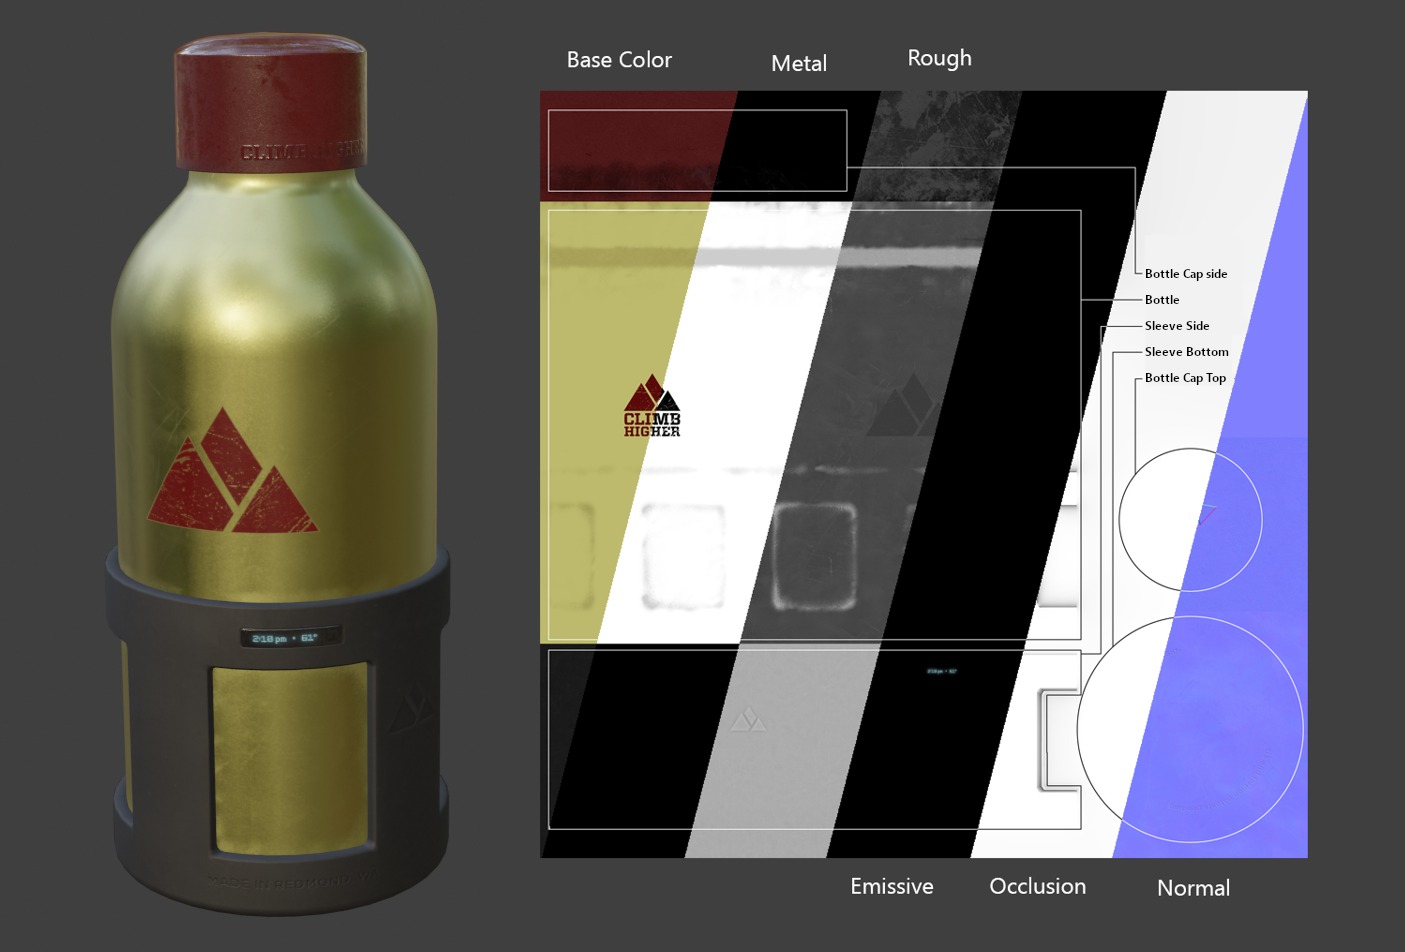
An example of the various image maps available in the glTF 2.0 core format. This is the water bottle sample model shown alongside slices of its various image maps.
Imported Materials
The glTF material system is different from Blender’s own materials. When a glTF file is imported, the add-on will construct a set of Blender nodes to replicate each glTF material as closely as possible.
The importer supports Metal/Rough PBR (core glTF), Spec/Gloss PBR (KHR_materials_pbrSpecularGlossiness)
and some extension materials. The complete list can be found in Extensions part of this documentation.
팁
Examining the result of the material import process is a good way to see examples of the types of material nodes and settings that can be exported to glTF.
Exported Materials
The exporter supports Metal/Rough PBR (core glTF) and Shadeless (KHR_materials_unlit) materials.
It will construct a glTF material based on the nodes it recognizes in the Blender material.
The material export process handles the settings described below.
참고
When image textures are used by materials, glTF requires that images be in PNG or JPEG format. The add-on will automatically convert images from other formats, increasing export time.
Base Color
The glTF base color is determined by looking for a Base Color input on a Principled BSDF node. If the input is unconnected, the input’s default color (the color field next to the unconnected socket) is used as the Base Color for the glTF material.
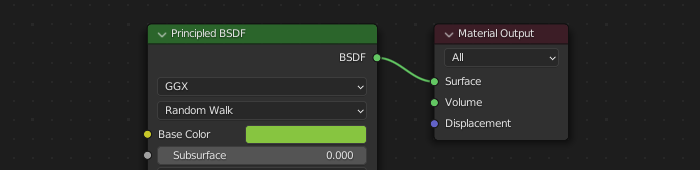
A solid base color can be specified directly on the node.
If an Image Texture node is found to be connected to the Base Color input, that image will be used as the glTF base color.
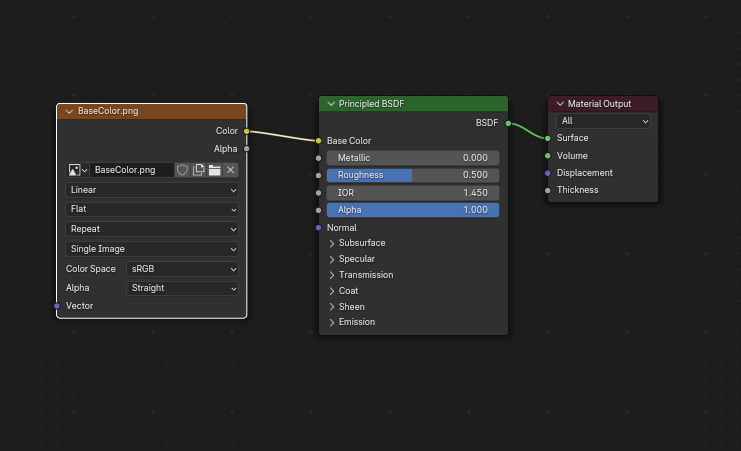
An image is used as the glTF base color.
Metallic and Roughness
These values are read from the Principled BSDF node. If both of these inputs are unconnected, the node will display sliders to control their respective values between 0.0 and 1.0, and these values will be copied into the glTF.
When using an image, glTF expects the metallic values to be encoded in the blue (B) channel,
and roughness to be encoded in the green (G) channel of the same image.
If images are connected to the Blender node in a manner that does not follow this convention,
the add-on may attempt to adapt the image to the correct form during exporting (with an increased export time).
In the Blender node tree, it is recommended to use a Separate RGB node
to separate the channels from an Image Texture node, and
connect the green (G) channel to Roughness, and blue (B) to Metallic.
The glTF exporter will recognize this arrangement as matching the glTF standard, and
that will allow it to simply copy the image texture into the glTF file during export.
The Image Texture node for this should have its Color Space set to Non-Color.
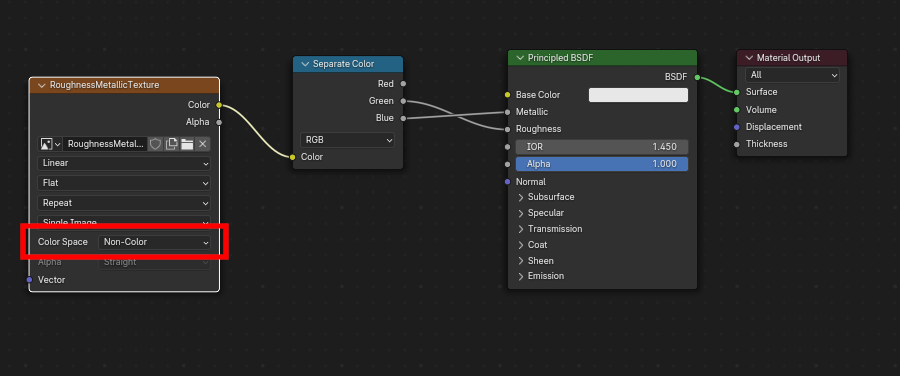
A metallic/roughness image connected in a manner consistent with the glTF standard, allowing it to be used verbatim inside an exported glTF file.
Baked Ambient Occlusion
glTF is capable of storing a baked ambient occlusion map.
Currently there is no arrangement of nodes that causes Blender
to use such a map in exactly the same way as intended in glTF.
However, if the exporter finds a custom node group by the name of glTF Material Output, and
finds an input named Occlusion on that node group,
it will look for an Image Texture attached there to use as the occlusion map in glTF.
The effect need not be shown in Blender, as Blender has other ways of showing ambient occlusion,
but this method will allow the exporter to write an occlusion image to the glTF.
This can be useful to real-time glTF viewers, particularly on platforms where there
may not be spare power for computing such things at render time.

A pre-baked ambient occlusion map, connected to a node that doesn’t render but will export to glTF.
팁
If you enable Shader Editor Add-ons in preferences, you will be able to add this custom node group from Menu: Add > Output > glTF Material Output

glTF stores occlusion in the red (R) channel, allowing it to optionally share
the same image with the roughness and metallic channels.
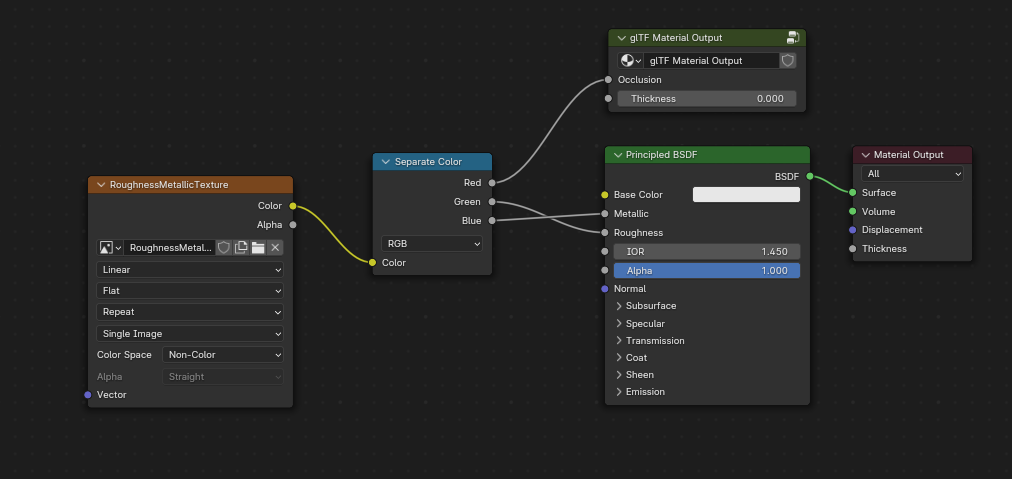
This combination of nodes mimics the way glTF packs occlusion, roughness, and metallic values into a single image.
팁
The Cycles render engine has a Bake panel that can be used to bake
ambient occlusion maps. The resulting image can be saved and connected
directly to the glTF Material Output node.
Normal Map
To use a normal map in glTF, connect an Image Texture node’s color output to a Normal Map node’s color input, and then connect the Normal Map normal output to the Principled BSDF node’s normal input. The Image Texture node for this should have its Color Space property set to Non-Color.
The Normal Map node must remain on its default property of Tangent Space as this is the only type of normal map currently supported by glTF. The strength of the normal map can be adjusted on this node. The exporter is not exporting these nodes directly, but will use them to locate the correct image and will copy the strength setting into the glTF.
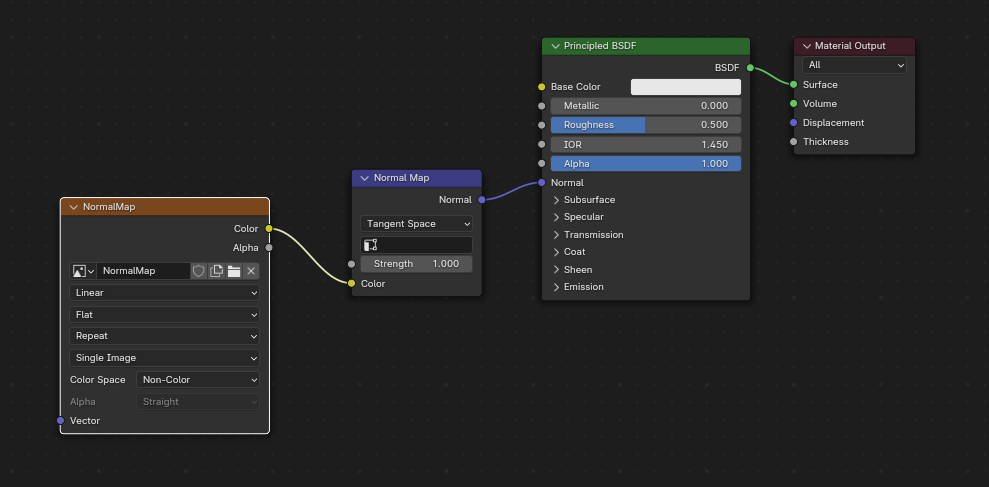
A normal map image connected such that the exporter will find it and copy it to the glTF file.
팁
The Cycles render engine has a Bake panel that can be used to bake tangent-space normal maps from almost any other arrangement of normal vector nodes. Switch the Bake type to Normal. Keep the default space settings (space: Tangent, R: +X, G: +Y, B: +Z) when using this bake panel for glTF. The resulting baked image can be saved and plugged into to a new material using the Normal Map node as described above, allowing it to export correctly.
See: Cycles Render Baking
Emissive
An Image Texture node can be connected to the Emission input on the Principled BSDF node to include an emissive map with the glTF material. Alternatively, the Image Texture node can be connected to an Emission shader node, and optionally combined with properties from a Principled BSDF node by way of an Add Shader node.
If the emissive map is alone in the material, it is best to set the Base Color default to black, and the Roughness default to 1.0. This minimizes the influence of the other channels if they are not needed.

This arrangement is supported for backwards compatibility. It is simpler to use the Principled BSDF node directly.
If any component of emissiveFactor is > 1.0, KHR_materials_emissive_strength extension will be used.
Clearcoat
When the Clearcoat input on the Principled BSDF node has a nonzero default value or
Image Texture node connected, the KHR_materials_clearcoat glTF extension will be
included in the export. This extension will also include a value or Image Texture
from the Clearcoat Roughness input if available.
If Image Textures are used, glTF requires that the clearcoat values be written to
the red (R) channel, and Clearcoat Roughness to the green (G) channel.
If monochrome images are connected, the exporter will remap them to these color channels.
The Clearcoat Normal input accepts the same kinds of inputs as the base Normal input, specifically a tangent-space normal map with +Y up, and a user-defined strength. This input can reuse the same normal map that the base material is using, or can be assigned its own normal map, or can be left disconnected for a smooth coating.
All Image Texture nodes used for clearcoat shading should have their Color Space set to Non-Color.
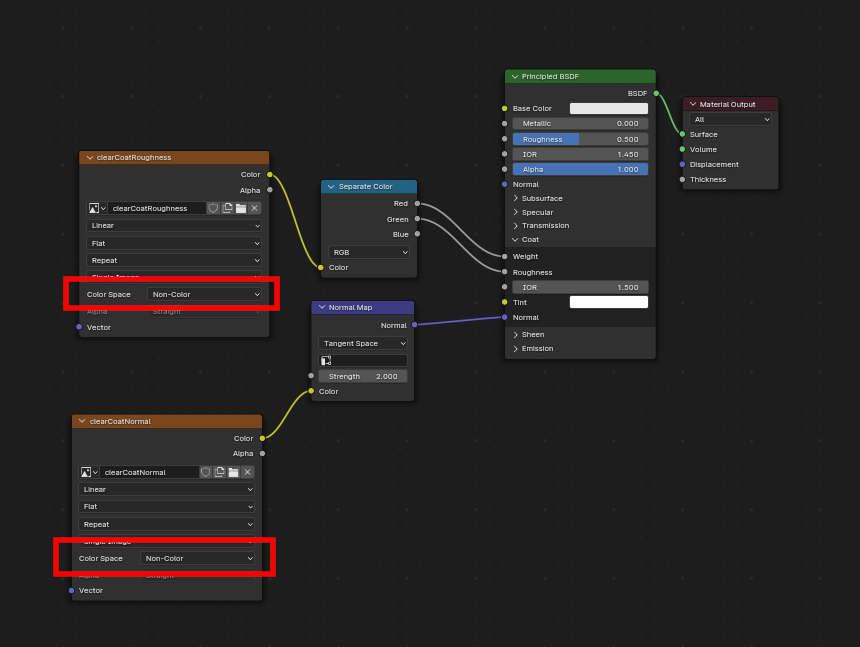
An example of a complex clearcoat application that will export correctly to glTF. A much simpler, smooth coating can be applied from just the Principled BSDF node alone.
Sheen
If a Sheen Roughness Texture is used, glTF requires the values be written to the alpha (A) channel.
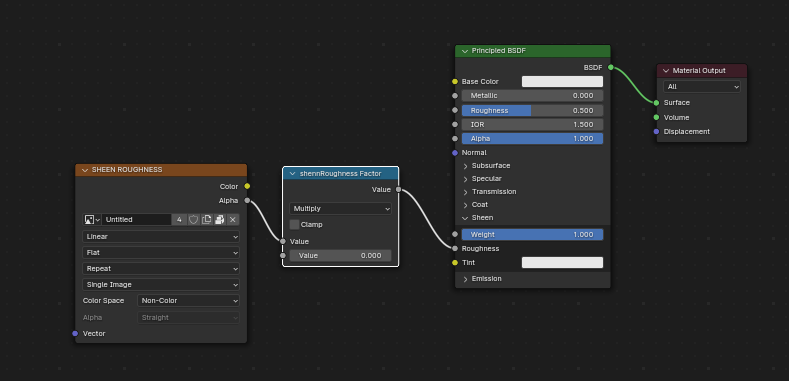
팁
Sheen BSDF node is only available on Cycles render engine. You may have to temporary switch to Cycles to add this node, and get back to EEVEE.
Specular
When the Specular IOR Level or Specular Tint input of Principled BSDF node have a non default value or
Image Texture node connected, the KHR_materials_specular glTF extension will be
included in the export.
Anisotropy
Anisotropic textures and data need to be converted at export, and at import.
At import, some nodes are created to manage this conversion
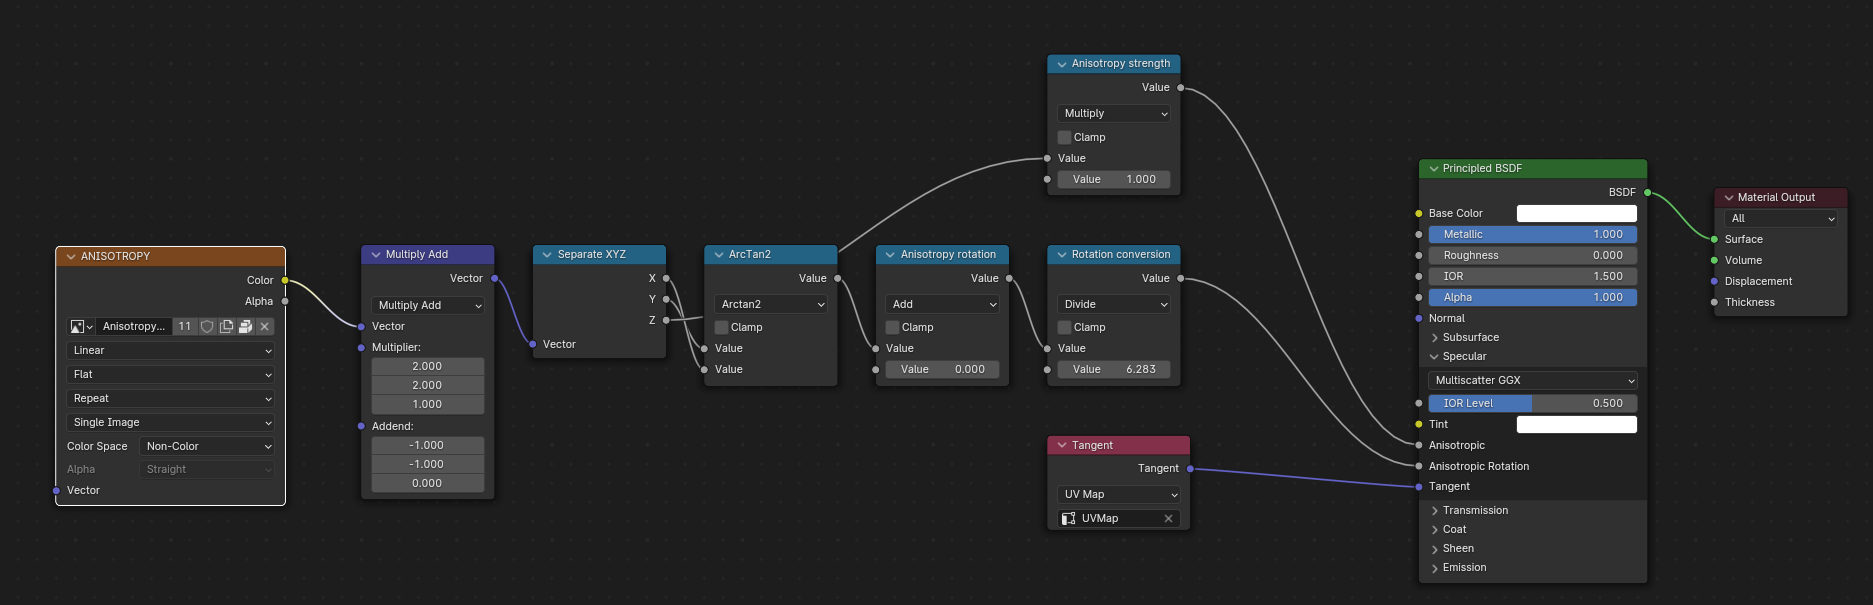
At export, this exact same nodes are detected, and used to export data.
At export, you can also plug some grayscale textures for Anisotropic and Anisotropic Rotation sockets. Then, exporter will convert these texture into a glTF compatible texture.
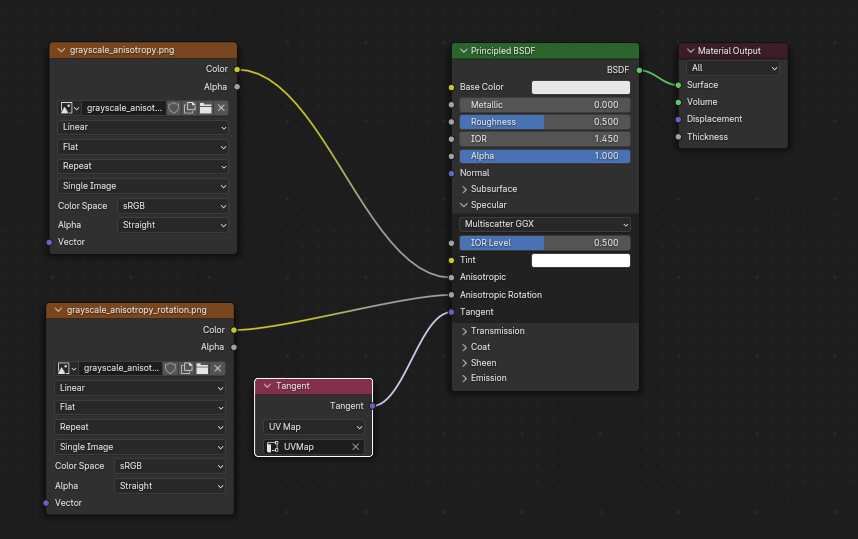
Note that the tangent socket must be linked to a tangent node, with UVMap. The choosen UVMap must be the UVMap of the Normal Map.
Transmission
When the Transmission input on the Principled BSDF node has a nonzero default value or
Image Texture node connected, the KHR_materials_transmission glTF extension will be
included in the export. When a texture is used, glTF stores the values in the red (R) channel.
The Color Space should be set to Non-Color.
Transmission is different from alpha blending, because transmission allows full-strength specular reflections. In glTF, alpha blending is intended to represent physical materials that are partially missing from the specified geometry, such as medical gauze wrap. Transmission is intended to represent physical materials that are solid but allow non-specularly-reflected light to transmit through the material, like glass.
팁
The material’s base roughness can be used to blur the transmission, like frosted glass.
팁
Typically the alpha blend mode of a transmissive material should remain “Opaque”, the default setting, unless the material only partially covers the specified geometry.
참고
In real-time engines where transmission is supported, various technical limitations in the engine may determine which parts of the scene are visible through the transmissive surface. In particular, transmissive materials may not be visible behind other transmissive materials. These limitations affect physically-based transmission, but not alpha-blended non-transmissive materials.
참고
If you want to enable refraction on your model, KHR_materials_transmission must also
be used in addition with KHR_materials_volume. See the dedicated Volume part of
the documentation.
경고
Transmission is complex for real-time rendering engines to implement,
and support for the KHR_materials_transmission glTF extension is not yet widespread.
IOR
At import, there are two different situation:
if
KHR_materials_ioris not set, IOR value of Principled BSDF node is set to 1.5, that is the glTF default value of IOR.If set, the
KHR_materials_ioris used to set the IOR value of Principled BSDF.
At export, IOR is included in the export only if one of these extensions are also used:
KHR_materials_transmissionKHR_materials_volumeKHR_materials_specular
IOR of 1.5 are not included in the export, because this is the default glTF IOR value.
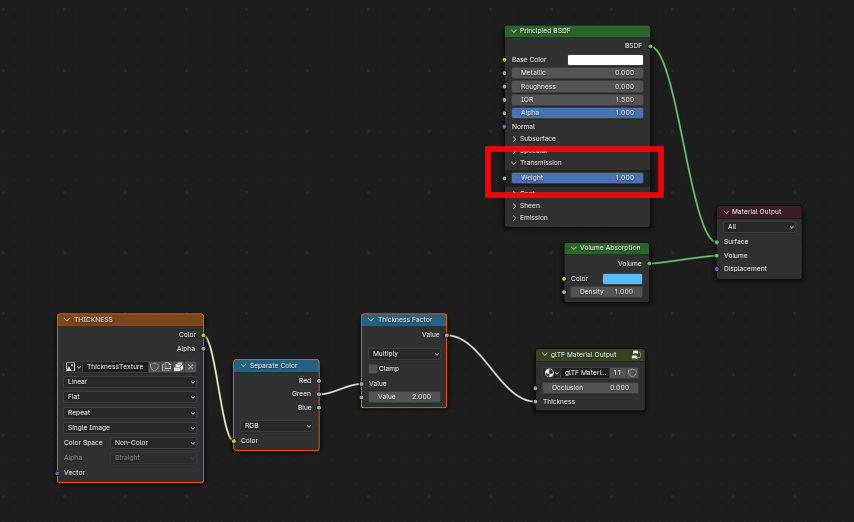
Volume
Volume can be exported using a Volume Absorption node, linked to Volume socket of Output node.
Data will be exported using the KHR_materials_volume extension.
For volume to be exported, some transmission must be set on Principled BSDF node.
Color of Volume Absorption node is used as glTF attenuation color. No texture is allowed for this property.
Density of Volume Absorption node is used as inverse of glTF attenuation distance.
Thickness can be plugged into the Thickness socket of custom group node
glTF Material Output.If a texture is used for thickness, it must be plugged on (
G) Green channel of the image.
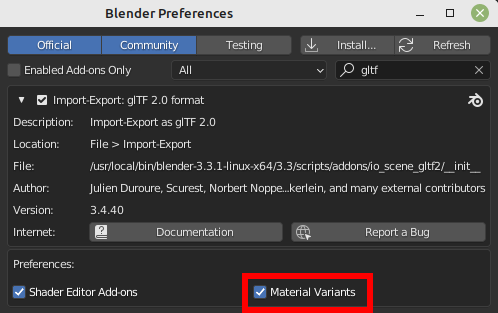
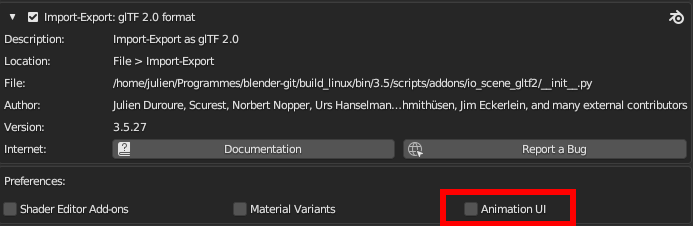
glTF Variants
참고
For a full Variants experience, you have to enable UI in Add-on preferences
There are two location to manage glTF Variants in Blender
In 3D View, on
glTF VariantstabFor advanced settings, in Mesh Material Properties (see Advanced glTF Variant checks)
The main concept to understand for using Variants, is that each material slot will be used as equivalent of a glTF primitive.
glTF Variants switching
After importing a glTF file including KHR_materials_variants extension, all variants can be displayed.
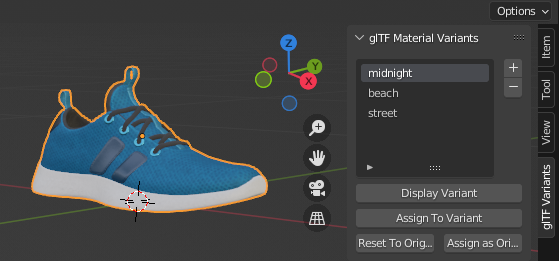
You can switch Variant, by selecting the variant you want to display, then clicking on Display Variant.
You can switch to default materials (when no Variant are used), by clicking on Reset to default.
glTF Variants creation
You can add a new Variant by clicking the + at right of the Variant list.
Then you can change the name by double-clicking.
After changing Materials in Material Slots, you can assign current materials to the active Variant using Assign to Variant.
You can also set default materials using Assign as Original.
These materials will be exported as default material in glTF.
This are materials that will be displayed by any viewer that don’t manage KHR_materials_variants extension.
Advanced glTF Variant checks
If you want to check primitive by primitive, what are Variants used, you can go to Mesh Material Properties.
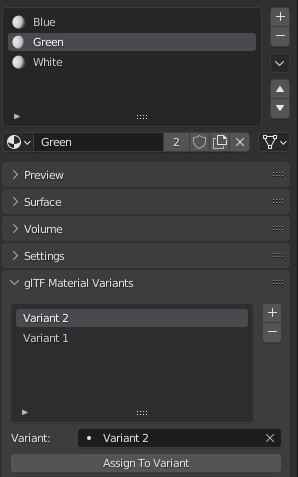
The glTF Material Variants tab refers to the active material Slot and Material used by this slot. You can see every Variants that are using this material for the given Slot/Primitive.
You can also assign material to Variants from this tab, but recommendation is to perform it from 3D View tab.
Double-Sided / Backface Culling
For materials where only the front faces will be visible, turn on Backface Culling in the Settings panel of an EEVEE material. When using other engines (Cycles, Workbench) you can temporarily switch to EEVEE to configure this setting, then switch back.
Leave this box unchecked for double-sided materials.
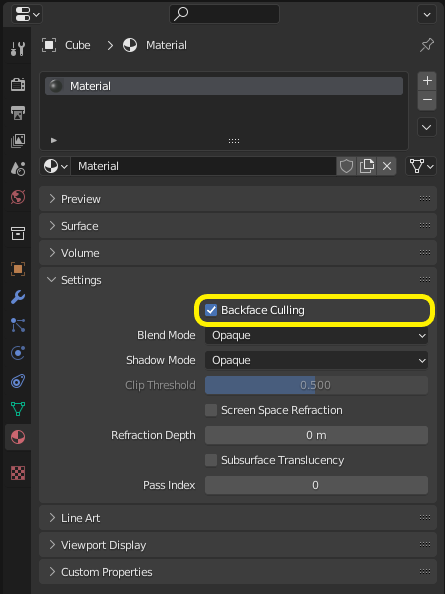
The inverse of this setting controls glTF’s DoubleSided flag.
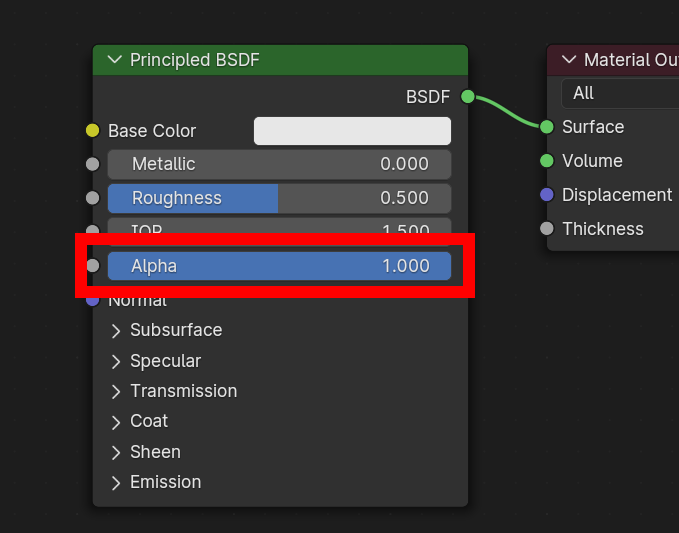
Alpha Modes
glTF has three alpha modes, depending on whether the alpha value is always 1, always 0 or 1, or can be between 0 and 1. The exporter determines the alpha mode automatically from the nodes connected to the Alpha socket.
- Opaque
In opaque mode, the material alpha is always 1.
- Mask
In mask mode, the material alpha is always 0 or 1. This creates “cutout” transparency, where there is a hard edge between opaque and transparent regions, and can be used for things like leaves or cloth with holes. To enable this mode, use a Math node to round the alpha value to either 0 or 1.
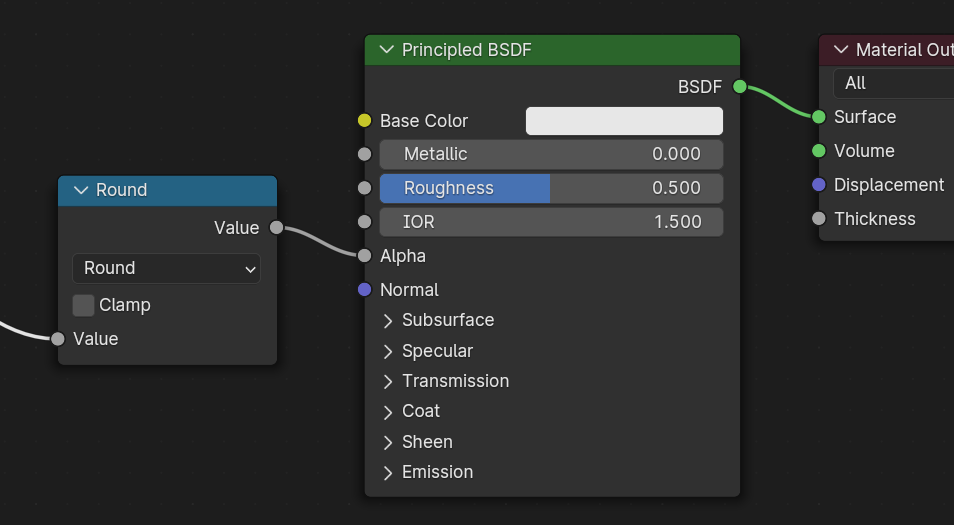
Rounding snaps alpha values that are 0.5 or greater up to 1, and ones below 0.5 down to 1. It is also possible to use a cutoff value different than 0.5 by using Math nodes to do
1 - (alpha < cutoff).Mask mode is essentially the same as EEVEE’s “Alpha Clip” blend mode, but is done with shader nodes so it works in other render engines.
- Blend
Materials that use neither of these will use blend mode. Blend mode allows partially transparent surfaces that tint the objects seen through them, like layers of colored film. However, partial transparency is complex to render, and glTF viewers may show visual artifacts in non-trivial scenes that use blend mode.
To avoid artifacts, it may be a good idea to separate out parts of a model that can use opaque or mask mode, and use blend mode only on the parts where it is necessary, or to use only a single layer of transparent polygons in front of opaque objects.
UV Mapping
Control over UV map selection and transformations is available by connecting a UV Map node and a Mapping node to any Image Texture node.
Settings from the Mapping node are exported using a glTF extension named KHR_texture_transform.
There is a mapping type selector across the top. Point is the recommended type for export.
Texture and Vector are also supported. The supported offsets are:
Location - X and Y
Rotation - Z only
Scale - X and Y
For the Texture type, Scale X and Y must be equal (uniform scaling).
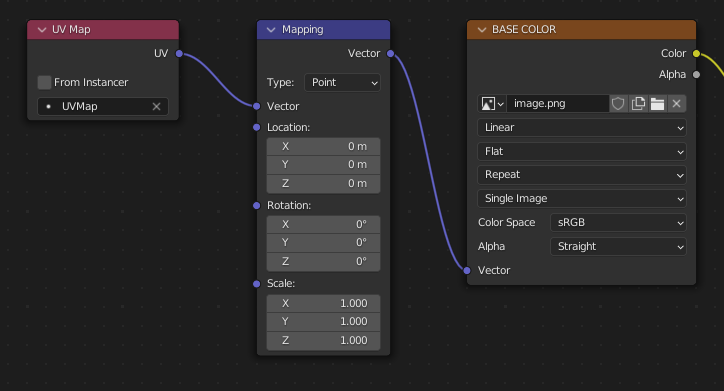
A deliberate choice of UV mapping.
팁
These nodes are optional. Not all glTF readers support multiple UV maps or texture transforms.
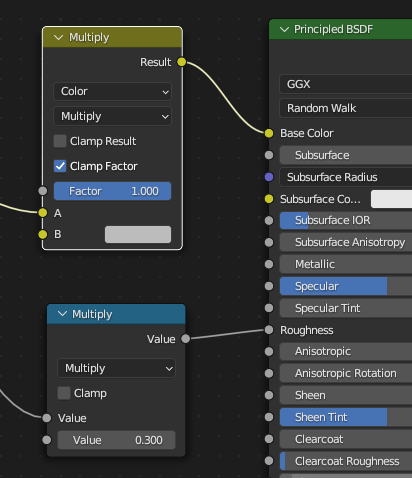
Factors
Any Image Texture nodes may optionally be multiplied with a constant color or scalar. These will be written as factors in the glTF file, which are numbers that are multiplied with the specified image textures. These are not common.
Use Math node (multiply) for scalar factors. Use second value as factor
Use Mix node (color / multiply) for color factors. Set Factor to 1, and use Color2 (B) as factors
Example
A single material may use all of the above at the same time, if desired. This figure shows a typical node structure when several of the above options are applied at once:
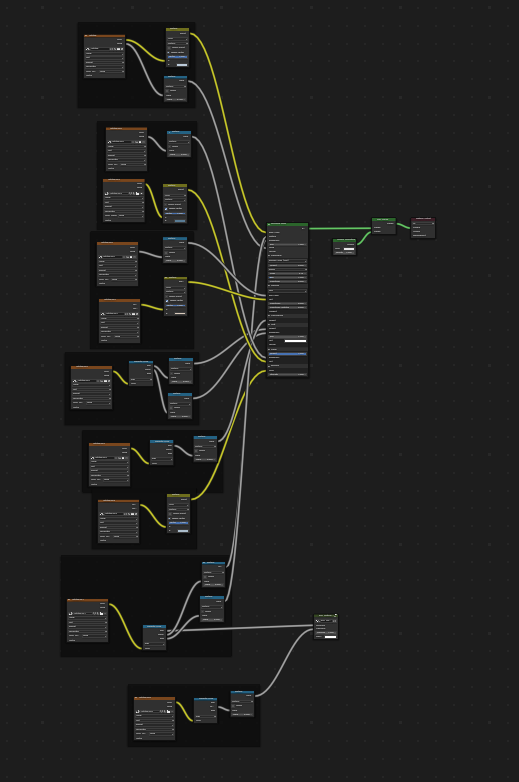
A Principled BSDF material with an emissive texture.
UDIM
UDIM is a way to store multiple textures in a single image file. The UDIM system is supported by Blender, but is not supported by glTF. When exporting a model that uses UDIM, the add-on will automatically split the image into multiple images, one for each tile, and will update the material nodes to use the new images. All UDIM texture must use the same UV map to be exported.
Exporting a Shadeless (Unlit) Material
To export an unlit material, mix in a camera ray, and avoid using the Principled BSDF node.
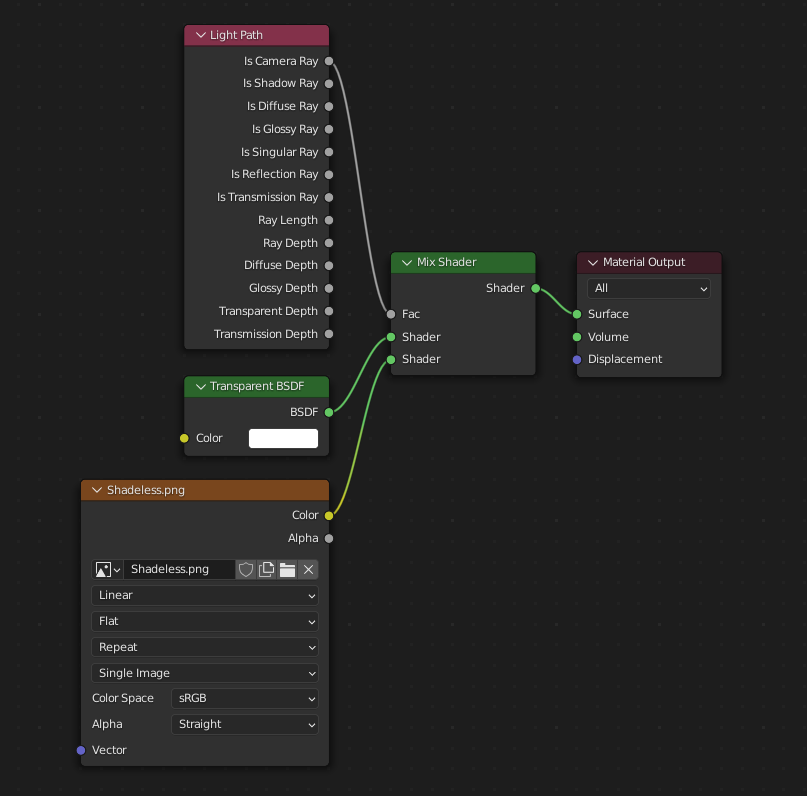
One of several similar node arrangements that will export
KHR_materials_unlit and render shadeless in Blender.
Extensions
The core glTF 2.0 format can be extended with extra information, using glTF extensions. This allows the file format to hold details that were not considered universal at the time of first publication. Not all glTF readers support all extensions, but some are fairly common.
Certain Blender features can only be exported to glTF via these extensions. The following glTF 2.0 extensions are supported directly by this add-on:
Import
KHR_materials_pbrSpecularGlossinessKHR_materials_clearcoatKHR_materials_transmissionKHR_materials_unlitKHR_materials_emissive_strengthKHR_materials_volumeKHR_materials_sheenKHR_materials_specularKHR_materials_anisotropyKHR_materials_iorKHR_materials_variantsKHR_lights_punctualKHR_texture_transformKHR_mesh_quantizationEXT_mesh_gpu_instancing
Export
KHR_draco_mesh_compressionKHR_lights_punctualKHR_materials_clearcoatKHR_materials_transmissionKHR_materials_unlitKHR_materials_emissive_strengthKHR_materials_volumeKHR_materials_sheenKHR_materials_specularKHR_materials_anisotropyKHR_materials_iorKHR_materials_variantsKHR_texture_transformEXT_mesh_gpu_instancing
Third-party glTF Extensions
It is possible for Python developers to add Blender support for additional glTF extensions by writing their own third-party add-on, without modifying this glTF add-on. For more information, see the example on GitHub and if needed, register an extension prefix.
Custom Properties
Custom properties are always imported, and will be exported from most objects
if the option is selected before export.
These are stored in the extras field on the corresponding object in the glTF file.
Unlike glTF extensions, custom properties (extras) have no defined namespace, and may be used for any user-specific or application-specific purposes.
Animations
A glTF animation changes the transforms of objects or pose bones, or the values of shape keys. One animation can affect multiple objects, and there can be multiple animations in a glTF file.
Import
Imported models are set up so that the first animation in the file is playing automatically. Scrub the Timeline to see it play.
When the file contains multiple animations, the rest will be organized using the Nonlinear Animation editor. Each animation becomes an action stashed to an NLA track. The track name is the name of the glTF animation. To make the animation within that track visible, click Solo (star icon) next to the track you want to play.
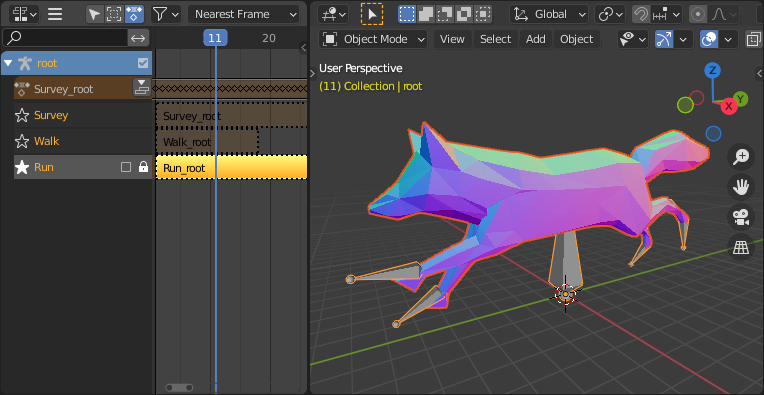
This is the fox sample model showing its “Run” animation.
If an animation affects multiple objects, it will be broken up into multiple parts. The part of the animation that affects one object becomes an action stashed on that object. Use the track names to tell which actions are part of the same animation. To play the whole animation, you need to enable Solo (star icon) for all its tracks.
참고
There is currently no way to see the non-animated pose of a model that had animations.
You can also use the animation switcher that can be found in Dope Sheet editor.
참고
You have to enable UI in Add-on preferences for seeing the animation switcher
You can switch all animation imported. It automatically enables Solo (star icon) for all needed tracks. It also reset non animated object to Rest transformation.
Export
You can export animations using different ways. How glTF animations are made from actions / NLA is controlled by the export option.
Actions (default)
An action will be exported if it is the active action on an object, or it is stashed to an NLA track (e.g. with the Stash or Push Down buttons in the Action Editor). Actions which are not associated with an object in one of these ways are not exported. If you have multiple actions you want to export, make sure they are stashed!
A glTF animation can have a name, which is the action name by default. You can override it
by renaming its NLA track from NLATrack/[Action Stash] to the name you want to use.
For example, the Fig. fox model will export with three animations,
“Survey”, “Walk”, and “Run”.
If you rename two tracks on two different objects to the same name, they will become part
of the same glTF animation and will play together.
The importer organizes actions so they will be exported correctly with this mode.
This mode is useful if you are exporting for game engine, with an animation library of a character. Each action must be on its own NLA track.
Active Actions merged
In this mode, the NLA organization is not used, and only one animation is exported using the active actions on all objects.
NLA Tracks
In this mode, each NLA Track will be export as an independent glTF animation. This mode is useful if you are using Strip modifiers, or if you get multiple action on a same Track.
If you rename two tracks on two different objects to the same name, they will become part of the same glTF animation and will play together.
Scene
Using Scene option, animations will be exported as you can see them in viewport. You can choose to export a single glTF animation, or each object separately.
참고
Remember only certain types of animation are supported:
Object transform (location, rotation, scale)
Pose bones
Shape key values
Animation of other properties, like physics, lights, or materials, will be ignored.
참고
In order to sample shape key animations controlled by drivers using bone transformations, they must be on a mesh object that is a direct child of the bones’ armature.
참고
Only Actions (default) and Active Actions merged mode can handle not sampled animations.
File Format Variations
The glTF specification identifies different ways the data can be stored. The importer handles all of these ways. The exporter will ask the user to select one of the following forms:
glTF Binary (.glb)
This produces a single .glb file with all mesh data, image textures, and
related information packed into a single binary file.
팁
Using a single file makes it easy to share or copy the model to other systems and services.
glTF Separate (.gltf + .bin + textures)
This produces a JSON text-based .gltf file describing the overall structure,
along with a .bin file containing mesh and vector data, and
optionally a number of .png or .jpg files containing image textures
referenced by the .gltf file.
팁
Having an assortment of separate files makes it much easier for a user to go back and edit any JSON or images after the export has completed.
참고
Be aware that sharing this format requires sharing all of these separate files together as a group.
glTF Embedded (.gltf)
This produces a JSON text-based .gltf file, with all mesh data and
image data encoded (using Base64) within the file. This form is useful if
the asset must be shared over a plain-text-only connection.
경고
This is the least efficient of the available forms, and should only be used when required. Available only when you activated it in addon preferences.
특성
Import
- Pack Images
Pack all images into the blend-file.
- Merge Vertices
The glTF format requires discontinuous normals, UVs, and other vertex attributes to be stored as separate vertices, as required for rendering on typical graphics hardware. This option attempts to combine co-located vertices where possible. Currently cannot combine verts with different normals.
- Shading
How normals are computed during import.
- Guess Original Bind Pose
Determines the pose for bones (and consequently, skinned meshes) in Edit Mode. When on, attempts to guess the pose that was used to compute the inverse bind matrices.
- Bone Direction
Changes the heuristic the importer uses to decide where to place bone tips. Note that the Fortune setting may cause inaccuracies in models that use non-uniform scaling. Otherwise this is purely aesthetic. The default value will not change axis, and is best for re-exporting from Blender. This default option will change display mode (adding shape and changing relationship line) to have a better view, even if original bones axis are not the most accurate (estheticaly speaking)
- Lighting Mode
Optional backwards compatibility for non-standard render engines. Applies to lights. Standard: Physically-based glTF lighting units (cd, lx, nt). Unitless: Non-physical, unitless lighting. Useful when exposure controls are not available Raw (Deprecated): Blender lighting strengths with no conversion
- Import WebP textures
If a texture exists in WebP format, loads the WebP texture instead of the fallback png/jpg one.
Export
- 형식(format)
See: File Format Variations.
- Keep Original
For glTF Separate file format only. Keep original textures files if possible. Warning: if you use more than one texture, where PBR standard requires only one, only one texture will be used. This can lead to unexpected results
- Textures
For glTF Separate file format only. Folder to place texture files in. Relative to the gltf-file.
- Copyright
Legal rights and conditions for the model.
- Remember Export Settings
Store export settings in the blend-file, so they will be recalled next time the file is opened.
Include
- Selected Objects
Export selected objects only.
- Visible Objects
Export visible objects only.
- Renderable Objects
Export renderable objects only.
- Active Collection
Export objects from active collection only.
- Include Nested Collections
Only when Active Collection is On. When On, export recursively objects on nested active collections.
- Active Scene
Export active scene only.
- Custom Properties
Export custom properties as glTF extras.
- Cameras
Export cameras.
- Punctual Lights
Export directional, point, and spot lights. Uses the
KHR_lights_punctualglTF extension.
변형
- Y Up
Export using glTF convention, +Y up.
Data - Scene Graph
- Geometry Nodes Instances
Export Geometry nodes instances. This feature is experimental.
- GPU Instances
Export using
EXT_mesh_gpu_instancingextensions.- Flatten Object Hierarchy
Useful in case of non-decomposable TRS matrix. Only skined meshes will stay children of armature.
- Full Collection Hierarchy
Export collections as empty, keeping full hierarchy. If an object is in multiple collections, it will be exported it only once, in the first collection it is found.
Data - Mesh
- Apply Modifiers
Export objects using the evaluated mesh, meaning the resulting mesh after all Modifiers have been calculated.
- UVs
Export UVs (texture coordinates) with meshes.
- Normals
Export vertex normals with meshes.
- Tangents
Export vertex tangents with meshes.
- Attributes
Export Attributes with meshes, when the name starts with underscore.
- Loose Edges
Export loose edges as lines, using the material from the first material slot.
- Loose Points
Export loose points as glTF points, using the material from the first material slot.
- Shared Accessor
For triangles, use shared accessor for indices. This is more efficient (smaller files when you have lots of materials).
Data - Mesh - Vertex Color
- Use Vertex Color
- Material:
Export vertex color when used in material node tree as Base Color multiplier. This is the default, and the most accurate regarding glTF specification.
- Active:
Export active vertex colors, even if not used in material node tree. A fully compliant glTF viewer should display this VC as Base Color multiplier.
- 없음(None):
Do not export vertex color.
- Export all vertex colors
Export all vertex colors, additional VC will be COLOR_1, COLOR_2, etc.
- Export active vertex color when no material
Export active vertex color when no material is assigned to the object.
Data - Material
- Materials
Export full materials, only placeholders (all primitives but without materials), or does not export materials. (In that last case, primitives are merged, losing material slot information).
- 이미지
Output format for images. PNG is lossless and generally preferred, but JPEG might be preferable for web applications due to the smaller file size. If WebP is chosen, all textures will be saved as WebP, without any png/jpg fallback. If None is chosen, materials are exported without textures.
- Image Quality
When exporting jpeg or WebP files, the quality of the exported file.
- Create WebP
Creates WebP textures for every textures, in addition to the existing texture. For already WebP textures, nothing happen.
- WebP fallback
For all WebP textures, create a png fallback texture.
- Unused images
Export images that are not used in any material.
- Unused textures
Export texture info (sampler, image, texcoord) that are not used in any material.
Data - Shape Keys
Export shape keys (morph targets).
- Shape Key Normals
Export vertex normals with shape keys (morph targets).
- Shape Key Tangents
Export vertex tangents with shape keys (morph targets).
Data - Shape Keys - Optimize
- Use Sparse Accessor if better
Sparse Accessor will be used if it save space (if the exported file is smaller)
- Omitting Sparse Accessor if data is empty
If data is empty, omit to export SParce Accessor. Not all viewer managed it correctly, so this option is Off by default
Data - Armature
- Use Rest Position Armature
Export Armatures using rest position as joint rest pose. When Off, the current frame pose is used as rest pose.
- Export Deformation Bones only
Export Deformation bones only, not other bones. Animation for deformation bones are baked.
- Remove Armature Object
Remove Armature Objects if possible. If some armature(s) have multiple root bones, we can’t remove them.
- Flatten Bone Hierarchy
Useful in case of non-decomposable TRS matrix.
Data - Skinning
Export skinning data
- Bone influences
How many joint verex influences will be exported. Models may appear incorrectly in many viewers with value different to 4 or 8.
- Include All Bone Influences
Export all joint vertex influences. Models may appear incorrectly in many viewers.
Data - Lighting
- Lighting Mode
Optional backwards compatibility for non-standard render engines. Applies to lights. Standard: Physically-based glTF lighting units (cd, lx, nt). Unitless: Non-physical, unitless lighting. Useful when exposure controls are not available Raw (Deprecated): Blender lighting strengths with no conversion
Data - Compression
Compress meshes using Google Draco.
- Compression Level
Higher compression results in slower encoding and decoding.
- Quantization Position
Higher values result in better compression rates.
- Normal
Higher values result in better compression rates.
- Texture Coordinates
Higher values result in better compression rates.
- 색깔
Higher values result in better compression rates.
- Generic
Higher values result in better compression rates.
애니메이션
- Animation mode
Animation mode used for export (See Animations )
- Shape Keys Animations
Export Shape Keys Animation. Need Shape Keys to be exported (See Data - Shape Keys)
- Bake All Objects Animations
Useful when some objects are constrained without being animated themselves.
Animation - Rest & Ranges
- Use Current Frame as Object Rest Transformations
Export the scene in the current animation frame. When off, frame 0 is used as rest transformation for objects.
- Limit to Playback Range
Clips animations to selected playback range.
- Set all glTF Animation starting at 0
Set all glTF Animation starting at 0. Can be useful for looping animation
- Negative Frames
When some frames are in negative range, slide or crop the animation.
Animation - Armature
- Export all Armature Actions
Export all actions, bound to a single armature. Warning: Option does not support exports including multiple armatures.
- Reset pose bones between actions
Reset pose bones between each action exported. This is needed when some bones are not keyed on some animations.
Animation - Sampling
Apply sampling to all animations. Do not sample animation can lead to wrong animation export.
- Sampling Rate
How often to evaluate animated values (in frames).
Animation - Optimize
- Optimize Animation Size
Reduce exported file size by removing duplicate keyframes when all identical.
- Force keeping channel for armature / bones
if all keyframes are identical in a rig, force keeping the minimal animation.
- Force keeping channel for objects
if all keyframes are identical for object transformations, force keeping the minimal animation.
- Disable viewport for other objects
When exporting animations, disable viewport for other objects, for performance reasons, when possible.
Animation - Filter
Restrict actions to be exported to the ones matching the filter.
Contributing
This importer/exporter is developed through the glTF-Blender-IO repository, where you can file bug reports, submit feature requests, or contribute code.
Discussion and development of the glTF 2.0 format itself takes place on the Khronos Group glTF GitHub repository, and feedback there is welcome.