Randapparatuur Configureren
Beeldschermen
A full HD display (1920x1080) or higher is recommended. Multi-monitor setups are supported, and workspaces can be configured to span multiple monitors.
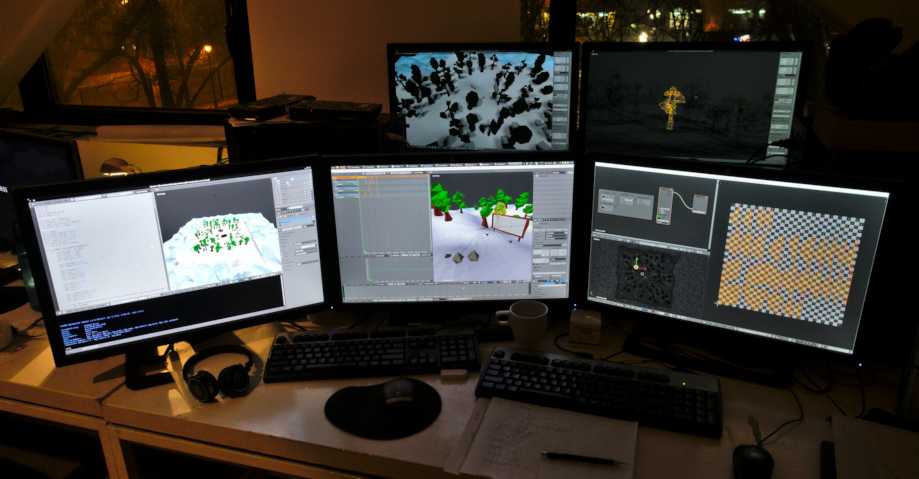
Voorbeeld van de ondersteuning voor meerdere monitoren in Blender.
Invoerapparaten
Blender ondersteunt verschillende soorten invoerapparaten:
Toetsenbord (aanbevolen: toetsenbord met numeriek toetsenbord, Engels toetsenbordindeling werkt het beste)
Muis (aanbevolen: muis met drie knoppen en een scrollwiel)
Grafisch Tekentablet
Touchpad
NDOF-apparaat (ook bekend als 3D-muis)
Notitie
If you don’t have a middle mouse button or numeric keypad, you can emulate these in the Input Preferences. However, be aware that these emulations may cause the loss of some shortcut keys. Where possible, it is suggested to use the recommended hardware.
Muis
A number of Blender interactions utilize the middle button (clicking the scroll wheel), or the use of the scroll wheel. This is why the recommendation for a mouse is a two-button mouse with an added scroll wheel that acts as a middle button (effectively a 3-button mouse). This will allow for the most efficient workflow within all of Blender’s modules.
Toetsenbord
A number of Blender interactions utilize the keyboard’s number pad (or numpad). This is the set of 10 numeric keys plus mathematical functions that appears on the right side of a traditional 104-key full-sized keyboard. This will allow for the most efficient workflow within all of Blender’s modules.
Numpad Emulatie
If you do not have a number pad on the side of your keyboard, you may want to emulate one. You can then use the number row at the top of the keyboard instead, but will no longer have access to these keys’ original functions (such as switching between vertex/edge/face selection in Edit Mode).
Zie ook
Lees meer over Numpad Emulate in de Preferences.
Niet-Engelstalige Toetsenborden
Als je een toetsenbord met een niet-Engelse indeling gebruikt, kan het handig zijn om over te schakelen naar de UK- of US-indeling wanneer je werkt met Blender.
Notitie
Je kunt ook de toetsenbordindeling wijzigen vanuit de Preferences. Deze handleiding gaat er echter van uit dat je de standaard toetsenbordindeling gebruikt.
Touch Screens
Blender has several settings that can be enabled to improve the experience on touch-enabled devices. These options make it easier to manage areas, menus, and interactions without relying on precise mouse input.
Enable Show Handles to simplify resizing and rearranging Areas (Velden).
Increase the Border Width to make area edges easier to select with a finger.
Grafisch Tekentablet
Grafische tekentablets kunnen worden gebruikt om de muisaanwijzer te besturen met een pen, wat een meer traditionele methode is. Dit kan een vertrouwde ervaring bieden voor artists die gewend zijn aan tekenen met vergelijkbare tools, en ook extra functies bieden zoals drukgevoeligheid.
Notitie
If you are using a graphic tablet instead of a mouse and pressure sensitivity does not work properly, try to place the mouse pointer in the Blender window and then disconnect/reconnect your graphic tablet. This might help.
Touchpad
Touchpad-besturing is beschikbaar op Windows, macOS en Linux met Wayland. Als je werkt vanaf een laptop zonder muis, kun je de besturing emuleren met multi-touchgebaren op het touchpad via de Preferences.
Gesture (Gebaar) |
Effect |
|---|---|
Pan (Verplaatsen/Zwenken) |
Houd Shift toets ingedrukt terwijl je twee vingers over het touchpad sleept. |
Zoom (Inzoomen) |
Houd Ctrl of OSKey toets ingedrukt terwijl je twee vingers over het touchpad sleept. |
Orbit (Eromheen draaien) |
Sleep twee vingers over het touchpad. |
Rechtsklik emuleren |
Tik met twee vingers op het touchpad. |
NDOF (3D Mouse)
3D mice or NDOF devices are hardware that you can use to navigate a scene in Blender. Currently only devices made by 3Dconnexion, such as the SpaceMouse™, are supported. These devices allow you to explore a scene, and make Fly/Walk Navigation easier to control. The NDOF device can be configured in the Preferences. These settings can also be accessed directly from the viewport using the NDOFMenu button on the NDOF device.
Zie ook
Zie Input Preference voor meer informatie over het configureren van randapparatuur.
Head-Mounted Displays (Virtual Reality)
HMDs maken het mogelijk om gebruikers in een interactieve, virtuele omgeving te plaatsen. Bevestigd aan het hoofd, volgen het hoofdbewegingen om een schijnbaar omringende wereld te projecteren op kleine schermen voor de ogen van de gebruiker. Als het systeem goed werkt, ervaren ze de virtuele omgeving alsof ze er echt zijn.
Ondersteunde Platforms
De ondersteuning voor virtual reality in Blender is geïmplementeerd via de multi-platform OpenXR-standaard. Deze standaard is nieuw en daarom is de ondersteuning ervoor nog beperkt.
Platform |
Besturingssysteem |
Opmerkingen |
|---|---|---|
Windows |
||
Windows |
||
GNU/Linux |
Niet aanbevolen voor algemeen gebruik op dit moment. |
|
Meta (voormalig Oculus) (Rift and Quest) |
Windows |
Vereist Oculus v31 software-update. Oculus Link is vereist voor Quest. |
Windows, GNU/Linux |
Vereist SteamVR 1.16 of nieuwer. |
|
Windows |
– |
|
Windows |
Vereist Windows 10 mei 2019 Update (1903). |
Aan de slag
De volgende subsecties beschrijven hoe een HMD kan worden ingesteld met de ondersteunde platforms. Als dit niet wordt gedaan, zal Blender een foutmelding geven bij het proberen te starten van een virtual reality-sessie.
HTC Vive Cosmos
The dedicated platform for the HTC Vive Cosmos is currently targeted at developers and may lack features found in other platforms.
Volg de stappen op Vive Developer Forums.
Enable the VR Scene Inspection add-on in Blender.
HTC Vive Focus 3
Het toegewijde platform voor de HTC Vive Focus 3 is momenteel gericht op ontwikkelaars en kan functies missen die wel te vinden zijn in andere platforms.
Volg de stappen van op Vive Developer Forums.
Enable the VR Scene Inspection add-on in Blender.
Monado
Monado is een gratis en open source XR-platform voor Linux. Het is nog niet klaar voor productie en moet alleen voor testdoeleinden worden gebruikt.
Pakketten zijn beschikbaar voor de volgende distributies:
Ubuntu (Eoan, Focal)
Voor andere systemen moet het vanuit de broncode worden gecompileerd, wat in dit geval niet wordt aanbevolen voor mensen met weinig ervaring in het compileren van software. Volg desondanks de Getting Started Guides van Monado om dit te doen.
Enable the VR Scene Inspection add-on in Blender.
Meta (voormalig Oculus)
Meta (voormalig Oculus) biedt volledige ondersteuning voor OpenXR sinds de Oculus v31 Software Update.
Download en installeer de Oculus Rift/Oculus Link software.
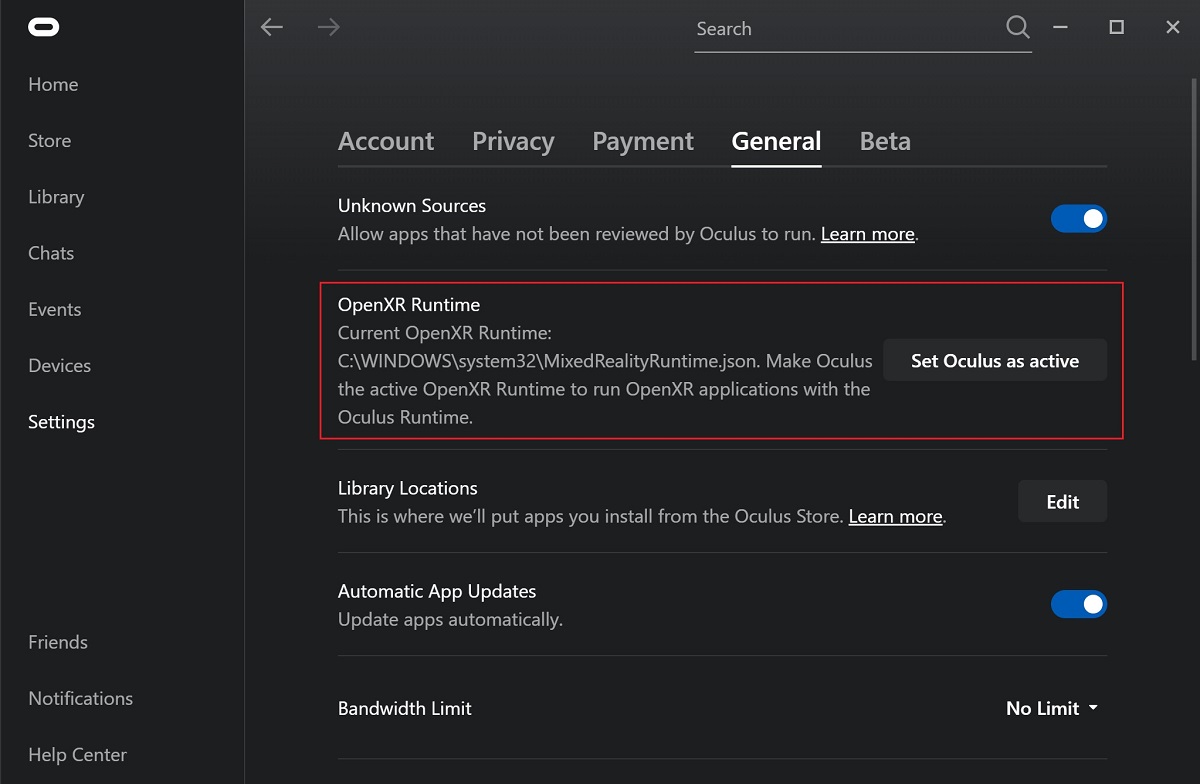
Stel Oculus in als de actieve OpenXR-runtime via het General tabblad in de Oculus App-instellingen.
Enable the VR Scene Inspection add-on in Blender.
Passthrough Support
Currently, passthrough support over OpenXR is disabled by default in the Quest Link app, and must be manually enabled in its settings to use this feature.
The performance of the passthrough render varies with the quality of the connection between the headset and the computer. For better results, connecting the headset directly through USB to the PC, or at least connecting the computer to the local network over Ethernet, is recommended.
SteamVR
SteamVR provides full support for OpenXR as of SteamVR 1.16.
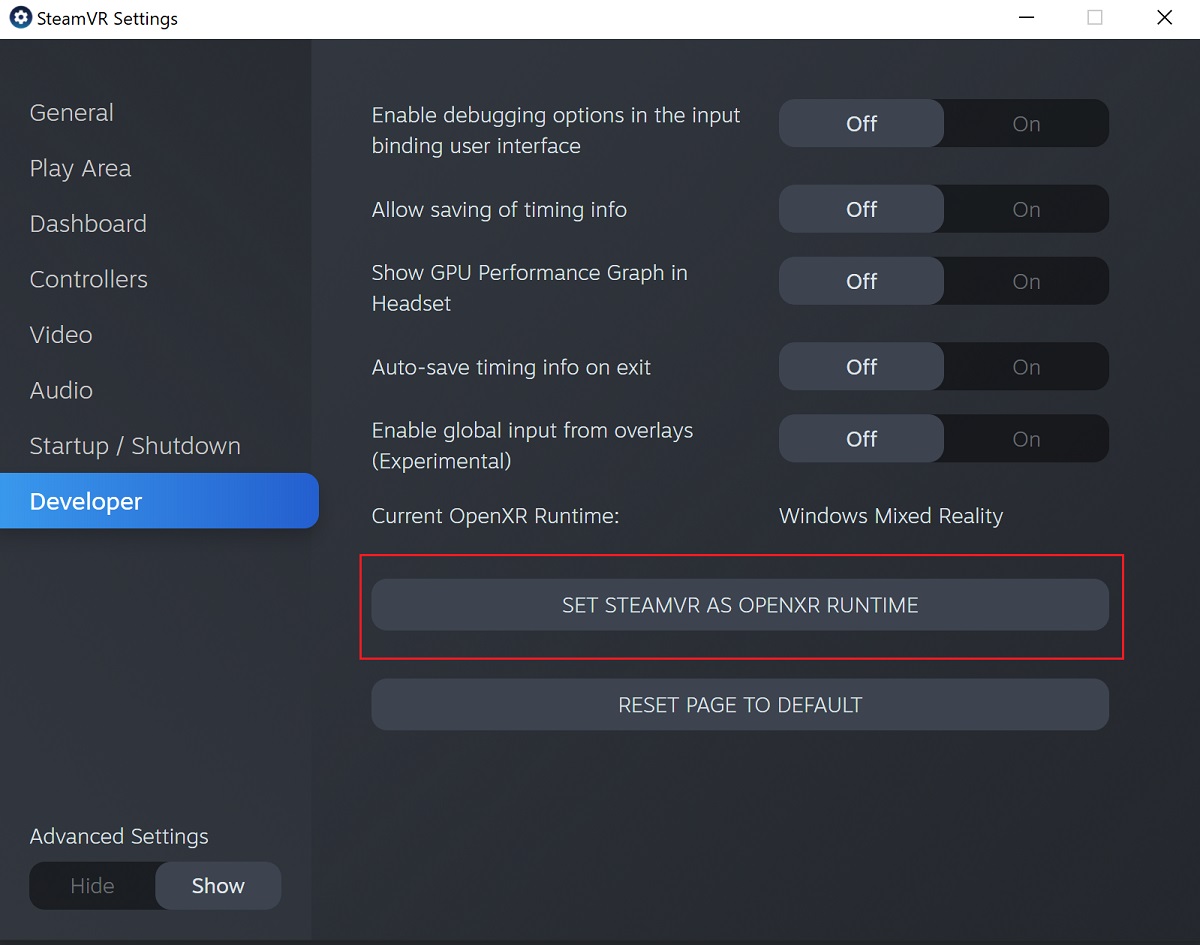
Stel SteamVR in als de actieve OpenXR-runtime via het Developer tabblad in de SteamVR-instellingen.
Enable the VR Scene Inspection add-on in Blender.
Notitie
De SteamVR-runtime kan ook worden gebruikt voor HTC Vive Cosmos, Oculus en Windows Mixed Reality HMD’s.
Varjo
Varjo includes full OpenXR support with its required Varjo Base software.
Enable the VR Scene Inspection add-on in Blender.
Windows Mixed Reality
Windows Mixed Reality biedt volledige ondersteuning voor OpenXR. Om te controleren of een pc voldoet aan de vereisten om de software uit te voeren, biedt Microsoft de applicatie Windows Mixed Reality PC Check.
Zorg ervoor dat de Windows 10 May 2019 Update (1903) is geïnstalleerd.
If the system meets all requirements, the Mixed Reality Portal should already be installed. It is also available in the Microsoft Store.
Start de Mixed Reality Portal. Klik op de menuknop
...in de linkeronderhoek. In het geopende menu, selecteer OpenXR instellen.Enable the VR Scene Inspection add-on in Blender.
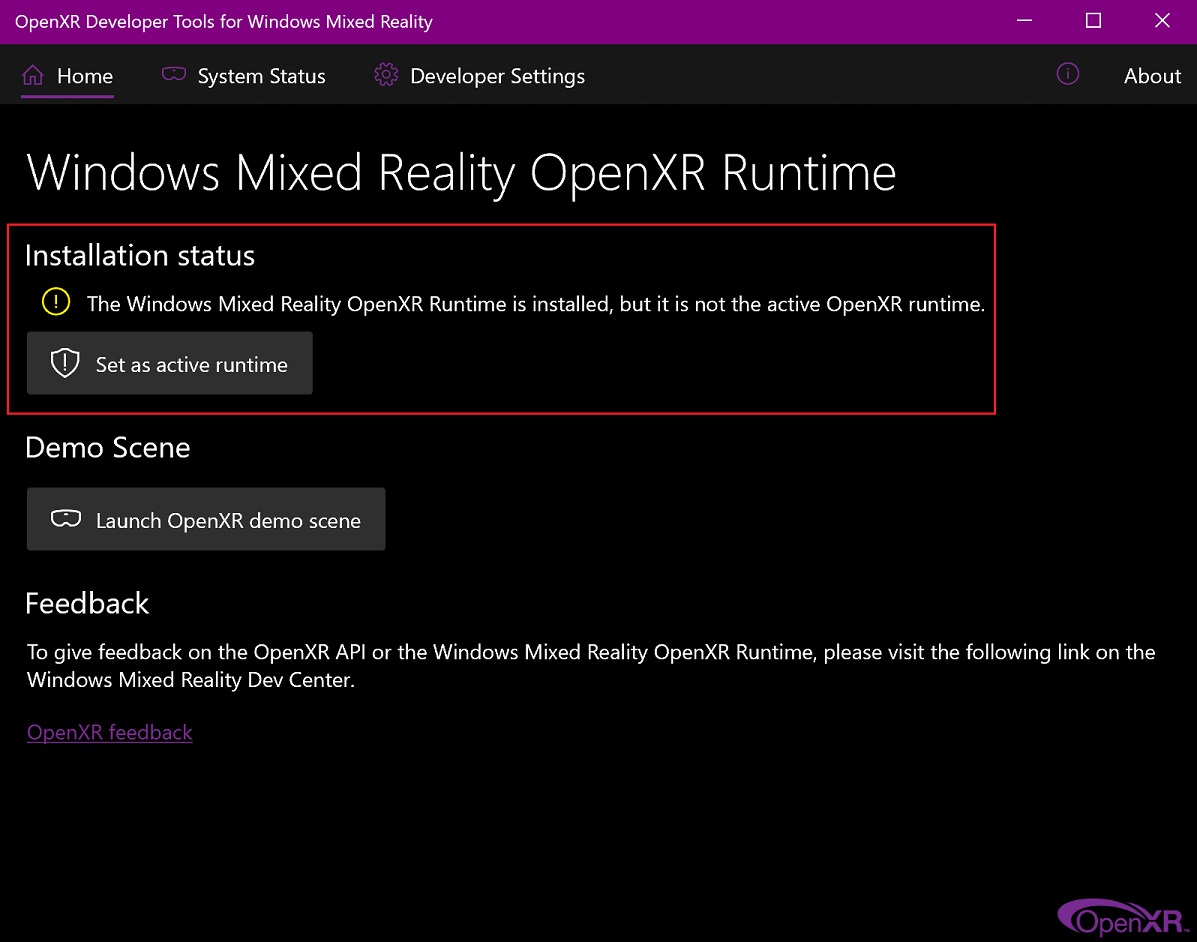
Notitie
Om over te schakelen naar Windows Mixed Reality vanuit een andere OpenXR-runtime (bijv. SteamVR), download de OpenXR Developer Tools van de Microsoft Store en stel Windows Mixed Reality in als de actieve runtime.